
Sewing Simplicity Pattern 2613 (Stuffed Animals)
Posted in Crafting
Carl’s sister is expecting a new addition to the family this week, and I wanted to make something personalized for the baby that can still be used as a toy, not just some pretty thing that is never touched. The local fabric store was having a five for $5 sale on Simplicity patterns this weekend, and it was kismet: an adorable Two Pattern Piece Stuffed Animal collection. I think it was the vintage-y calico prints that sold me, but also the simplicity of a two piece pattern, as I’ve never attempted something like this.
The Pattern
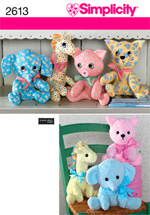
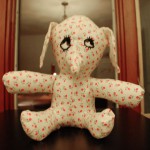
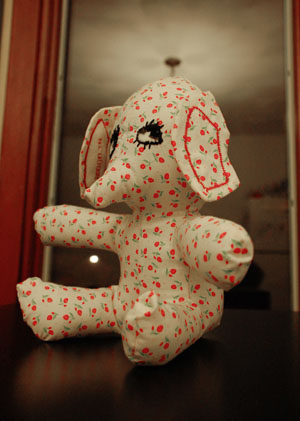
This pattern set comes with pieces and instructions to make four animals: elephant, cat, giraffe and piglet. I thought the elephant was especially cute with its little trunk, so that was my decision for this project. I have plans to make at least two more in the near future, including grandiose thoughts of modifying the pattern to make a bunny or dog.
Ease of creation
This was an extremely simple pattern to construct. The directions were very clear, and it’s all pretty simple construction. They even do a pretty good approximation of where curves need to be clipped on the diagrams. The biggest issue beginners might have would be sewing the curves (just go very slowly). If worse comes to worst, someone who is having issues with the curves around the corners of the limbs could just make sharper 90° corners.
Total project time: 3.5hrs.
It took about 45 min to cut out the pattern and pin up the seams. The sewing part was actually very quick, and was done within about 15 min (with the exception of the back stuffing hole). The rest of the time was experimenting with/completing the personalization, stuffing, doing the eyes, and sewing up the back by hand.
One thing I don’t understand
The pattern calls for substitution of “safety eyes” instead of the felt ones if the animal will be used as a toy. I don’t understand why hard little plastic pieces would be preferable to soft, well-attached felt ones. The closest explanation I could come up with is that the felt could easily be ripped off and swallowed, but somehow the hard plastic pieces can’t be (really?).
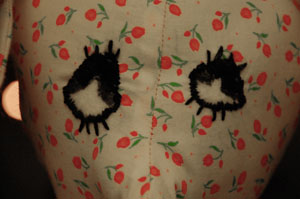
I decided to make the felt ones, but with a modification for safety: rather than making the eyes out of two contrasting pieces of felt that are glued or hand stitched on as called for in the pattern, I used one white circle of felt and created the pupil with hand-sewn black embroidery satin-stitching straight through the felt into the body of the animal. This change ensures that the felt eyes are very securely attached—the baby would have to somehow remove all of the embroidery to get those pieces off. If the parents choose to keep the toy away from the infant in light of this “lack of safety,” my feelings won’t be hurt, however I don’t see how it’d be an issue.
My modifications
Maybe I’m projecting here—I still have the very first stuffed animal given to me tucked away in a box somewhere. It is a little pink bear that rattles, which my uncle bought in the hospital gift shop. Its name is “Jiggles,” and it wears a t-shirt that says “baby’s first bear.” But regardless of my reasoning, I thought personalizing it would make it a great keepsake. My decision: embroidering her name and birth date on the ears with the simple embroidery functions on my machine. I could do it by hand, but it’s been many years since I tried to do any lettering, so the machine sounded like a good choice. Since they’d already decided 100% on the name, and the baby is scheduled for surgical birth, I can do this and have it ready for the big day.
Personalization
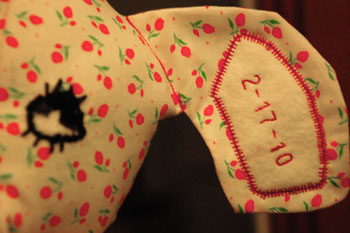
In testing (always test these things), I found that the background print on the fabric I chose was a little too busy to allow lettering to show up well, even with a contrasting color. I had some white 100% wool felt remnants leftover from a previous project, and decided to make an insert for the ears with the personalization. This sets off the lettering (the best use I’ve found of it on this machine function so far), and gave a little more interest to the solid patterned toy.
Even though the ears aren’t stuffed according to the design, I choose to leave all stuffing out until after I’d sewn on the ear patches just for sake of easy maneuverability with the machine. The body being stuffed would make it a little more difficult and I had no desire to do it by hand. If you are doing this and don’t have the convenience of knowing the name and date before birth, it is still possible to get everything ready and add the patches afterward, but will likely need to do it by hand. Or, it might make a great meet-the-baby party gift after you know all the details.
Making it More Fun (for the baby)
The second modification I made was adding a rattle. Annoying to the parents? Perhaps, although I’m sure no where near as annoying as the newer electronic toys are. Endless hours of entertainment for a developing infant? Definitely.
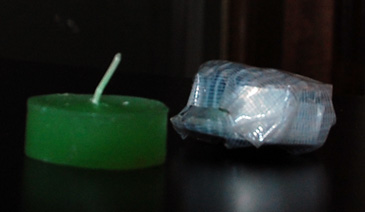
Getting creative here, I used the empty shells of two tea lights with a little rice inside. Completely encasing it with clear duct tape provided a great seal that should stay water-tight if the animal is washed. I added the rattler it to the middle of the body wrapped in a little bit of spare batting I had, and put in the rest of the stuffing around it. It can barely be felt through the stuffing. It’s not loud, but does provide some audible interest.
The Finished Product
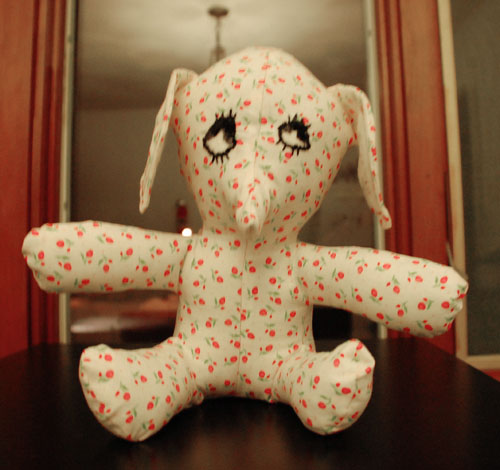
Now, I just need more baby nieces and nephews to sew cute things for! This wasn’t the only adorable pattern I bought.
One Response to “Sewing Simplicity Pattern 2613 (Stuffed Animals)”
Jordan White
8:32 am | 10/03/11
Realllllly well written!! I checked out this site because I saw the pattern & thought the animals would make adorable toys for my daughter, as well as props for the product photos of baby quilts that I make and sell online. Wish I’d written this!