
The Couch Project
Posted in Crafting
The ultimate impetus for purchasing my new machine was the disastrous crumbling of a gear in my old one midway through the first seam of the new upholstery on our couch. That was six months ago. Somehow, with all of life and my lack of interest in working on the cushions, it’s still not complete. However, I made a promise that I wouldn’t work on any stitchery projects until the couch is done, thus my lack of projects in this section. So, “How’s the couch coming,” you say? Slowly, but surely.
The background. When a dear friend was cleaning out her basement very soon after we’d moved into our new apartment, she offered an aged couch she had down there. Carl had quite the history with this couch, having moved it first into the house when she moved in, and then into the basement when she replaced it with a new living room set. All I knew was that it was far, far comfier than the cheap “click-clak” couch I had from college. So somehow (and I’m really not sure how, given its size) Carl and another friend managed to maneuver all 8’+ of it into our living room.
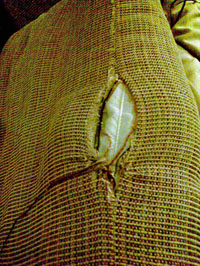
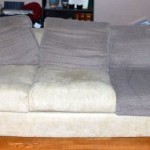
After a year of living with it, some of the small wear spots began to rip, creating sizable holes in some of the cushions. After one of the top cushions tore about halfway across, we decided to just reupholster it. And, rather than make a simple slipcover, we decided to go all the way and almost completely redo it.
Working on the Project
Our decision was admittedly impulsive. The night we decided it’d be nice to do, we headed over to our local JoAnns (the only fabric store around) to see what the possibilities were. Luckily, when it comes to decor, Carl and I are generally on the same page and easily agreed to go with something in the tan/brown/sandy-green color range. While we went to the store with plans to just review the possibilities and make a choice later, we came across a great bargain: 16 yds of tan microsuede upholstery fabric for $6/yd (originally $24)! We decided to make the purchase then and there, especially when a helpful free guide in the store said that it was about the perfect amount for our ~8.5′ long overstuffed monstrosity.
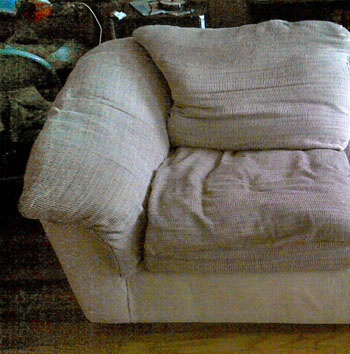
We got to work the next night. We decided against removing all of the fabric from the body of the couch, choosing to wrap the new around it to save us from some sure headaches. The biggest obstacle? Choosing how to handle the extremely overstuffed arms, which we removed in preparation for covering the body. Ultimately, we decided to just ditch them instead of trying to incorporate them under the new shell. After removing them, we decided we really liked the lines of the couch without them. There were four pieces:
- The back was stapled to the bottom, wrapped over the top and pulled through to the bottom again and stapled.
- The two sides were single pieces stapled to the bottom, secured under the back piece, and seamed on the front The fourth side is stuffed under the cushion base. I actually got around to sewing on of those seams by hand. The other is still undone.
- The front bottom is a strip sewn to muslin, the latter of which serves as the cushion base. This piece was stapled to the bottom front and pulled through under the back, then stapled there as well.
The staple gun really was our friend.
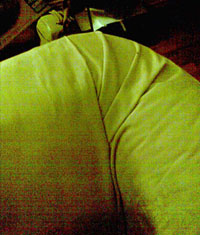
Covering the body went pretty smoothly. I did make the executive decision to cut one corner—or not, as it were: rather than shape it to the back of the couch, we did some creative tucking. It’s not as clean-lined as it could be, but it would have been a very difficult seam to create. The front of the arms, however, I chose to sew, which was where my old machine broke.
The second major change was made with the bottom cushions. Originally, they were multi-sectioned—a base latex block section was topped by a second smaller cushion in its own zippered compartment. My procrastination actually benefited us here: originally we decided to ditch the top section, partially because I had no desire to recreate the multiple compartments. However, after taking the first cushion apart and being lazy about making the new cover, we threw the latex block, loosely covered in fabric on the couch when company came over. After a few weeks, we decided that the extra padding really was more comfortable. Final decision: stack them in the same compartment creating a smoother silhouette with the same comfort.
Eventually, after more procrastination, I created a muslin of the new cushion cover, and have managed to sew up two finals so far.
What’s Left?
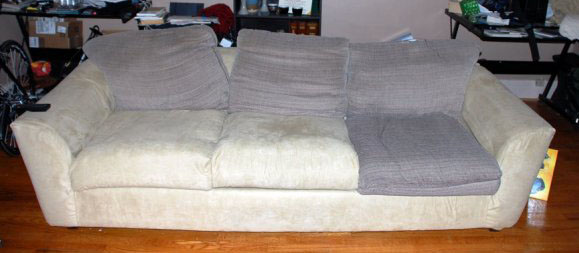
As you can see from the second photo, we’re a little over half done. There’s still a final bottom cushion to go, and all three of the back ones.
The biggest change? We’ve chosen to completely redo the top cushions with new stuffing. We still haven’t decided exactly how to shape them. Mostly likely they’ll be large squares. We definitely won’t be making them side-specific as the current ones are.
Once the cushions are complete, depending on the amount of fabric leftover, I’ll likely whip up a few extra throw pillows. The biggest downside to removing the pillows on the arms is that they’re a little uncomfortable to lean against.
And someday, in the far future, I’ll get around to sewing the back and front bottom seams on the body. Right now, they’re just craft glued, but as you can see in the second photo on the bottom left side where it is puckered, the seam has come loose and needs to be pushed back together a bit.
Comments are closed.