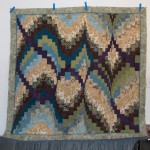
Bargello Debrief

Posted in Quilting
Here’s a quick summary of things I learned in the process.

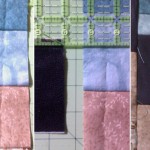
- Staggered rows means uneven rows. If your pattern calls for staggered rows, then the rows starting with full blocks will be a quarter-inch longer on the top than the ones with half blocks. Knowing this from the start can reduce bowing and shifting later on.
- ¼” wide rows are obnoxious. If you’re inexperienced or looking for hassle free, pick a pattern that doesn’t have eight ¼” rows. I.e., not this one.
- Be careful second-guessing yourself. I spent hours drawing the layout up on the computer. I calculated exactly how I should cut my mid-block insertions for purple pieces. Then, I decided to change one of them in the quilt. After doing so, I realized I should have left it as originally planned. Of course, your experience may be the opposite.
- Poly micro-suede is not nearly as easy to sew as cotton. It’s a lot tougher, so make sure you have a sharp needle. I didn’t quilt in the purple areas because it’s just that much more difficult to sew through than the cotton.
- Trim stray threads as you go. Otherwise, you’ll spend a lot of time pulling them through seams and snipping them out of hard to get areas.
- Be aware of row alignment as you work across the quilt. My top was pretty out of square at the end. I maneuvered it back into some semblance of shape by steam ironing bits to stretch them as needed. However, it could have been avoided if I had paid attention to how the rows were aligning. With a staggered pattern like this, make sure that every other row is aligning properly with each other. Meaning, row 1, 3, 5, 7… should all have seams along a straight line. Mine did not line up across the quilt, which caused some of the out-of-squareness.
Number of seams ripped because I sewed the wrong pieces together: 6
Number of rows cut twice, because I thought I lost one: 1
Number of purple pieces cut .5″ too short: 40
Leftover fabric: I haven’t totaled it up, but I have at least a ¼” yard of most of the fabrics, and more of others. Granted, I purchased extra of many because I like them so much.
About the quilting itself
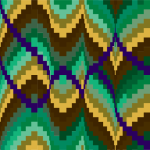
I’m kind of un-adventurous when it comes to quilting so far. I decided to stick to simple stuff: echoing the purple curve. I used invisible thread on the top, and a teal (called peacock, I believe) poly on the bottom.
My machine does not like Gütermann invisible thread. Something about the way it comes off the spool causes it to tangle around the horizontal spindle and eventually screws up tension. Halfway through, I managed to get it to work on the vertical spindle, but I didn’t want to tear out the first half, so it is less than stellar overall.
After I figured out how to get mine to work, I came across this Quilter’s Review invisible thread comparisons article and comparison table. I wish I’d seen it before. I don’t even remember why I purchased the Gütermann thread to begin with (it’s been sitting in my thread box for a while). I’m usually a fan of the brand, but I think I’ll try something different next time—especially since the author of that article claims it’s the thickest of the six (I really hate the stiff texture!).

I used a 50% Bamboo Rayon / 50% Organic Cotton blend batting, that is pretty similar in consistency to Warm and Natural cotton batting. Really, my choice of batting in this case came down to the fact that they sell a 60″ x 60″ packaged version, which was absolutely perfect for this quilt. Since I used a poly fill that I’d purchased for some previous crafting/couch reupholstering in the baby quilt, I wanted to work with something low-loft like Warm and Natural, and the bamboo/cotton blend seemed decent.
It was very easy to work with, but I suggest pulling it out of the package and laying it out flat for a couple days or ironing it or something, because it holds the packaging folds. My teacher suggested possibly throwing it in the dryer on low or air with a very slightly damp towel just to release the wrinkles, but just laying it out flat overnight had helped enough that it wasn’t too much of an issue.
As I expected, doing a 55″ square quilt on my machine was a little unweildy, but aside from the frustrations with the nylon thread and a few mistakes I made in how I’d planned to quilt it, it turned out okay, I think.
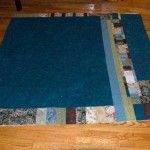
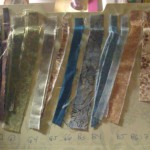
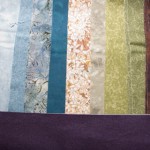
Here are some photos of the front and back.


I’m looking forward to my next class: we’re doing appliqué and free motion quilting, so expect something a little more exciting in the future!