Piecing the Backing
Now that the front of the bargello quilt is complete with borders, it is time to think about the back. Quilt backs can be simple—small ones can even be just a width of fabric—or complex. The most common form of backing is simply taking yardage and using it as-is (if wide enough) or sewing widths together until it is wide enough. I wanted to do something more exciting than that.
Who says piecing is only for the front of quilts?
Well, if someone did, I’ll have to politely disagree with them. You can do fun things with the back too, if you’re so inclined. It’s a great chance to use up extra blocks from the front, or fabric leftovers. Of course, it’s a creative process so I can’t really do a tutorial on how you should piece a back, but here’s what I did.
Color-run inspiration
After finishing the front of my quilt, I still had some of one color run left; by the time I got to the central strips, the two color runs had converged into the same exact order, so I chose to exhaust one completely by cutting the remaining strips from it, leaving a good 8″ left on the second.

I also had a whole pile of little 3.5″ wide slices that I’d removed from all the rows for purple-block insertion, and a spare 1 1/2″ strip that I cut because I thought I’d lost the first one I cut (I’d actually sewn it to another strip in the wrong section).
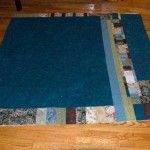
I decided to use the extra color run, strips and pieces on the back, filling in the remainder with the teal batik.
Labeling
Labeling is one of those things that is easily overlooked because it’s not vital to the quilt-making process. But, because I am giving this quilt as a late wedding gift to my cousin (the wedding quilt is in the long-term UFP pile), I thought a label recognizing their marriage is important.
The way I decided to incorporate a label actually became part of my back piecing. Deciding to stay far away from embroidery, I chose to give printable fabric a try. I picked up June Taylor Colorfast Printable Fabric from JoAnn Fabrics (with a 40% off coupon, of course). I hope to review it soon, but for now, suffice it to say that it seems to be somewhat color fast and printed just fine in my Canon PIXMA iP4300 (which is going on 4 years old now). I purchased white printable fabric, although you can also get cream. I figured white would allow a wider range of options in the future, since I’d have a lot left over. So, I printed a cream background to my label (which has faded a bit, hence the “somewhat” color fast). Having a border-less printer is really helpful here, as you either have to waste the printable fabric so that you can cut it down or have a printer that can do less than a 1/4″ margin on all sides of the label so that the white edges are hidden in seam allowances. My border-less printing settings weren’t behaving, but the print margins were < 1/4″, so all was well.
I set up a 3.5″x6″ (the width of the strip it was going into by a pretty arbitrary height) document in Illustrator and had fun designing a cool label, complete with a verse, my name, city, the date (Winter 2010/2011) and the name of the quilt. Drumroll please… “Bye-bye Blues… Welcome Verdant Spring.”

Putting it together
Once I’d created a label, I put it in a strip created from all the extra color run pieces. The strip is mostly in order of the color runs, but begins to skip when I ran out of some colors. I enclosed that strip with two strips cut from the color run leftovers (well, one was that spare one I’d cut accidentally).
I miscalculated the amount of fabric needed for the back, so I was short on the teal batik. I made up the difference using pieces of the other fabrics. Mainly G3 and B4, along with a lot of the black/brown paisley that was the original inspiration fabric and all the other little pieces left over from the front. I tried to use as little of the purple as possible on the back, because the poly is a bit harder to sew through than quilting cotton. One piece made it in as part of that stray slice I’d cut for the front.

The result is a back that is a little more tailored and interesting than a plain back (not that plain backs are boring—they can be amazing to look at the actual quilting of the quilt, but it’s really better to ignore that on one of mine as my quilting skills are very amateur).
Now it’s all sandwiched and waiting for me to quilt it!

What tips do you have for piecing backs? Is it something you do for most quilts, or do you prefer basic backs?


Comments are closed.