
Backup Drive Sleeve
Posted in Crafting
From a technologist’s standpoint, the number two tech item a college student needs is an external backup drive (number one is a computer). My oldest younger sister is finishing her first year at Missouri Science & Tech, and her birthday is coming up, so I’m giving her a backup drive. They are fragile, so I decided to whip up a quick carrying-case/shock absorber to go with it.

Caveat lector: I’m not claiming that batting can actually, truly help if the drive gets dropped/knocked around/etc, but it’s surely better than nothing, and I didn’t want to search for neoprene.
These instructions should work for any of the current-generation WD My Passport Essential, regardless of the storage capacity (in fact, you’re seeing my 1TB one in the photos, not hers). The drive is 3.25″ × 4.25″ and this sleeve is very form-fitting. If your drive is different, you’ll want to adjust your measurements. When I don’t have three projects with looming deadlines, I plan on whipping up one of my own.
Materials
- Fabric
-
Ultimately you need:
- Four (4) pieces 4.5″ × 5.5″—two exterior, two lining.
- Two (2) pieces 2″ × 3″—button strap.
- One (1) piece 2″ × 12″—binding (a little long, I like to make sure I won’t be short).
- One (1) piece 1.5″ × 4″—you could also use ¼–½”-wide ribbon for this piece (button strap loop).
So, some charm squares, an eighth of a yard, a fat eighth or just a bunch or scraps from the scrap bin. I made it from stash fabric that I had in a half-yard cut (hedgehogs) and a FQ (the lining/ties). You can piece the large cuts together, or just use solid pieces.
- Batting
-
Four (4) 4.5″×5″ pieces of low-loft batting.
This is a great project to use up extra pieces cut off the edges of quilt projects. I used some spare Warm & Natural. If you use something with a higher loft, you’ll need to adjust your measurements, as the higher loft means less space inside the sleeve. For lower loft, you can decrease the measurements or just have a slightly less snug sleeve.
- Button
- One (1) button. Mine was 5⁄8″, if yours is larger, you may need a longer ribbon/fabric piece (the 1″×4″ piece).
- Thread
- I didn’t really do much quilting or embellishing, but the sky’s the limit. Of course, you need something to sew it all together with.
Creation
Use ¼” seams unless otherwise stated.
- Cut out everything. You need four (4) pieces of fabric 4.5″ × 5.5″—two for the exterior and two for the lining. You also need four 4.5″ × 5″ pieces of batting. Why four? I doubled them up on each side for extra padding. You don’t have to, but if you don’t, the bag will be less snug unless you adjust the fabric measurements.
- Quilt the exterior pieces to the doubled-up batting, if desired. I used 505 spray to hold the batting and outer fabric together while I stitched the sleeve together, but it’s small enough to not need quilting when using W&N. Note that there should be an extra ½” of fabric at the top without batting—this is to reduce bulk when binding the top.
- Place exterior fabric right-sides together, with batting on outside and sew three sides to make a sleeve. Clip bottom corners. Turn right-side out.

- Place lining fabric right-sides together and sew three sides together. Clip bottom corners, but don’t turn.

- Put lining into the sleeve. I found it easiest if I put the drive in the lining, and used it to push the lining into the sleeve, but you can finagle it in there somehow if you don’t have the drive handy. Trim lining down to the height of the sleeve.
- If using fabric for the button strap loop, fold the 1.5″ × 4″ in half lengthwise and press, then press each raw edge into the fold. Topstitch down the edge opposite the middle fold to create a strap. Set aside momentarily.
- Since you’re at your iron, do the same pressing procedure to the 2″ × 12″ piece, but don’t sew it together. This will be binding for the top of the sleeve.

- Take your short strap (or piece of ribbon) and loop it in half like one of those cause ribbons. Pin onto the right side of one of the 2″ × 3″ pieces so that the raw edges are aligned with the fabric edge in the middle of one short side. Place the other 2″ × 3″ piece on top, right sides together and seam on three sides (2 long, the short one with the strap). Make the corners slightly curved, if desired. Clip corners and turn right-side out.


- Pin the button strap to the center of one inside edge of the sleeve, raw edges at top with the raw edges of the sleeve. Pin the binding (the pressed 2″ × 12″ piece) around the entire top edge, over the raw edges of the sleeve pieces and the button strap, cut off any excess, leaving enough to fold under for a finished edge. Sew down. It gets a bit unwieldy on the machine, so be patient.

- Pull button strap out and mark where to attach the button. Sew button on.


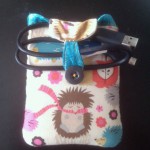
Voilá! A sleeve for the external hard drive. You can slide the cable under the button strap for transportation. I may have forgotten to consider that part when designing the sleeve.
If you make one, share photos!
Comments are closed.