
The Baby Quilt from a 1930s–Inspired Wall Hanging
Posted in Quilting
The project that started this new quilting hobby of mine was the idea to make a quilt for my oldest friend’s baby-on-the-way. Because she reads this blog occasionally, I couldn’t talk much about it while I was working on it, but now that it’s done, I get to share!

I started the fabric shopping plan with a certain quilt plan in mind—a simple sashed nine-patch layout—but then came across a bit of fabric that I fell in love with. The design didn’t suit the small squares of the nine-patch, though. So, I decided to use the basic pattern of the 1930s–Inspired Wall Hanging featured on allpeoplequilt.com. I went through a lot of their baby quilt designs and liked many, but when I saw this design, I not only liked it a lot, but realized it is about the same size as a crib quilt. I thought I could use my inspiration fabric as the outer border, and maybe as a square instead of the rail fence blocks. So, the choice was made. While I dig the ’30s reproduction fabrics, I wanted to go a little more modern with the quilt. The end result looks quite a bit different, don’t you think?


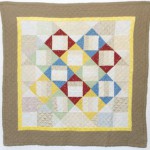
The front and back of the quilt. The photos aren’t the greatest—daylight is slim these days, so I had to use flash.
Although I can’t claim that my edges are totally square, they’re not nearly as off as they appear in the photos. The way I had to hang it to get photos ended up pulling it even more out of square temporarily.
The fabrics

The entire quilt was based off the fabric that I used as a medallion on the back. (I intended to use it for the outer border, but couldn’t fussy cut it in a way that I liked without cutting off too many animal heads). I took my color cues from it, resulting in a palette of creams, red, blue, green and yellow. Ultimately, I decided to stick to four patterns for the offset square blocks mostly for simplicity’s sake. I picked up a fat quarter for each, which was more than sufficient.
One part of the original design that I really liked is the way the center blocks are highlighted by the surrounding white prints and the center rail fence blocks. I wanted to keep that contrast. Then, I realized that the fat quarters that I chose are basic cotton prints, while the border fabric is a quilter’s flannel. That gave me the idea to play around with texture in the quilt, since babies and toddlers are very in to tactile sensation.

The result of that decision means that the white and off-white fabrics I chose were not just patterned, but different textures. Two are basic fat-quarter white-on-white/white-on-beige prints. Another is a 100% cotton linen-like weave. There are a few silk blocks. A cotton embroidered eyelet fabric was used as well, ultimately layered over the color fabrics so that there was something between the holes and the batting (which also gave a tint to those blocks, since the color bleeds through a bit). I grabbed each of these (except the fat quarters) from the remnant bin. To continue the texture bit, I also decided to use a different green fabric, swapping out the fat quarter I bought for a green/white stripped cotton seersucker.
The inner border is a very fuzzy yellow furry-type fabric that seemed fun. The outer border is a plain brown quilter’s flannel. The back has a medallion of the inspiration fabric, with the same outer border as the front of the quilt, and an applique of the elephant shape from the inspiration fabric cut out of the yellow furry fabric. I hope the baby has fun exploring all the different textures.
The construction
The project construction details that are provided by allpeoplequilt.com made cutting and piecing pretty simple. For the rail fence blocks, I tried to make sure the blocks were never made using the same sequence of the white fabrics. I then laid out all the pieces and did a lot of moving around of the pieces for the hourglass blocks and solid white squares so that the textures and patterns were distributed in a way that I liked. The instructions gave a very clear description of the steps needed to construct the four different hourglass blocks needed in the quilt.
I sewed the pieced part one row at a time, then put the rows together. Adding the borders as described in the instructions was simple as well. I did modify the outer border plans so that it has a log cabin motif instead of two longer pieces and two shorter, because my fabric wasn’t wide enough for the two long pieces.
I did a bit of piecing for the back, rather than making it plain. I had a yard of the inspiration fabric, which worked out perfectly for a square to mirror the 34″×34″ pieced square/inner border of the front. I added an outer border of the brown quilter’s flannel, again with a log cabin motif. This border is a couple inches wider than the front’s—to be trimmed after quilting. I machine appliqued an elephant to the bottom right corner of the medallion for a little more interest. In hindsight, adding a little batting so that the applique was raised a bit would have been good, but didn’t think of that until after the fact.
The quilting
Well, I managed to quilt it. I used a ~1″ diamond pattern all over. I’m somewhat unhappy with how it came out, and yet happy at the same time. From a distance, it looks fine. Up close, you can see how uneven the grid is. I tried marking with chalk, but ultimately I need some sort of guide that attaches to my machine, because the chalk plan didn’t work. Also, about half the quilt shows the darker bobbin thread (I used dark brown on the back, ivory on the front), because my machine decided it wanted to mess with the tension and nothing I did changed it. Then, at the end, it decided to work correctly again. What can I say, it was a labor of love, and its imperfections show that?
The binding
I had about 3″ of extra fabric on all sides of the backing, so I just folded it over and hand stitched it down, rather than cutting it off and using a separate binding. I think bias-tape bound quilts are more common, but I like the look of self-bound quilts, especially since my binding was going to be the same material as the edging on both sides anyhow.
So that’s that. My first finished quilt. I learned a lot. I have a lot of improvements to make, mostly dealing with impatience making seams not line up properly. Now it’s time to go back to the wedding quilt and hope I can finish it before my cousin and his wife’s fifth anniversary. Judging by the time it took me to quilt this small crib quilt, their queen one seems very daunting. They’ve been married for two months so far… my goal is actually Christmas, but I’m already doubting myself there.
Comments are closed.