
FWQAL Week 1—Blocks #2, 4, 92
Posted in Quilting
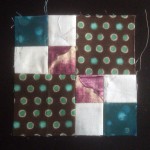
I’m already four weeks behind the group, and wasn’t planning on starting for another couple yet, but I needed a change from another project that is making me tear my hair out. Here is my week one. For these three blocks, I didn’t use templates. They were easy enough to figure out the size of the squares and rectangles. Plus, they can easily be simplified so that you aren’t working with as many small pieces (and are potentially able to sew them faster). I’ve added my notes about simplifying the cutting and piecing, including some of the measurements, but you’ll have to get the book for clarification on anything I left out.
#2 — Autumn Tints

Simplify the block
Instead of cutting out the 8 smaller square templates, cut:
Light: two 2″ × 4″ strips,
Med: one 2″ × 4″ strip, and
Dark: one 2″ × 4″ strip.

Sew each of the two darker strips to a light one, and then cut in half to create a 1 × 2 unit. Sew one of each color together giving you the full 2 × 2 unit (which measures 3.5″ × 3.5″). Sew these units and the larger solid squares together to complete the block.
#4 — Basket Weave

Simplify the block
Instead of cutting out four rectangles of each color, cut a 1.5″ × 14″ strip of each of the three colors.

Sew all three strips together, then cut into four 3.5″ × 3.5″ squares. Sew the four squares together for the complete block.
#92 — Streak of Lightning

Simplify the block
This one isn’t quite as straight forward. Consider the block to have three types of rows—A,B,C.
The A block has the short pieces on the ends. For those rows, cut:
Dark: one strip 1.5″ × 4.5″ and one strip 2.5″ × 4.5″,
Light: one strip 1.5″ × 4.5″ and one strip 2.5″ × 4.5″.

Sew the four strips together, then cut into three rows.
The B/C rows have the three wide pieces. B has light in the middle, C has light on the two ends. Cut:
Dark: one strip 2.5″ × 4.5″ and two 1.5″ × 2.5″ rectangles,
Light: one strip 2.5″ × 4.5″ and one 1.5″ × 2.5″ rectangle.

Sew the two strips together, then cut into three 1 × 2 units. Sew the remaining rectangles to the proper end of each unit to have a complete row. Sew your rows together for the block.
What order is that?
At first I thought I’d do them in order (of letters or piecing diagram, I don’t know), but then I decided I’d rather pick and choose depending on how I feel that week. So, that’s the plan going forward. I have a feeling that I’ll be tackling the ones with only squares and rectangles first, and then move on to ones with triangles I can do the math for… templates will be a new adventure for me.
Why am I doing this?
I love traditional blocks. There, I said it. I am one of the first few members of the Utica Modern Quilt Guild and I am in love with traditional quilt blocks. I even like 1800s reproduction fabrics (although I’m not using them for this, at least not the first go-around).
But honestly, it’s a great learning opportunity. Piecing a sampler quilt of 111 traditional blocks provides a great way to get familiar with piecing many different types of blocks, using a few different techniques. It’s a lot of practice with small-scale piecing, since these blocks finish at 6″ square. And I’ve thought about working on the quilt since I first saw the book a year ago (right as I was starting to quilt), but knew I’d never finish on my own. I love the motivation the group will give me.
So, I hope you stay tuned to my progress!
What is this all about?
A group of quilters are working their way through The Farmer’s Wife Sampler Quilt by Laurie Aaron Hird, trying to complete two blocks a week and posting them all to the group Flickr pool.
Check out our progress:
You can see all of my progress on the Farmer’s Wife Quilt tag page.
Comments are closed.