
Modifying Layouts for Maximum Yardage Savings

Posted in Learning
 For the novice sewer, the cutting layouts supplied by most pattern manufacturers are a boon. Not only do they help approximate the most economical way to cut pieces out, they ensure that your pieces are being cut in the right direction—either on the grain or properly on the bias, on the right or wrong side of the fabric—to ensure correct draping and fit. But there are trade-offs involved: those layouts generally take into account the different gradings of the multi-sized patterns, so smaller sizes will have many more scraps of odd sizes than will the larger. As you gain experience, it might be time to start developing your own cutting layouts.
When to modify the cutting layout?
The smart aleck in me wants to say “always,” (because I have yet to see a layout that can’t be tweaked a little) but that would be doing you a disservice. If you’re not comfortable with understanding why a piece needs to follow the grain or be cut on the bias, you’re best off following the given guides. But eventually, you’ll find that you understand everything well enough to mix things up a bit.
I really can’t reiterate enough. Don’t rotate pieces or alter their placement away from the grain or bias lines until you understand how that affects how the piece gives and lays.
When I talk about modifying the layout, I generally mean moving the different pieces around to other spots, but in the same orientation as originally noted. Pieces are cut on the bias or grain line for reasons dealing with fit, as well as strength and wear. A piece that should be cut on the grain but is cut on the bias will end up stretching in strange ways that it isn’t meant to. Likewise, a piece that should be cut on the bias will not fall correctly or stretch when needed if it is cut on the grain. Even lengthwise-grain (down the yardage) vs cross-grain (selvage-to-selvage) are important: many fabrics stretch in different ways across the two weaving directions, which will also cause issues (and mess up patterns and such).
That said, I live by the idea that once you know the rules, sometimes you can bend or even break them, so if you’re willing to possibly screw up (and need more fabric), the sky’s the limit.
When you can modify the layout for size
When it comes to multi-size patterns, it’s generally in the printer’s best interest to have all sizes graded to a single piece, rather than having to print four different versions of a pattern piece—one in each size (taking up more space on paper). Likewise, when it comes time to plan a cutting layout, it’s most economical for the drafter to create a layout that will accommodate all sizes provided in the pattern. If you need a smaller size, try adjusting the layout by moving the cutting lines as close to each other as possible. You may find that you can rearrange the pattern pieces to be more economical when you’re not having to worry about the extra inches for larger sizes.
When you can use folds to make less work
Most pattern cutting layouts try to keep the layout as simple as possible; in other words, they will usually only require a single fold, maybe two. But if you play around with the layout, you may find that you’re able to use more folds to save yourself cutting work, and fabric. Make sure to pay special attention to resulting pieces being on the correct side of the fabric, especially if they are asymmetrical.
When you are using stripes, plaids, or obvious patterns
When working with stripes, plaids and obvious patterns, you generally need to match up the patterns along seam lines or risk looking totally amateur. In fact, most patterns will advise you that you’ll need more fabric to match stripes, plaids, etc. This is almost always true. My general rule of thumb is to either purchase the 54″/60″ yardage amount if I’m using 45″ fabric, or add 20% to the yardage amount.
But a caveat, of course: it’s really a pretty loose rule. I almost always study the given pattern and cutting layout before buying my material. If we’re talking expensive patterned (striped/plaid/etc) fabric, I’ll find out the pattern repeat (where the pattern repeats itself on both the horizontal and vertical axes), measure the pattern pieces, and play around in a graphics program (and do more math than I would like) to really get a good idea of an alternative layout, and then make my purchase. You could do the same with graph paper and a pencil and ruler as well.
Another reason to alter the cutting layout is to capture a particular motif in a section of a pattern piece. For instance, you may want to cut your back pieces so that a particularly interesting part of the fabric design is centered on the back. This is sometimes called fussy-cutting in the quilting world.
When you’ve extensively modified an existing pattern or draped your own
When you’ve made many changes to a pattern, the recommended cutting pattern probably needs to go right out the window. You may be able to base a new layout off of the original, but sometimes you might need to start from scratch. The latter is also true, of course, when you drape your own pattern. I usually spend a lot of time moving all of my muslin/draping pieces around on the empty floor before I even consider pulling out the fashion fabric.
When you’re planning multiple projects from the same fabric
If you can plan in advance and cut out multiple projects at the same time, you may find that you can squeeze pieces into the excess of the first layout, or even completely rearrange everything and end up needing less fabric than you would have used when cutting the patterns separately.
A case study: two Elizabethan shirts, or cutting multiple projects at once
When working on the smock and shirt for Faire-going this summer, I had the goal of being as economical as possible with my material to better emulate what an Elizabethan seamstress would have done. I may have taken it to the extreme, spending far too much time in my graphics program playing around with potential layouts. The result, however, was an extremely economical layout that used less yardage together than they would have separately.
The rule: when planning multiple projects from the same material, rearrange the curring layout so that you cut all projects at the same time. You will likely find that you can use less yardage by creating a more compact cutting layout.
My cutting layouts went from this:

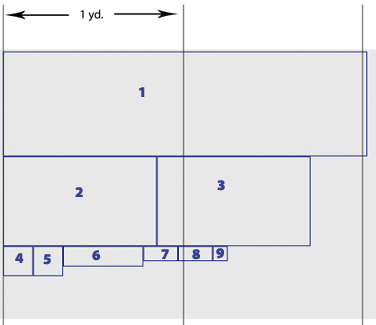
To this:

I was able to save over a half yard of fabric by cutting at once, leaving very few—but very useful for straps and ruffles—scraps.
Do you have any fabric-saving tips to share? Do these methods help you in your projects?
One Response to “Modifying Layouts for Maximum Yardage Savings”
Erika
7:16 am | 09/09/11
Thanks for this info. I am trying to maximize fabric for a simple pattern to get the most use out of the fabric and I just keep getting the numbers mixed up in my head. The fabric I am using (and will use in the future to make more) typically comes in 52in width, which is short of the perfect layout by 2 inches- UGH! So, I’m trying to figure out how much more yardage I can add to the length to still minimize the waste. It’s daunting sometimes, but your tips helped.
Thanks!