This is a static export of a blog I put on ice many years ago, that still has personally relevant content. No promises can be made around linkrot, styles, or working functionality.
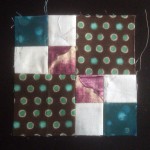
Looking back, I should have waited on making either Wrench or Churn Dash and used a different color scheme for one, since they’re essentially the same block. But, they’re done. And a third—Practical Orchard—for good measure.
“In for a penny, in for a pound” seems apt for my current participation. I wasn’t going to start for a while, but then I needed a break last week, and found myself doing another set of three last night. These were all simple enough to finish without diving into the templates, so I have some notes to share on measurements.
I’m already four weeks behind the group, and wasn’t planning on starting for another couple yet, but I needed a change from another project that is making me tear my hair out. Here is my week one. For these three blocks, I didn’t use templates. They were easy enough to figure out the size of the squares and rectangles. Plus, they can easily be simplified so that you aren’t working with as many small pieces (and are potentially able to sew them faster). I’ve added my notes about simplifying the cutting and piecing, including some of the measurements, but you’ll have to get the book for clarification on anything I left out.
Math’s no fun, at least in my opinion. So, as I get into this whole quilting thing, I’ve been doing more math than I like, and doing it poorly. I have found that Adobe Illustrator is great to play around and piece my quilt blocks together in a digital sense, but unlike quilt-specific software (like Electric Quilt), it doesn’t magically add my seam allowances for cutting out the bits and pieces. My most annoying mistake: sizing half-square triangles.
First, in case you’re asking: a half-square triangle is the triangle created by cutting a square in half diagonally (usually used to create another square of two triangles), like in the image above.
The wrong way
When I went to add seam allowances and cut out my triangles, I made a totally rookie mistake (hey, I am one!): I forgot about the seam allowances needed for the hypotenuse of the triangle. I simply added a half inch to the width and height of my square (a ¼” allowance on each side), and cut down the middle.
In a graphic sense, I did it like this:
Final width/height + ½” does not the proper-sized triangle make.
But as you can see, that doesn’t give me the right size.
The right way
To get the proper size, you need to consider the hypotenuse seam allowance as well, but as is the nature of triangles, simply adding another half inch doesn’t quite work how you want it to.
For perfect half-square triangle measurements cut from squares, cut out a square that is 7⁄8″ larger than your intended finished size, then cut that in half diagonally.
Graphically:
Final width/height + 7⁄8″ does the proper-sized triangle make, regardless of the measurements for final width/height.
Some people will add a full inch to the final size (¼” on the outside edges and they think two ¼” allowances in the center), cut that and then sew the center seam and trim off the small excess when they realize it’s not quite the right size, but why put yourself through that much extra work? Start with the right size and end with the right size, no extra cutting involved. Just make sure to sew that perfect ¼” seam.
But, what if I’m not doing a 2.5″ square?
The 7⁄8″ measurement doesn’t change. It is based on the ¼” seam allowances, not the size of the square/triangles. My choice to use 2.5″ in the example was mostly arbitrary.
Does this technique work for you? Do you have another way of cutting out half-square triangles?


 Math’s no fun, at least in my opinion. So, as I get into this whole quilting thing, I’ve been doing more math than I like, and doing it poorly. I have found that Adobe Illustrator is great to play around and piece my quilt blocks together in a digital sense, but unlike quilt-specific software (like Electric Quilt), it doesn’t magically add my seam allowances for cutting out the bits and pieces. My most annoying mistake: sizing half-square triangles.
