This is a static export of a blog I put on ice many years ago, that still has personally relevant content. No promises can be made around linkrot, styles, or working functionality.
I hope you are having a wonderful holiday season, whatever you celebrate! Here in my world, we’re gearing up to celebrate our first Christmas in our new home tomorrow, and after trying to weasel out of spending most of the day at his parents’ house, ended up volunteered to host Christmas dinner (sans oven!). We’re off on our annual end-of-the-year trip to Missouri (both Kansas City and the Lake of the Ozarks) to visit my family starting Monday. Once we get to MO, I have a full five days’ worth of present reveals scheduled to show you.
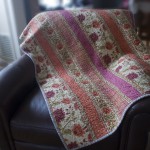
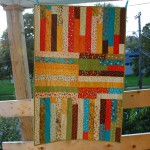
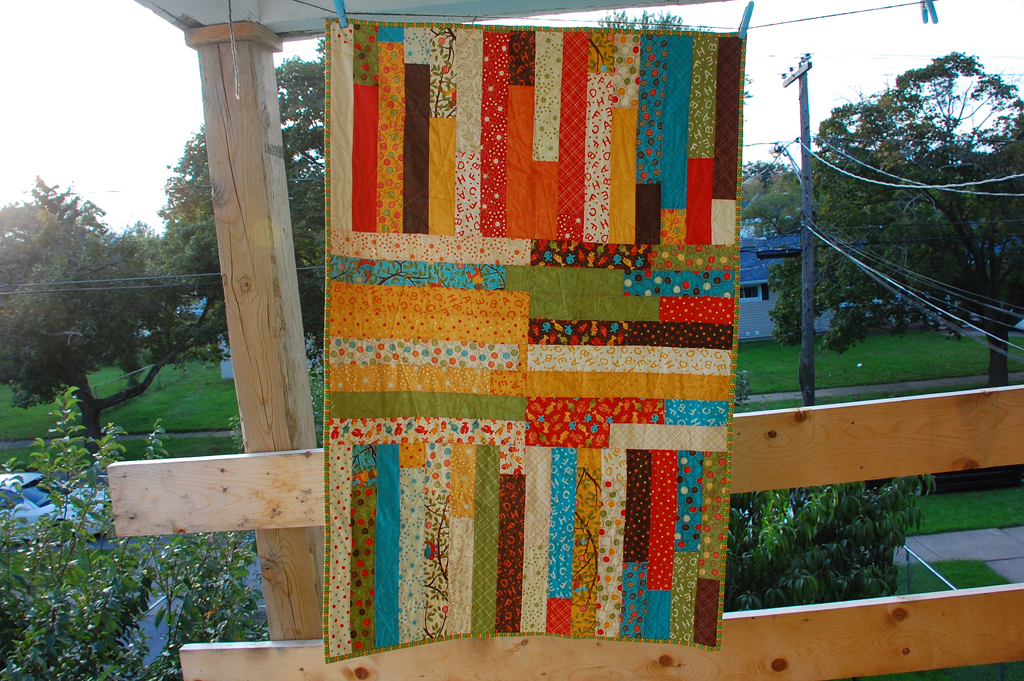
Last Sunday, Carl asked me how long it took to make a quick quilt, and I—clearly out of my mind—told him I could make his Grandma one by Christmas. So I did. She won’t receive it by Christmas, seeing as we just mailed it yesterday, but it is finished.
So, I pulled out the psudo–jelly-roll of Lollipop that I bought in March and made this:
I began with an idea based on the Jelly-roll Race 1 Choice 4 Quilting sponsored a few months ago. However, my fabric wasn’t exactly a jelly-roll. It was a roll of scraps from a LQS. The tag said it was 43 strips, 2.5″ × 22″. So, sort of like half a jelly-roll, except instead of half the number of strips, it was a full roll of half-length strips.
If you happen to be my sister, and happen to be older than me, and your name happens to start with an ‘S’, don’t read any further. You’ll see this in person soon enough.
The sun was peeking out just enough for photos this morning, so I finally shot the Synchronized Squares quilt! Above-mentioned sister is perhaps a little obsessed with frogs, so Prince Charming by Tula Pink and a selection of green prints from various lines—as well as a few solids in green and complimentary colors (including a corduroy!)—made a great choice for this.
Since I am getting the hang of applique so long as I don’t need to turn any edges under, I decided to face another fear of mine—curved piecing—in the most fearful (that is, not actually confronting the fear) way possible: using applique to give the look of curved piecing.
Okay, that’s a bit of an exaggeration, but the ladies at Viking Gallery were offering a weeknight class to make a “Rob Pete” table runner using the Quiltsmart method which uses fusible interfacing and applique to create curves instead of traditional piecing. So I signed up.
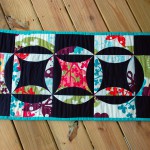
And before long, I had fabric that was originally intended to be the bag for the Spring Quilt Along and the Quiltsmart printed fusible interfacing turned into this bit of patchwork:
It’s a bit wrinkly from being stored rolled up for the past couple of days as I carted it around trying to finish the binding.
The printed fusible interfacing pieces look like this:
Since I was in a class, I don’t have any in-progress photos, but the premise is rather simple. You place your fabric and interfacing together (don’t fuse yet!), sew along the stitching lines, cut along the cutting lines and then turn right-side out. This puts the fusible side of the interfacing facing down so that you can fuse your curved piece to the background. Fuse, applique on, and then piece the blocks together and you’re done!
So, aside from a few typos about cutting requirements that were in the pre-publication page previews that Quiltsmart kindly sent (evidently the old book is out of print, but they’re releasing a new one soon), this was an extremely simple, straight-forward way to make Rob Peter to Pay Paul.
And, since I have no table on which to place a table runner (seriously… the table runner is the same dimensions as my coffee table, which is the largest table in the house aside from our desks), I decided to turn this into a very useful item: an ironing mat!
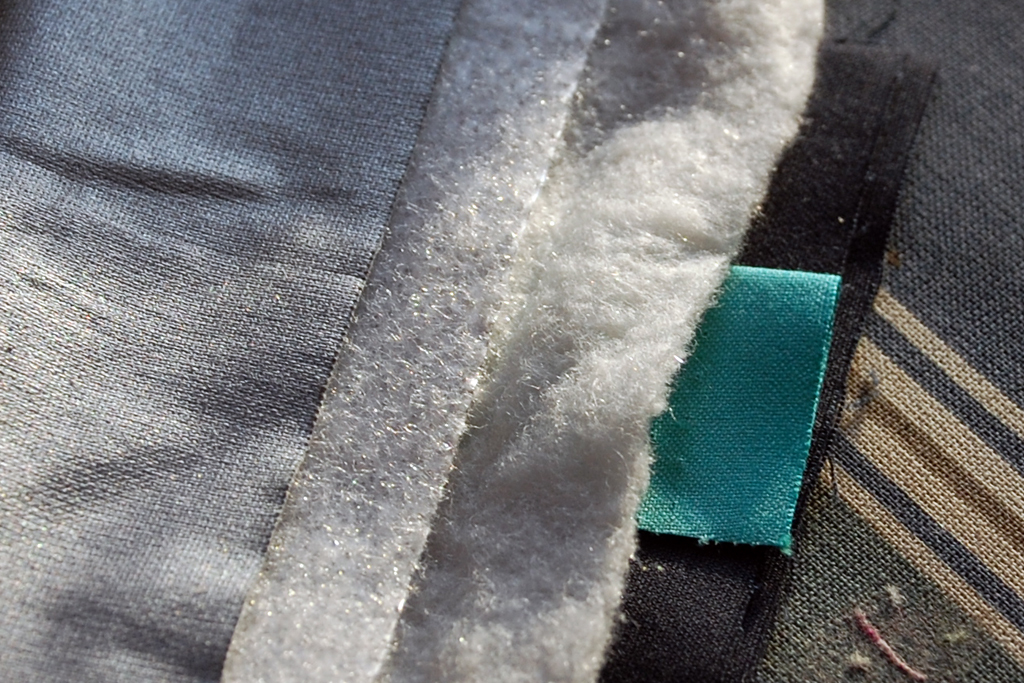
There are a few ways to make an ironing mat, but my approach required three more layers:
Ironing board fabric, which is a special aluminum-coated fabric. I bought mine from the local JoAnn, which had it in the utility fabric section. I’ve heard some people claim you shouldn’t use special fabric like this because it redirects heat back up to your fabric and promotes scorching. I’ve never had any problems. If you associate with the former camp, you can always use plain cotton instead.
Insul-Bright, a heat/cold-reflecting batting-like fabric. This is often used for things like pot-holders or lunch bags and is also available in the utility fabric aisle or in pre-cut packages in the notions aisle.
Natural fiber batting such as Warm & Natural or Bamboo/Cotton blends (I used Bamboo Fusible Batting that I had on hand. The fusible part was a bonus, but not necessary).
Then, you sandwich them all together in this order:
Ironing fabric (backing, silver-side out)
Insul-Bright with shiny-side toward the ironing fabric
Batting
Pretty pieced fabric
Simulation from scraps. Your batting, Insul-Bright, and ironing cover pieces should be approx. 2″ larger than patchwork on all sides to accommodate quilting.
Consider using spray-basting, as the ironing board fabric holds pin holes—with spray, you don’t need to pin. This was one advantage to using the fusible batting I had—I fused the patchwork to the batting and the batting to the Insul-Bright, and only had to spray baste the ironing fabric to the Insul-Bright.
Quilt as desired. For mine, I stitched in the ditch along the straight seams—which is pushing it as far as closeness for recommended quilting for the batting, but I doubt this is going to be washed very often.
Then use! You iron on the shiny side, but can flip it over to use as a table runner when it’s not needed.
Or, slip some ribbon in the binding…
That ribbon fits beautifully with the eggplant color in the Just Wing It print, but I have no idea where I purchased it. Possibly Walmart at some point or another.
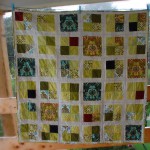
My youngest younger sister Kaite is a very talented singer/actress/theater person who landed the role of Velma in her local theater’s production of Chicago. So, we visited MO to see the show, and I decided to make her a quilt (because making one for Mom wasn’t enough during May, or something).
Note: I was a total doofus and forgot to take photos (to be fair, I finished the quilt about 2 hours before we arrived, doing the last bit of quilting at the hotel on the way, and sewing down the binding in the car). Kaite provided these photos so I can tell all you blog reader friends about it.
I lost a block for the Bird’s Nest Quilt at the beginning of May. I think maybe the dog ate it, but I didn’t want to comb the yard for evidence. It was a show-stopper; I didn’t have fabric to make a replacement. So, to console myself, I went fabric shopping at JoAnns. After all, Mother’s Day was a week away, and the missing block was for my gift to Mom. Luckily, I had the excuse of visiting this past weekend—3 weeks later—to give myself extra time to finish.
I knew of a fabric line at JoAnn’s that I really liked and thought my mom would too, and ended up with this selection:
to which I added Moda Clover (Bella Solids) from my stash and a light blue faux-batik print I have yards of in the stash to use on the back (75% off because of a streaky/splotchy print issue that went away in the washer. Yay).
Since I was down to the wire, I needed a simple quilt idea, and nothing was coming to mind, but I found this pattern on allpeoplequilt.com that has 19″ blocks—super simple and interesting to boot.
Quilting, quilting, quilting. On one hand, I like this part, because it’s really the point where you almost have a real finished project (pssh, who needs binding). On the other, my sewing machine doesn’t really like behaving when it comes to quilting—FMQ, at least. I can fiddle with my tension/needle and rethread the machine all I want sometimes and the tension just won’t be right, and then bam! it’ll magically start working again. So, walking foot it was.
Here’s a quick summary of things I learned in the process.
Staggered rows means uneven rows. If your pattern calls for staggered rows, then the rows starting with full blocks will be a quarter-inch longer on the top than the ones with half blocks. Knowing this from the start can reduce bowing and shifting later on.
¼” wide rows are obnoxious. If you’re inexperienced or looking for hassle free, pick a pattern that doesn’t have eight ¼” rows. I.e., not this one.
Be careful second-guessing yourself. I spent hours drawing the layout up on the computer. I calculated exactly how I should cut my mid-block insertions for purple pieces. Then, I decided to change one of them in the quilt. After doing so, I realized I should have left it as originally planned. Of course, your experience may be the opposite.
Poly micro-suede is not nearly as easy to sew as cotton. It’s a lot tougher, so make sure you have a sharp needle. I didn’t quilt in the purple areas because it’s just that much more difficult to sew through than the cotton.
Trim stray threads as you go. Otherwise, you’ll spend a lot of time pulling them through seams and snipping them out of hard to get areas.
Be aware of row alignment as you work across the quilt. My top was pretty out of square at the end. I maneuvered it back into some semblance of shape by steam ironing bits to stretch them as needed. However, it could have been avoided if I had paid attention to how the rows were aligning. With a staggered pattern like this, make sure that every other row is aligning properly with each other. Meaning, row 1, 3, 5, 7… should all have seams along a straight line. Mine did not line up across the quilt, which caused some of the out-of-squareness.
Number of seams ripped because I sewed the wrong pieces together: 6
Number of rows cut twice, because I thought I lost one: 1
Number of purple pieces cut .5″ too short: 40
Leftover fabric: I haven’t totaled it up, but I have at least a ¼” yard of most of the fabrics, and more of others. Granted, I purchased extra of many because I like them so much.
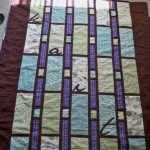
About the quilting itself
I’m kind of un-adventurous when it comes to quilting so far. I decided to stick to simple stuff: echoing the purple curve. I used invisible thread on the top, and a teal (called peacock, I believe) poly on the bottom.
My machine does not like Gütermann invisible thread. Something about the way it comes off the spool causes it to tangle around the horizontal spindle and eventually screws up tension. Halfway through, I managed to get it to work on the vertical spindle, but I didn’t want to tear out the first half, so it is less than stellar overall.
After I figured out how to get mine to work, I came across this Quilter’s Review invisible thread comparisons article and comparison table. I wish I’d seen it before. I don’t even remember why I purchased the Gütermann thread to begin with (it’s been sitting in my thread box for a while). I’m usually a fan of the brand, but I think I’ll try something different next time—especially since the author of that article claims it’s the thickest of the six (I really hate the stiff texture!).
I used a 50% Bamboo Rayon / 50% Organic Cotton blend batting, that is pretty similar in consistency to Warm and Natural cotton batting. Really, my choice of batting in this case came down to the fact that they sell a 60″ x 60″ packaged version, which was absolutely perfect for this quilt. Since I used a poly fill that I’d purchased for some previous crafting/couch reupholstering in the baby quilt, I wanted to work with something low-loft like Warm and Natural, and the bamboo/cotton blend seemed decent.
It was very easy to work with, but I suggest pulling it out of the package and laying it out flat for a couple days or ironing it or something, because it holds the packaging folds. My teacher suggested possibly throwing it in the dryer on low or air with a very slightly damp towel just to release the wrinkles, but just laying it out flat overnight had helped enough that it wasn’t too much of an issue.
As I expected, doing a 55″ square quilt on my machine was a little unweildy, but aside from the frustrations with the nylon thread and a few mistakes I made in how I’d planned to quilt it, it turned out okay, I think.
Here are some photos of the front and back.
Front details The back of the quilt. In the detail, you can see that I have some wrinkles sewn in. I didn’t baste it quite well enough.
I’m looking forward to my next class: we’re doing appliqué and free motion quilting, so expect something a little more exciting in the future!
The project that started this new quilting hobby of mine was the idea to make a quilt for my oldest friend’s baby-on-the-way. Because she reads this blog occasionally, I couldn’t talk much about it while I was working on it, but now that it’s done, I get to share!
Quilt pattern as shown on allpeoplequilt.com
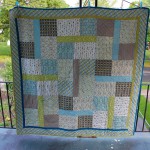
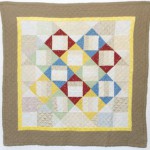
I started the fabric shopping plan with a certain quilt plan in mind—a simple sashed nine-patch layout—but then came across a bit of fabric that I fell in love with. The design didn’t suit the small squares of the nine-patch, though. So, I decided to use the basic pattern of the 1930s–Inspired Wall Hanging featured on allpeoplequilt.com. I went through a lot of their baby quilt designs and liked many, but when I saw this design, I not only liked it a lot, but realized it is about the same size as a crib quilt. I thought I could use my inspiration fabric as the outer border, and maybe as a square instead of the rail fence blocks. So, the choice was made. While I dig the ’30s reproduction fabrics, I wanted to go a little more modern with the quilt. The end result looks quite a bit different, don’t you think?
The front and back of the quilt. The photos aren’t the greatest—daylight is slim these days, so I had to use flash.
Although I can’t claim that my edges are totally square, they’re not nearly as off as they appear in the photos. The way I had to hang it to get photos ended up pulling it even more out of square temporarily.
The fabrics
The entire quilt was based off the fabric that I used as a medallion on the back. (I intended to use it for the outer border, but couldn’t fussy cut it in a way that I liked without cutting off too many animal heads). I took my color cues from it, resulting in a palette of creams, red, blue, green and yellow. Ultimately, I decided to stick to four patterns for the offset square blocks mostly for simplicity’s sake. I picked up a fat quarter for each, which was more than sufficient.
One part of the original design that I really liked is the way the center blocks are highlighted by the surrounding white prints and the center rail fence blocks. I wanted to keep that contrast. Then, I realized that the fat quarters that I chose are basic cotton prints, while the border fabric is a quilter’s flannel. That gave me the idea to play around with texture in the quilt, since babies and toddlers are very in to tactile sensation.
These are the four colored fabrics for the front. I couldn’t get good photos of the whites.
The result of that decision means that the white and off-white fabrics I chose were not just patterned, but different textures. Two are basic fat-quarter white-on-white/white-on-beige prints. Another is a 100% cotton linen-like weave. There are a few silk blocks. A cotton embroidered eyelet fabric was used as well, ultimately layered over the color fabrics so that there was something between the holes and the batting (which also gave a tint to those blocks, since the color bleeds through a bit). I grabbed each of these (except the fat quarters) from the remnant bin. To continue the texture bit, I also decided to use a different green fabric, swapping out the fat quarter I bought for a green/white stripped cotton seersucker.
The inner border is a very fuzzy yellow furry-type fabric that seemed fun. The outer border is a plain brown quilter’s flannel. The back has a medallion of the inspiration fabric, with the same outer border as the front of the quilt, and an applique of the elephant shape from the inspiration fabric cut out of the yellow furry fabric. I hope the baby has fun exploring all the different textures.
The construction
The project construction details that are provided by allpeoplequilt.com made cutting and piecing pretty simple. For the rail fence blocks, I tried to make sure the blocks were never made using the same sequence of the white fabrics. I then laid out all the pieces and did a lot of moving around of the pieces for the hourglass blocks and solid white squares so that the textures and patterns were distributed in a way that I liked. The instructions gave a very clear description of the steps needed to construct the four different hourglass blocks needed in the quilt.
I sewed the pieced part one row at a time, then put the rows together. Adding the borders as described in the instructions was simple as well. I did modify the outer border plans so that it has a log cabin motif instead of two longer pieces and two shorter, because my fabric wasn’t wide enough for the two long pieces.
I did a bit of piecing for the back, rather than making it plain. I had a yard of the inspiration fabric, which worked out perfectly for a square to mirror the 34″×34″ pieced square/inner border of the front. I added an outer border of the brown quilter’s flannel, again with a log cabin motif. This border is a couple inches wider than the front’s—to be trimmed after quilting. I machine appliqued an elephant to the bottom right corner of the medallion for a little more interest. In hindsight, adding a little batting so that the applique was raised a bit would have been good, but didn’t think of that until after the fact.
The quilting
Well, I managed to quilt it. I used a ~1″ diamond pattern all over. I’m somewhat unhappy with how it came out, and yet happy at the same time. From a distance, it looks fine. Up close, you can see how uneven the grid is. I tried marking with chalk, but ultimately I need some sort of guide that attaches to my machine, because the chalk plan didn’t work. Also, about half the quilt shows the darker bobbin thread (I used dark brown on the back, ivory on the front), because my machine decided it wanted to mess with the tension and nothing I did changed it. Then, at the end, it decided to work correctly again. What can I say, it was a labor of love, and its imperfections show that?
The binding
I had about 3″ of extra fabric on all sides of the backing, so I just folded it over and hand stitched it down, rather than cutting it off and using a separate binding. I think bias-tape bound quilts are more common, but I like the look of self-bound quilts, especially since my binding was going to be the same material as the edging on both sides anyhow.
So that’s that. My first finished quilt. I learned a lot. I have a lot of improvements to make, mostly dealing with impatience making seams not line up properly. Now it’s time to go back to the wedding quilt and hope I can finish it before my cousin and his wife’s fifth anniversary. Judging by the time it took me to quilt this small crib quilt, their queen one seems very daunting. They’ve been married for two months so far… my goal is actually Christmas, but I’m already doubting myself there.