This is a static export of a blog I put on ice many years ago, that still has personally relevant content. No promises can be made around linkrot, styles, or working functionality.
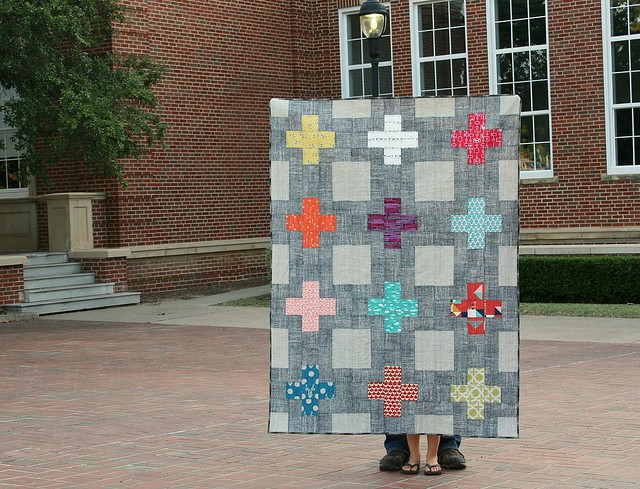
My latest project is a quilt composed of plus blocks that are a bit different from the typical standard-grid plusses. It looks tricky, but once it’s broken down into components it’s not a difficult block to make. Here are the measurements and a diagram to make one like mine, which finishes at 17.5″ (yes, a very large block!).
Cutting
Fabric 1 ( Corners)
Four 4.75″ squares
Fabric 2 (Background)
Four 4″ squares
Four 3.25″ x 4.75″ rectangles
Four 3.25″ x 7.5″ rectangles
Note: the more obviously patterned the background fabric is, the more obvious your seams will be without fussy pattern matching, so keep that in mind when selecting fabric.
Fabric 3 (Plus)
Two 4″ squares
One 4″ x 11″ rectangle
Piecing
By considering it an irregular nine-patch, you can see how the sections all fit together without requiring any Y-seams. You can easily string piece the sections, but pay attention to the mirrored placement for the corner components.
If you’re looking for a similar pattern that provides all the details for a full quilt, I recommend this Double Plus pattern. While the proportions of the block may not be exact, I drew my inspiration from it when figuring out my own design.
When I explored Burlington pre-job acceptance, I found Stitched, a fabric shop in Williston, and fell in love. They had me at Tula Pink Nightshade showcased beautifully right as I walked in (one of three of her lines they had in the store!). Each new room in the old yellow house had some new print or designer that I’d previously only seen online. Despite what some might claim, that didn’t seal the moving deal, but it was a strong mark in the ‘pro’ column!
So, of course I walked out of there with a bit of Tula: 6 FQs of Salt Water, tied with a bow.
Fast forward three months. I saw this gorgeous “Double Plus” design come up in the Modern Quilts Flickr group, and was inspired.
So, rather than go back to WIP finishing, I dove into a new project. It’s very handy being able to just meander over to the fabric store to pick up more fabric from the line rather than wait for a shipment. Or dangerous, perhaps. C’est la vie d’une quilter.
I couldn’t wait for Carl to head back to Utica for work next week, so we swung down to Utica for the day last Saturday and picked up my sewing machine.
I cut these pieces out a while back, but originally planned to finish some other projects first (before the move and sewing machine separation). Instead, I pulled them out for a quick project this week.
I wanted to thoroughly test the machine, so I modified my idea to include embroidery: appliqueing the recipient’s name using an embroidery pack from Daily Embroidery and a dog from the same.
The quilt looked different in my head; the solids have taken over the prints (a charm pack of Oink-A-Doodle-Moo) and some of the charms could have been placed more strategically. I think the recipient will like it, nonetheless. My goal is to bribe him to let me have the one I made him before he was born back temporarily so that I can fix it. According to his mother, it’s one of his favorite possessions. I hope this one is as well received.
Now, off to pick out a color of Minky for the back!
When I posted about “Disappearing Seven Wonders”, I mentioned that it had a new label and that I’d say more about them later that week. Three months later, now I am!
All quilters people who make quilts should label their quilts. When I say that, I don’t mean every quilt needs a label added to the quilt. Quilts should have the maker(s) name and date somewhere, even if it is just a signature and date in indelible ink on the fabric itself, tucked in a back corner. Many quilters say that they don’t label certain quilts, because this one is going to stay on their couch, but I think that is a cop out for when they are ready to move on to the next project. Some day, frankly, you die, and someone else will have the quilt. Why not claim your work and let them know you made it?
I like collections, meta data, and history, so labels are my way of attaching that information to my quilts in a way simply writing my name and location can’t do. For a while, I was using print-at-home fabric and making custom labels, but now I’ve had a chance to see how those hold up. The labels on the quilts I gave my mom and sister in 2011 have faded drastically. Carl’s quilt has only been washed once, yet the label looks like this:
The grey didn’t bleed onto any of the other fabrics or even the color catchers, just the label.
So, I’ve decided to start ordering labels from Spoonflower on the Linen/Cotton canvas, a few at a time—however many will fit onto their 8″ swatch. In my obsession with the color scheme from Shakespearian Bars, I also designed a new brand identity. Eventually, I’ll redo the site, too. These labels use that new logo and design scheme. Some are small, for bags and crafts:
You can see both smaller sizes on these bags.
Each larger quilt one has a unique QR code. The whole label is about the same size as a business card. I know there are a lot of jokes about their usefulness (see Pictures of People Scanning QR Codes, for example), but they are a quick way to link to more information about something.
The code points to a page on this site showing photos, details, and links to posts about the quilt. They are a little tricky to scan once washed, which I anticipated, so they also include the link in text. The one for my recent Amish Sampler points to raevenfea.com/q013ac. You’ll see that same code listed as a tag for all blog posts about a specific quilt (although sometimes they won’t be coded until the quilt is finished and I know which label it will get).
I was originally planning on ordering a full FQ batch after the initial test order (since it’s cheaper per label), but I’m glad I didn’t. This latest order required a bit of a change from the first few:
Did you spot it? Yes, big news! We’re moving to (South) Burlington, VT! I got the job offer over a month ago, but I’m still in shock. Things have been super busy trying to sell our house, find an apartment, pack, and work out employment for Carl. Sewing has been a great brain vacation (and a way to pare down my sewing room packing), thus the spate of recent posts, but things will probably be quiet around here for the next few weeks until we’re settled in.
I better get back to packing! What is your take on labels for quilts and QR codes?
My email archive tells me that the class to make this box was last September; it’s about time I finished it up! It was a free class at the Viking Sewing Gallery, and the project was meant to demo the decorative stitches and a new foot. I didn’t use the fancy foot, but my box turned out well enough.
It’s basically just a 8.5″ cube with no top. The sides are quilted to the batting, with a floating lining. The project was on the Husqvarna Viking site at one point, but since they redid everything, I can’t find it.
When I started it, it was a great stash buster that allowed me to use up the ends of various thread spools for the fancy stitched parts. I pulled the other fabrics out of my stash as well, thinking it would be a great accessory to a future quilt. I still think it will be, but no quilt is in the works yet. I did find the stack of fabrics, though—it was my collection of Savannah Bop that had gone missing in my sewing room a few weeks back.
I finished the decorative stitches and piecing for the outside (including quilting) in the class or soon after. It’d just been sitting around waiting to be assembled ever since. I don’t know why I waited so long—it took less than 20 minutes to finish up.
I know of at least one baby quilt that needs to be made later this year, so perhaps it will go to those expecting parents. Regardless, it is nice to have yet another finished project from the WIP cubbies.
I certainly seem productive lately! I guess that is the advantage of finally tackling my collection of almost-abandoned projects.
I’ve been on a de-cluttering kick, and pulled this out of the back of my closet:
I made it in 2004 for my high school graduation. Yes, for some reason, we wore wedding gowns (tuxes for the guys) for the graduation ceremony. It’s a little too big for this dress form, but you get the general idea. The fit was actually pretty good despite the construction issues, believe it or not:
I know better photos exist somewhere, but I don’t know of any digitized ones. The weathervane sticking out of my head is a nice touch.
I was way into medieval stuff and LOTR, so fell in love with McCall’s 3861 at first sight. Somewhere along the line I decided not to make sleeves, so this was the result.
I’m pretty sure I cut corners all over the place to finish it in time. Such as this basting (maybe?) on the shoulders.
Half the hem was only pinned in, not sewn. Actually, I have a really bad habit about this on dresses. The difference is, I now know about hem tape. My regency gown is still waiting on a hem, too.
Then, there are the splitting seams at the underarm.
And, there’s no hook above the zipper (not to mention oddness at the zipper base).
So, it can’t be donated as is, and probably shouldn’t be anyhow because of poor construction elsewhere. It is also far too small for me now, so can’t be remade (at least, not with my imagination). Any ideas for what to do with it?
If you know of anyone that could use it for a drama production or something, I’m more than willing to part with it!
This may not be a new WIP, per se, as I’ve been thinking about it for as long as I’ve been quilting and had the “fabric” for longer, but it’s now made it to the cutting table: College t-shirt squares for a t-shirt quilt.
I’m not sure if Moof was protecting the blocks, trying to claim he helped, or just excited that things were on the floor…
I got tired of the storage bag taking up space in my closet (I’m not much of a patterned t-shirt wearer these days), and cut the shirts all apart the other day. The blocks will probably stay in this state for quite some time, but at least they take up a lot less space now.
I didn’t count, but I think there were around 20 shirts, some with front and back printed, some with just front, some with smaller logos on the front and full back, etc.
Part of the reason I don’t want to piece this yet is that one notable shirt is missing. I probably wouldn’t care, if not for the fact that I designed it. At some point we had two, because Carl also had one, but neither are to be found, either in my bag of shirts or our dressers. I have no idea how both disappeared! I know those two weren’t donated at any point. Maybe one’ll pop up sometime soon.
But, I have plenty of other projects to work on anyway and am very happy to reclaim the closet space!
Tips
Fuse on the interfacing before you cut. Interfacing is a must, even just a light-weight one. Cut it larger than your planned squares, fuse, then cut. It makes life much easier.
Pick block sizes that work together, especially if you don’t have a final layout planned. My shirts were mostly men’s smalls and mediums, with a few women’s larges thrown in. I was able to get a 12.5″ square from each very easily (which was great, because I have a square ruler that size). Some shirts had smaller motifs on the front, so I also cut 6.5″×12.5″ and 6.5″×6.5″ pieces, which will all work together well.
Unless there is something printed on the side seam, cut up each side, all the way through the bottom of the sleeve. This will let you open up the shirt and lay it flat, while keeping as much fabric in place to position your interfacing and ruler.
Have you ever made a t-shirt quilt? I’m kind of making up this process as I go along…
My mom’s Christmas gift was a matching set composed of a quilted cosmetic bag, eyeglasses sleeve, and curling iron sleeve. Unfortunately, I may not have photographed it. I also promised to make a matching zippered bag for her purse, but didn’t finish it in time for Christmas. It’s suddenly the end of June, but now it’s made!
I was in the groove, and made a few more small storage pouches for myself; they’ve been on my to-do list for a while. I wrote a tutorial about the first ones I made over a year ago.
Since I still had fabric to match my mom’s set, I made one for her too. Because I used the last of my Velcro on mine, I improvised by adding a flap that closes with a button. There’s also an inner divider in hers using up the last of the yellow contrast fabric.
Not bad for about an hour and a half of sewing time!
I don’t want to sound prideful, but I’m proud of myself—I’ve made a good dent in my WIP storage lately. This photo is from Sunday:
At the beginning of the month, all twelve cubbies were full. Since the photo, I’ve also cleared out a small one that held Mom’s fabric; cut apart the pieces for my Miniatures Nine-Patch (one of the post-it marked ones); and migrated my EPP stuff to its new home in my new bag. Damn, it feels good to be a gangsta WIP finisher. Granted, that’s not my only WIP storage, but it’s a good feeling to have finished some projects, made progress on others, and organized even more.
Did you make any resolutions to tackle WIPs this year?
My friend that also went on the retreat back in February pointed out that I make all these cosmetic bags, yet mine were in one of those free-with-purchase “gifts” from a department store cosmetic brand. She quipped about the “shoemaker’s children” and how I should get around to making myself one. I still haven’t made a cosmetic bag, but I did finish up another UFO for myself.
Back in November, I mentioned paper piecing a small block to go on a bag for my EPP and other handwork projects. I made the bag exterior, and let it languish on my shelf for… eight months now. So, this weekend, I decided to UFO bust and dragged out the bag.
The problem with letting a project that you dreamed up and didn’t write any notes down about languish for months on end is that you have no idea where you were going with it or what the measurements were. Somehow, I managed to cut out a lining of the right size, and managed to sew it in without too much trouble.
I even made a zipper bag and two Velcro pouches with leftover fabric—great for keeping bits of fabric separate, and to act as thread catchers, etc. The largest scrap I now have of the hedgehog print is a 2.5″ square—talk about efficient cutting (completely by luck)!
The outside has a few pockets, and a small needle/pin section.
And the inside has a pocket as well, with an elastic top to help keep things inside.
I don’t know what I was thinking with the handle, but without the strap where it is, the front is too long for the bag. I added a hook that keeps the flap connected to the top of the front by way of a button-hole, while still allowing access to the pockets, but I may rip off the strap and affix it to the sides at a later date.
For now, I just need to load it up and see how it works. It’s large enough to carry around my iPad and notebook, so it may work as a purse, too.
Hooray for finished projects! I’ve actually managed to empty out quite a few of my UFO/WIP cubbies lately (at least it seems so—although some of it has been by condensing things into other locations, I think). I think that means my project ADD will kick in again soon. 🙂
Have you managed to finish any UFOs or WIPs recently?
The final block swap meeting for the puss-in-the-corner/uneven nine-patch blocks is later this month (we’ve been postponing and rescheduling for a while).
Since I finished up my signature blocks and piano keys, I thought I’d get a start at piecing the center of the top. It’s going to be twin-bed sized, so too large for my current batting scrap on the wall.
Sorry about the Moof butt
I have half of it pieced, and as usual, its presence on the floor is a magnet to Moof.
The rest is on the wall, sideways and unpieced.
I hope to finish piecing it this week, and am looking forward to getting all the border pieces on the 29th.