This is a static export of a blog I put on ice many years ago, that still has personally relevant content. No promises can be made around linkrot, styles, or working functionality.
Chiffon. Gauze. Georgette. Organza. All four of these fabrics are sheer fabrics that are traditionally made of silk and often confused for one another. Small differences in the yarn used in weaving and the weight of the fabric can help you tell them apart.
Gauze and Organza are both open-weave fabrics that differ in both weight and tightness of weave.
Silk Gauze is a very loosely-woven, lightweight fabric. It is typically 3–5mm. Because of its loose weave, gauze is floppy.
Organza is not as loosely-woven as gauze, and is slightly heavier; it is generally 4–6mm. The tight twisted yarns (though not as tight as crêpe yarns) make it extremely crisp. It’s often used in couture sewing as interfacing.
Unlike the above, chiffon and georgette are crêpe fabrics, meaning they’re woven of very tightly-twisted yarns, which gives them a dull, slightly rough texture. The main difference between chiffon and georgette is weight.
Chiffon is the lighter of the two, generally 6–8mm. It is woven using a single-ply crêpe yarn. It is a soft, somewhat limp fabric that drapes beautifully. Chiffon can be doubled, meaning two warp and two weft yarns are used at once, making it heavier (12–16mm), but retaining the same soft hand.
Georgette is heavier, usually 8–12mm. It is woven with two- or three-ply yarns, which give it weight and a slightly rougher feel than chiffon. It is also much crisper than chiffon.
All four of these fabrics are traditionally made from silk, although it is more common to find them made from synthetics at your typical chain fabric store.
Now you know the differences between chiffon, gauze, georgette and organza. Do you have a favorite? I’m rather partial to georgette, when it comes to flowing garments, but they all have their uses.
My partner and I both have hobbies that can get expensive. His is cycling, which is by far the more healthy of the two. Mine is (obviously) sewing. Once you reach a certain threshold, each can be about as expensive as you’re willing to make them—and dedicated hobbyists of either are often willing to go quite expensive to get the best gear. The two hobbies actually have a lot of financial similarities—especially when it comes to the cost of machines. So here it is: the cyclists guide to sewing machines, or, how to understand why that $5,000 sewing machine is just important to your sewist’s hobby as your $5,000 bike is to yours.
The discount store machine
Images courtesy schwinnbike.com and singerco.com
Once upon a time—not so long ago, in fact—Schwinn was a household name. It was a name that screamed quality. The American Dream in bike form. Schwinn made great bikes. Now they’re reduced to being sold in Walmart and other discount stores, a mere ghost of what they once were. Schwinn road bikes can generally be purchased in the $150–900 range. They get you from point A to point B, but they’re made with cheap components and clunky, heavy geometry.
Similar to Schwinn, Singer was the household name for sewing machines for over a century. Issac Singer, the company’s namesake, created the first commercially successful machine in the early 1850s. His company’s products continued to be known for quality and staying at the forefront of technological advances. At least, until the later part of the 20th century came along. Now, Singer is fast becoming the Schwinn of sewing machines. Their cheap models can be found at discount stores across the country for under $200. Their nicer machines fall in the $200–1000 range, but even those aren’t the high-quality all-metal-gear technologically-advanced machines Singer was once known for. This isn’t to say they are worthless machines—I currently own a Singer and they still have the majority of the market share—but the dedicated hobbyist with a Singer is just biding her time until she can afford the next step up. Other brands in this category include Kenmore and Brother.
The entry-level machine
Images courtesy trekbikes.com and berninausa.com
For the rider who is really interested in putting miles down on the pavement, the cheapest place to start is with one of the $600–$1,500 entry-level bikes available from brands like Trek and Specialized. That will get you a somewhat light aluminum frame, maybe a carbon fiber fork, and an okay group set. It won’t be the best bike out there on the road, but it’s an improvement over the discount store bike. It’ll shift pretty smoothly and handle the road better. If you buy it from the right store, you’ll be assured that it was built correctly and you’ll have access to knowledgeable salespeople and mechanics.
For the sewist who is really dedicated to putting stitches down on fabric and creating amazing products—be they quilts, clothing, home dec, or whatever else—the place to start are the $600–$1,500 entry-level computerized machines available from brands like Husqvarna Viking and Bernina. These machines have metal parts that hold up better than the plastic ones in cheaper brands. They have some simple fancy options. They sew smoothly and handle what you throw at them a little better than the discount store machines. Like an entry-level bike, these machines should be purchased from a good store with knowledgeable salespeople who can steer you toward a good repair shop. Other quality brands that offer entry level machines include Pfaff and Janome.
The competition machine
Images courtesy pinarello.com and husqvarnaviking.com
The rider that is putting down 4,000 mi a year on a bike probably isn’t rolling on a Trek 1.2 or a Specialized Allez. Someone putting down that many miles is going to go for a high-end bike. Whether they’re looking for comfort on centuries or speed in races, light-weight components and fine-tuned geometry are important. You can spend anywhere from $3,000 to $20,000 on a high end bike. The same brands that make entry level machines also have models like the Madone and the Tarmac—bikes that have won the Tour de France. Bikes that run in the thousands for just the frame alone. This category also includes foreign brands like Pinarello, Cervelo, and many others.
For the dedicated sewist who wants to expand her craft, entry-level machines don’t cut it. They just don’t have all the options. That’s where the $2,000+ machines come in. They have the high-quality metal parts found in the entry level machines, but have better stitching, more options, and advanced computerized interfaces. Some of them automatically adapt to the type of fabric being used, removing the need to change the tuning on the machine to handle it. Just think—how cool would it be for your cassette to automatically adjust to the proper gear ratios for hills vs a long flat ride? The more expensive machines generally have embroidery options as well, with ways to interface with your computer to allow almost endless options for creativity. Cyclists want to go faster and longer. Sewists want to create more intricate, embellished projects.
The rain/training machine
Once you reach the level of owning a $5,000 racing bike, it is quite painful to take it out on the wet, dirty, oily roads. Thinking of damaging your super-light race wheels on a stray pothole brings tears to your eyes, and replacing the race-level tires every 1,500 mi gets costly. So, most cyclists at that level keep a rain/training bike. It might be the entry-level bike you started out with or your last frame with cheap componentry, 32-spoke wheels and touring tires, but whatever it is, it’s what you bring out when the elements are going to beat it up.
The sewist often has her own rain machine. A older machine, often with fewer options, sits packed away until she needs to work on something that might hurt her precious competition machine. For instance, when she needs to sew fleece, which has fuzz that gets everywhere and gums up the mechanics if you don’t clean the machine after. Or when sewing heavy materials that put a lot of stress on the machine. Or to teach someone how to sew on—after all, sewing machines don’t need to to be adjusted to fit the user. It’s the machine that gets ridden hard with the thought that if something happens, at least it wasn’t the expensive machine.
The time trial/specialty machine
Images courtesy feltbicycles.com and pfaffusa.com
Truly dedicated cyclists aren’t content with their single bike (or two bikes, including the rain bike). They start wanting things like a time trial/tri bike, with its special geometry that’s all about aerodynamics for short, high-energy sprints. They might have a bike built up solely for riding in hills, or one geared for flats. These machines are built for specific purposes. They may be less-used than the main machine, but they are just as important to the overall experience of cycling. Sure, you can go out to a time trial on a normal road bike with aero bars, but an aero bike and the appropriate gear will help you shave minutes off your time.
Sewing has its own specialty machines. There are sergers or overlock machines, which use multiple threads and needles to make quick, finished seams and sew knits with ease. This is often the second machine added to a sewist’s lineup. There are stand-alone embroidery machines rather than the sewing/quilting/embroidery systems described above. There are heavy-duty machines that have limited options and are made to sew denim, leather, and other heavy fabrics or are for extremely heavy use, such as in a professional tailor’s shop. Very serious sewists and professionals will have multiple machines configured for different tasks, such as one set up strictly for quilting, another for a certain type of sartorial sewing and a third for some other sartorial task. Large quilting machines are also available that can be programmed in different ways to automatically quilt the backing, batting and quilt top together.
Gear
While a bike is the main component to cycling, that’s not all you need. A helmet, bike shorts and jersey, gloves and shoes are all additional gear needed for cycling. As with bikes, each bit of gear comes in many different brands, styles and levels of quality, not to mention price. Sewing is no different. Your $100 Giro helmet with all its vents is better than the $30 Bell one. Likewise, the $80 Gingher shears (scissors, for the layman) are better than the $30 Fiskar ones for your sewist. Sewing has its own gear, called notions. Things like pins, needles, thread, drafting tools—they all allow a sewist to be good at her craft. Where cyclists have to replace brakes, chains, tires, tubes and cassettes after riding a certain number of miles, sewists need to buy fabric for their different projects.
A true hobbyist will learn to work with whatever machine is available. Like the racer who won a 75km road race on a hardtail mountain bike, skill can make you successful with the tools you have, but the higher-end tools make the job easier, more enjoyable, and allow you to push harder toward the limits you think exist. You can sew by hand—you don’t need a machine at all—but to continue pushing yourself to create new and better things, sometimes you have to spend a little more money. For now, Carl’s out there on his Madone 5.9, and I have my Singer (and a Trek 1.2), but that’s only because once you’ve had the discount model, you want to jump straight to the high-end, and the $6,000 machine I lust after is a commitment I can’t yet afford, to be sure.
Of course, there is one difference in cost between cycling and sewing: electricity isn’t exactly cheap, but the asphalt is free. C’est la vie.
Back before I started this whole quilting endeavor, the quilting section of fabric stores was quite a mystery to me. Sure, I’d wander about because patterned cottons can come in handy for other types of sewing, but one section of fabric really confused me: the fat quarters. I had no idea what that meant. But now, the mystery is solved.
It’s all in the cut
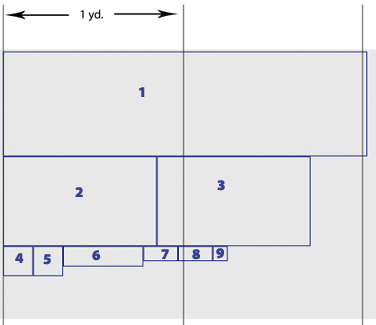
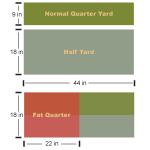
Fat quarters are are 18″ × 22″ rectangles of fabric. They get their name from the fact that they are quarter yards of fabric, but cut differently than “normal” quarter yards. Rather than cutting a quarter yard off of a bolt, which results in a 9″ × 44″ piece of fabric, a half yard (18″ × 44″) is cut in half parallel to the selvage, resulting in two fat quarters.
So, you see the measurements come from the size of “normal” quarter and half yard cuts. The size of those cuts are determined by the width of fabric, which is almost always 44″ for quilter’s cotton (plus or minus an inch). A yard is 36″.
Fat quarter uses
Fat quarters have some advantages over traditional quarter yard cuts.
Longer strips can be cut parallel to the selvage, or lengthwise grain, which is less stretchy than the crosswise grain.
You may be able to cut more of certain shapes. For instance, you can cut 12 5″ squares from a fat quarter (3 rows of 4 squares) rather than 8 from a normal quarter yard (1 row of 8 squares).
For larger patterns, the 18″ side may allow for more flexibility in larger blocks (as in you can get more of the pattern).
Beyond their usefulness of cutting, more fabric sellers and manufacturers ship pre-cut fat quarters as part of a fabric collection, meaning you can easily pick up the prepackaged cuts (sometimes in packs with multiple patterns).
You can also find fat eighths, which follow the same idea. Rather than a very thin strip (4.5″ × 44″), a quarter yard is cut in half resulting in a 9″ × 22″ piece of fabric.
I mentioned in my last post of project updates that I am working on a dress for a wedding (now little more than a week away. Eek!). My original plan was to use the ivory/gray linen I have sitting in my stash, but kept being bothered by how bland it is for such a happy affair. The only other usable (for the style/pattern) length of fabric I have is some very bright white ramie linen. A conundrum.
Bright white ramie linen.
Enter my idea to dye the ramie to a wedding-appropriate, summery color. I’ve never attempted to dye anything before (tie-dye t-shirts in my youth excepted). I didn’t want to sacrifice any of my kitchen pots for the endeavor, and didn’t want to run the risk of staining the bathtub in our rented apartment, so I researched washing-machine dyes. The type I heard best things about is Jacquard iDye. So, I picked up a packet of their lilac color and set out to dye 1.5lbs of white ramie linen.
The dye
Jacquard iDye has a pretty decent delivery idea: a small, water-soluble packet that you toss into the washer, add salt or vinegar depending on the fabric, and let the washing machine agitate and rinse the fabric. No complicated measuring or mixing, and you can dye 2-3 lbs of fabric. (In fact, I probably dyed a bit too little for the full pack. That’s a downside: no way to reduce the amount of dye being used for a smaller batch.)
They have 30 different colors for natural fibers, and 8 for polyester/nylon dyeing (iDye Poly). Presumably, you could do plenty of mixing for larger batches to create your own colors. When dyeing poly mixes, you choose a natural color and the closest match from the poly set and use both—presumably mixing won’t work as well there since you’re targeting the different fibers.
For dark or very vibrant colors or natural fiber/polyester mixes, Jacquard recommends using the stove and a big pot rather than the washing machine. Since I didn’t want anything too vibrant or dark, the washing machine seemed like the way to go. The higher heat you can get with the stovetop method also makes the dye more color fast, in theory.
Availability
I, like usual, had a 40%-off coupon to employ at Joann Fabrics, and they stock it. So that’s where mine came from. You can also get it from Amazon, Dharma Trading Co., and likely many other craft shops.
If you’re concerned about color-fastness, they also sell an iDye Fixative that is supposed to help. I didn’t see it at Joann, but it’s on Amazon and Dharma. There’s also a color remover packet available.
What can I dye?
Any natural fiber can be dyed with iDye. They have iDye Poly for polyester/nylon fabrics, and suggest that you use a packet of each when working with blended fabrics. Since you can use the washing machine or the stove top, you should be able to dye pretty much anything (for instance, wool would likely felt if you put it in the machine, but the stove should work fine).
Do I add salt or white vinegar?
For plant fibers you use salt. Plant fiber-based fabrics include cotton, linen and rayon. This category also includes the ramie I used and bamboo.
For animal fibers you use vinegar. Animal fiber-based fabrics include wool and silk.
For poly mixes use the one appropriate for the natural fibers in the mix.
For plant/animal mixes (cotton/silk, lindsey-woolsey, linen/silk), Jacquard comes off as rather indifferent and unhelpful. Their suggestion:
It’s not critical—either the salt or the vinegar will work so just pick one.
Don’t add either, but use substantial heat in the dyebath (stovetop method).
Do 2 separate dyebaths—one with salt and one with vinegar. This will probably be best for darkest colors.
Excuse me, not critical? Then why are we adding it in the first place? Clearly there is a reason. A caring company would explain that and give a thoughtful answer. Hmph.
Melodramatics aside, the salt and/or vinegar combined with the heat help set the dye (semi-)permanently and improve the wash-ability of the dye job. So, likely results if you follow their suggestions:
You’re splitting the color-fastness. If you use salt, the plant fibers will be more color-fast, while the animal fibers will be less; with vinegar, vice versa. Over time, certain threads will fade faster than others. It could give an interesting new dimension to your dye job or just look like crap. It’s a gamble.
Sure, you can leave it out, but that will decrease life of the dye job (more heat should help, but not to the same degree as heat and salt/vinegar).
We have a winner, and not just for darkest colors. This solution adds the color-fastness to both types of fibers. However, the tradeoff is that it is more expensive and takes longer. With dark or vivid colors, fading is more obvious than it is with lighter colors, so this is definitely the right approach there, but there’s nothing lost if you take this approach with the lighter colors as well. Keep in mind that two dye baths will give a more intense color, so you’d need to reduce the time spent in each bath unless you want a very bright or dark color.
The results
I had some concerns about whether the temperature of our water is hot enough for this application. It’s really not that hot most of the time (old house). But, I put the washer on its longest agitating setting and the ramie I used took the dye like a dream. I’ll have to wait and see how color-fast it is in the long run though. Heat is an important part of that.
The coverage
The fabric is all the same color, no splotches.
The color
Monitors differ, so this color might not be perfect but close. See, quite blue compared to the image on the package.
I was a little concerned when I pulled it out of the washer; it looked extremely blue. After drying, the shade mellowed out to a lilac-ish purple. It is a little closer to the blueberry side of purple than I expected based on the package graphics. Perhaps they need to have their print shop color correct the graphics. In hindsight, I think I would have preferred using the violet dye and leaving in the dyebath for a little less time. I prefer a reddish purple to a very blue one. It looks better with my skin tone.
My “set it at the longest cycle setting and let it go” timing method worked out well and I’m happy with the intensity of the color, but you may want to be a little more scientific with knowing how long your agitation cycle is based on the washer you have and the color you want.
The washing machine damage
Just kidding with the header here. Although I wasn’t about to sacrifice a load of whites to see exactly how little dye was left in the washing machine, I ran a load of towels and darks through and a bit of white cotton, and I’m happy to say that there’s no lilac tinge.
Color-fastness
I’ll come back and edit this once I get a little more experience with how the dye job holds up as I use the fabric, but a couple of quick observations:
The water ran clear when I rinsed the fabric after the dye cycle. No lilac water running that I could see.
There was an awful lot of bluish-lilac-colored lint in the lint trap after I dried the fabric. That’s is somewhat disconcerting since ramie is not a linty fabric… it looks like some of the dye bled onto whatever lint was sitting in the machine after the last cycle. Although, I suppose it’s possible that the lint was that color because of whatever had been dried in the dryer previously. We do share it with the tenants in the other apt.
The verdict
For simple, quick applications, this seems like a great solution. Especially for a dyeing novice like me. I don’t have the time to jump into the dye arts right now, and until I decide to take the plunge and go more indepth with dyes, I think that this is reasonable for occasions when I can’t find the color I want.
Plus, I still have about 6 yards of that white ramie left. I don’t know what I’m going to make out of it yet, but it’s possible that I’ll try this again. It does make those $50 15-yard bolts of ramie linen at Fashion Fabrics Club seem even more interesting now. I was hesitant to buy more considering the limited colors available (there’s only so many uses I have for red/black/off-white/white linen in 15-yard chunks), but based on my opinions of the fabric and the cheap price, if I can dye it this many colors, it’s an awesome source. I talked about it at length in my review of the ramie bolt, but I still think that this really is a much higher quality fabric than the other cheap linens available, and with most of the same qualities and draping as flax-based linen.
Math’s no fun, at least in my opinion. So, as I get into this whole quilting thing, I’ve been doing more math than I like, and doing it poorly. I have found that Adobe Illustrator is great to play around and piece my quilt blocks together in a digital sense, but unlike quilt-specific software (like Electric Quilt), it doesn’t magically add my seam allowances for cutting out the bits and pieces. My most annoying mistake: sizing half-square triangles.
First, in case you’re asking: a half-square triangle is the triangle created by cutting a square in half diagonally (usually used to create another square of two triangles), like in the image above.
The wrong way
When I went to add seam allowances and cut out my triangles, I made a totally rookie mistake (hey, I am one!): I forgot about the seam allowances needed for the hypotenuse of the triangle. I simply added a half inch to the width and height of my square (a ¼” allowance on each side), and cut down the middle.
In a graphic sense, I did it like this:
Final width/height + ½” does not the proper-sized triangle make.
But as you can see, that doesn’t give me the right size.
The right way
To get the proper size, you need to consider the hypotenuse seam allowance as well, but as is the nature of triangles, simply adding another half inch doesn’t quite work how you want it to.
For perfect half-square triangle measurements cut from squares, cut out a square that is 7⁄8″ larger than your intended finished size, then cut that in half diagonally.
Graphically:
Final width/height + 7⁄8″ does the proper-sized triangle make, regardless of the measurements for final width/height.
Some people will add a full inch to the final size (¼” on the outside edges and they think two ¼” allowances in the center), cut that and then sew the center seam and trim off the small excess when they realize it’s not quite the right size, but why put yourself through that much extra work? Start with the right size and end with the right size, no extra cutting involved. Just make sure to sew that perfect ¼” seam.
But, what if I’m not doing a 2.5″ square?
The 7⁄8″ measurement doesn’t change. It is based on the ¼” seam allowances, not the size of the square/triangles. My choice to use 2.5″ in the example was mostly arbitrary.
Does this technique work for you? Do you have another way of cutting out half-square triangles?
My various projects in the world of sewing, web, and life are legion, but I’ve now got it in my head to start quilting. We’ll see how that goes considering I’m 48 hours into this plan, and I’m already being surprised. Not by the process of quilting but by something I found as I quested into the rarely-explored (by me) section of quilting fabrics at the local JoAnn Fabrics: non-commercial, home use-only fabrics.What?
It’s a good thing I happened to get that particular quarter yard, otherwise I might have never known!
No, my eyes aren’t deceiving me, right?: that bit of fabric selvage clearly statesSold for non-
commercial home use only.
Intellectual property (IP) and copyright isn’t something I’ve ever considered to have ramifications on the sewing world. Considering that most of my sewing experience deals with basic, mostly non-patterned fabrics, there’s been little call for me to consider the implications of copyright on my creations. I learned not too long ago that clothing can’t be copyrighted, even though patterns can be, so that was the end of my thoughts on the matter.
Serendipitously enough, Katherine, the author of a blog I follow (and college friend) is the daughter of a patent/IP lawyer, and she—with answers from her mom—just authored a post about how IP has (or doesn’t have) an effect on Etsy products. Her article is where I’m sourcing most of this from, with a little help from my years of awareness with Instructional Technology work (although digital media is its own beast when it comes to copyright).
Define IP and copyright
People have spent entire law careers focused solely on IP: a good indication that there’s no clear-cut, always-followed definition. A good working one however is that Intellectual Property is a copyrightable, trademark-able or patentable product of someone’s creativity or intellectual activity.
For a definition of copyright, we’ll look to Wikipedia:
Copyright is the set of exclusive rights granted to the author or creator of an original work, including the right to copy, distribute and adapt the work. These rights can be licensed, transferred and/or assigned. … Copyright applies to a wide range of works that are substantive and fixed in a medium.
So, how is fabric IP?
Let’s get semantic here: if we consider that copyright applies only to works that are fixed in a medium, fabric can’t be copyrighted. While it is itself a medium, it becomes other media, such as quilts, clothes, decorations. It can be affixed to artworks, etc. It is not fixed to any specific medium. Not to mention, if the method used to weave plain-weave cotton fabric could be patented, it’s fallen into public domain by now, surely.
But in this case, the fabric isn’t just defined by its method of construction, but by the design printed on it. That design is fixed to a medium: the fabric it’s printed on. Additionally, the visual design was created by someone—in this case Susan Winget—and is therefore a copyrightable piece of “art”.
Does it really mean “I can’t sell a product made with this fabric?”
Because IP and copyright are both so debatable and have a variety of gray-areas, it’s hard to just say “yes” or “no” here. So, let’s discussed a couple different types of selling:
I’m a clothier who intends to make objects of clothing out of this with the sole intention to profit.No. From start to finish, the intent here is commercial.
I’m a hobbyist that sews clothing, quilts and craft things for my [children/grandchildren/friends] and those items are occasionally resold once they’ve been outgrown.Probably ok. This is a gray area. The item created from the fabric was not made with the intention of commercial profit. If you were to post an item for sale it may be within the artist’s rights to request that you remove listings of the item, but you should contact a lawyer only if that happens. Chances are, the artist won’t care in this situation. Your intent was not to profit, you’re merely (re)selling a used item.
When I talked to Katherine about this, she had another good point: “Commercial use” also applies to things used in for-profit plays, television shows, advertisements, etc. So, if you’re making an article of clothing or craft item for display in say, your pattern company’s catalogue, as a project made from your pattern, you’re violating copyright if you use this fabric. Or, if you’ve sewn a quilt using this material for non-profit purposes but use an image of that quilt in the advertisement for your quilt-making company, you’re probably violating copyright with that advertisement.
So, this all really makes me think twice about ever buying fabric from that designer again. The project I purchased this for is most likely going to be presented to a friend’s baby, but as she gets further along and finds out the gender, I may start a new, more-gender-specific quilt. If that were to happen, my thoughts were to possibly sell the currently in-progress project. That makes me wonder if I should even bother using the fabric in it at all. I’m sure I’m not the only one out there with that choice to make. That’s not to say that I don’t think fabric designers deserve to profit and have rights to their designs, but as a craftswoman trying to navigate the big bad world of commercial endeavors, this is one more thing I have to be aware of—and worried about—when plying my hobby/trade. In my world, it’s simpler to just deal with fabrics that don’t have copyright strings attached.
Do you think fabric should be able to be given this sort of terms of use? Have you encountered issues with this in your own sewing? One thing’s for sure: I’m definitely going to be more cognizant of what I’m buying in the future.
For the novice sewer, the cutting layouts supplied by most pattern manufacturers are a boon. Not only do they help approximate the most economical way to cut pieces out, they ensure that your pieces are being cut in the right direction—either on the grain or properly on the bias, on the right or wrong side of the fabric—to ensure correct draping and fit. But there are trade-offs involved: those layouts generally take into account the different gradings of the multi-sized patterns, so smaller sizes will have many more scraps of odd sizes than will the larger. As you gain experience, it might be time to start developing your own cutting layouts.
When to modify the cutting layout?
The smart aleck in me wants to say “always,” (because I have yet to see a layout that can’t be tweaked a little) but that would be doing you a disservice. If you’re not comfortable with understanding why a piece needs to follow the grain or be cut on the bias, you’re best off following the given guides. But eventually, you’ll find that you understand everything well enough to mix things up a bit.
I really can’t reiterate enough. Don’t rotate pieces or alter their placement away from the grain or bias lines until you understand how that affects how the piece gives and lays.
When I talk about modifying the layout, I generally mean moving the different pieces around to other spots, but in the same orientation as originally noted. Pieces are cut on the bias or grain line for reasons dealing with fit, as well as strength and wear. A piece that should be cut on the grain but is cut on the bias will end up stretching in strange ways that it isn’t meant to. Likewise, a piece that should be cut on the bias will not fall correctly or stretch when needed if it is cut on the grain. Even lengthwise-grain (down the yardage) vs cross-grain (selvage-to-selvage) are important: many fabrics stretch in different ways across the two weaving directions, which will also cause issues (and mess up patterns and such).
That said, I live by the idea that once you know the rules, sometimes you can bend or even break them, so if you’re willing to possibly screw up (and need more fabric), the sky’s the limit.
When you can modify the layout for size
When it comes to multi-size patterns, it’s generally in the printer’s best interest to have all sizes graded to a single piece, rather than having to print four different versions of a pattern piece—one in each size (taking up more space on paper). Likewise, when it comes time to plan a cutting layout, it’s most economical for the drafter to create a layout that will accommodate all sizes provided in the pattern. If you need a smaller size, try adjusting the layout by moving the cutting lines as close to each other as possible. You may find that you can rearrange the pattern pieces to be more economical when you’re not having to worry about the extra inches for larger sizes.
When you can use folds to make less work
Most pattern cutting layouts try to keep the layout as simple as possible; in other words, they will usually only require a single fold, maybe two. But if you play around with the layout, you may find that you’re able to use more folds to save yourself cutting work, and fabric. Make sure to pay special attention to resulting pieces being on the correct side of the fabric, especially if they are asymmetrical.
When you are using stripes, plaids, or obvious patterns
When working with stripes, plaids and obvious patterns, you generally need to match up the patterns along seam lines or risk looking totally amateur. In fact, most patterns will advise you that you’ll need more fabric to match stripes, plaids, etc. This is almost always true. My general rule of thumb is to either purchase the 54″/60″ yardage amount if I’m using 45″ fabric, or add 20% to the yardage amount.
But a caveat, of course: it’s really a pretty loose rule. I almost always study the given pattern and cutting layout before buying my material. If we’re talking expensive patterned (striped/plaid/etc) fabric, I’ll find out the pattern repeat (where the pattern repeats itself on both the horizontal and vertical axes), measure the pattern pieces, and play around in a graphics program (and do more math than I would like) to really get a good idea of an alternative layout, and then make my purchase. You could do the same with graph paper and a pencil and ruler as well.
Another reason to alter the cutting layout is to capture a particular motif in a section of a pattern piece. For instance, you may want to cut your back pieces so that a particularly interesting part of the fabric design is centered on the back. This is sometimes called fussy-cutting in the quilting world.
When you’ve extensively modified an existing pattern or draped your own
When you’ve made many changes to a pattern, the recommended cutting pattern probably needs to go right out the window. You may be able to base a new layout off of the original, but sometimes you might need to start from scratch. The latter is also true, of course, when you drape your own pattern. I usually spend a lot of time moving all of my muslin/draping pieces around on the empty floor before I even consider pulling out the fashion fabric.
When you’re planning multiple projects from the same fabric
If you can plan in advance and cut out multiple projects at the same time, you may find that you can squeeze pieces into the excess of the first layout, or even completely rearrange everything and end up needing less fabric than you would have used when cutting the patterns separately.
A case study: two Elizabethan shirts, or cutting multiple projects at once
When working on the smock and shirt for Faire-going this summer, I had the goal of being as economical as possible with my material to better emulate what an Elizabethan seamstress would have done. I may have taken it to the extreme, spending far too much time in my graphics program playing around with potential layouts. The result, however, was an extremely economical layout that used less yardage together than they would have separately.
The rule: when planning multiple projects from the same material, rearrange the curring layout so that you cut all projects at the same time. You will likely find that you can use less yardage by creating a more compact cutting layout.
My cutting layouts went from this:
These layouts are more or less the most effective way to cut the fabric for each individual project.
To this:
The main concept here is to have the second longest piece’s length “eaten” by the first, so you’re not adding any additional length. The same with the third and fourth longest, etc.
I was able to save over a half yard of fabric by cutting at once, leaving very few—but very useful for straps and ruffles—scraps.
Do you have any fabric-saving tips to share? Do these methods help you in your projects?
I’m a big fan of natural fibers, mainly because they feel better against the skin. I especially like linen, which is cool in the summer, has a nice weight and hand, and is also historically accurate for costuming purposes. Unfortunately, linen is uncommon in fabric stores and relatively expensive here in the US (especially when your only local fabric shops are JoAnn Fabrics and small quilting-only places). And when you’re really trying to be a frugal sewer and the average prices online ($8-15/yd for average quality) are still too much (like, say, always), one often has to make sacrifices. My recent sacrifice was trying a fiber I’d never heard of, ramie, and I must say, it doesn’t seem like much of a sacrifice at all.
What is ramie?
Despite the shroud of mystery surrounding it, especially in the US market, ramie is evidently one of the oldest fibers cultivated for textiles. Commonly called China Grass, it is grown and used mainly in southern and eastern Asia (with some production in Brazil). Only a small percentage of the overall production seems to be exported for use in Euro/America. Ramie fibers are naturally white, which reduces the need for bleaching, but in order to be used in textiles, they require extensive processing, including de-gumming. The fibers are also very strong and—like linen—improve in strength when wet with very little shrinkage.
Textiles made from ramie behave similarly to linen textiles. They are prone to wrinkling and will breakdown if sharply creased, so it is best to fold them loosely and store flat. One advantage ramie has over linen is that it is naturally bacteria- and mold-resistant. It holds dye well, although saturated colors can be prone to crocking, which is discoloration of skin or other fabrics that contact the dyed ramie at stress points or wet areas.
Ramie is sometimes blended with other fibers to create cloth that benefits from the properties of two or more fibers. Common combinations include cotton, polyester and wool.
Fabric care
When buying pre-made clothing made from any type of textile, you are best off following the directions provided with the garment. Those instructions have less to do with what the fabric can handle, and more to do with how the fabric was treated prior to construction of the garment. Especially with dry-clean only clothing, even if the fibers can handle washing machines without destruction, shrinkage from the process can affect seams and fitting, leaving you with a ill-constructed garment.
Ramie can handle the same heat and agitation as linen. For the yardage I purchased, I ran it through the same process I do linen to get maximum shrinkage before construction: a hot water wash on the regular cycle, a cold water wash on the gentle cycle with soap to remove any processing chemicals, and then tumble dry low until it is slightly damp. I then iron it at a medium-high setting to complete the drying. This will give maximum versatility when it comes to care of any constructed garments.
Like with linen, repeated washing will soften and dull the fabric, fade dye and cause it to be more prone to wrinkles, so if you’re going for maximum stiffness, smoothness and shine, dry cleaning is your best option.
Availability
Unfortunately, like linen, ramie is pretty scarce in the northeastern US—another online-only sort of fiber for me, at least. I’ve only found it on a few fabric discount sites. My purchase was swayed when I found it by the bolt—15 yards in this case—for about $3.33/yd (plus shipping, which still didn’t top $4/yd). Sure, it’s quite a bit of fabric, but I have a few different projects that I’d love to use linen for and hadn’t planned on it because of affordability, so it’s the perfect price for those. Aside from the large amount of yardage, the color selection was also somewhat limited, but at the time I was in the market for plain white anyway, so it again wasn’t an issue.
Ramie vs. Linen
The ramie I purchased was about 4.9 oz., which falls toward the medium-weight of linen. It has a 60×60 thread count per inch, which is a tighter weave than many of the cheaper (and even some more expensive) linens out there, which results in a higher-quality feeling fabric. When I first received it, the fabric had a bit of a waxy feeling to it. My best guess is that it had something to do with processing/weaving/shipping, because after a trip through the washing machine it felt natural and very much like linen (hooray!). It also has the crisp, stiffness of linen that is lacking in linen/poly, linen/rayon and poly/rayon linen-look blends. All of the other linen-advantages: wicking, breathability, etc. are also apparent. Verdict: ramie as a linen substitute works for me, especially if it continues to be cheaper. I will stick to linen when I need colored fabric, since I don’t yet trust my dye skills.
Should you use Ramie?
If you fit one or more of these descriptors, ramie might be a good substitute for you as well:
You need a fairly large amount of linen or linen-like fabric (maybe you go through it like crazy for costuming or making linens for weddings or gifts, etc)
You don’t need odd colors or are willing to do dyework yourself
You’re not absolutely anal about needing 100% historically accurate fabrics for European/American costuming, but want some of the qualities of linen
Do you have any experience using ramie? What do you use as a linen substitute?
In my post about my machine being out of time, I counseled again and again on the need to use the right sewing machine needle for your project. However, I never answered the question of “What is the right sewing machine needle?”. All the numbers on the needle package can get quite confusing, as are the distinctions such as “sharp,” “ballpoint” and “universal.” Read on to learn what you need to know to choose the right needle for your project.
Size
Using the wrong size of needle can turn a great project into a complete mess. A needle that is too heavy can leave gaping holes along the seam line, while a needle that is too thin will end up bending and breaking. You’ll end up with puckered, poorly-stitched seams that look terrible.
Sewing machine needles are labeled according to two systems: American and European. American sizes range on an indeterminate scale from 8-19, while European sizes range from 60-120 and are based on metric measuments (a size 60 needle is .6mm in diameter). Most needle packages list the size in both systems, generally with the European size first, like 60/8. Occasionally you’ll see the American size listed first—just remember that the smaller numbers are American and the larger are European system.
The rule: the smaller the number, the thinner (lighter) the needle. But even knowing this, picking a needle for your fabric can still be tricky. Hopefully this table will demystify the numbering system:
Sewing machine needle sizes in the American and European systems
American
European
Suggested fabrics
8
60
Chiffon, organza, gauze
9
65
10
70
11
75
The closest thing to a universal size: linens, cottons, jerseys, medium-weight polyesters, etc. This is the size most home sewers use for everything.
12
80
14
90
Suede, vinyl
16
100
Denim, canvas, upholstery
18
110
19
120
Extremely-heavy fabrics
Once you’ve chosen your needle size, you should always test on a scrap of the fabric you intend to use. If the stitches aren’t smooth, you may need to use the next size up or down.
Don’t forget to consider your thread as well. If you’re using a heavy thread on a thin fabric, you’ll need a heavier needle than you would otherwise use. The thread should pass through the eye of the needle with ease. If the thread is too large for the eye of the needle, you’ll have issues with tension, as well as weakening the thread—often to the point of fraying it and breaking it mid-stitch.
Type
Size is not your only consideration when it comes to choosing a needle. You must also take into account the type of fabric and type of stitching you plan to do. There are three basic needle types:
Sharp
Sharp needles, as the name suggests, have sharp points that are good for piercing the fabric smoothly. These should be used on woven fabrics, particularly silks and mircofibers. They are also called Mircotex needles
Ballpoint/Stretch
Rather than having a very sharp point to pierce through fabric, ballpoint needles have a rounded tip that allows them to slide between threads in knitted fabrics. These needles are used on knits in order to keep from causing runs or breaking the threads. Stretch needles are similar to ballpoint needles and are made for use with lyrca and other stretchy knits.
Universal
Universal needles fall somewhere between sharp and ballpoint. They are meant to work for most fabrics the home sewer will encounter.
In general, universal needles will suit most projects, but it is good to use one of the other two for the best-finished project, especially when you’re not using a medium-weight woven fabric.
In addition to the three main types, there are some specialty needles available for specific applications:
Denim/Leather needles
These two needle types are heavier than normal needles and are made to pass easily through the heavy fabrics. Leather needles in particular have very sharp, shaped points that cut rather than pierce, so you may need to use a sharp/Microtex needle on synthetic leather.
Embroidery/Top-stitching/Metallic
These needle types have larger eyes and slightly different shaft/scarf/eye shapes to better accommodate the heavy, sometimes fragile, threads used for specialty applications.
Quilting
Quilting needles have a tapered shaft that helps sew through multiple layers of fabric with greater ease than a normal sharp or universal needle.
Wing (Hemstitch) needles
These needles have wings on the side of the needle that create a large puncture hole in the fabric. They are used for hemstitching and heirloom sewing to create cutwork-like designs.
Double (Twin)/Triple Needles
Double (and triple) needles have two (three) needles attached to a single shank. They are used mainly for decorative top stitching or hem/seam finishing, and come in different widths and point types (ballpoint, sharp, universal, denim, etc.). These needles may require a different faceplate, so be sure to check that before you use them.
You should use the appropriate specialty needle if possible. For instance, while a 16/100 Universal needle may be able to sew through denim, a denim needle will be better suited for the project. For more information on these needle types and troubleshooting tips, check out this overview article at Threads magazine.
Changing needles
One mistake I made often when I was first learning to sew was thinking that I needn’t touch my needle until it broke or I needed a different size in the machine. For a long time, no one told me otherwise. Now I know better: needles are a consumable product. You should be replacing your needle on a regular basis (and throw out the old one). There’s no hard and fast rule, but for the most part, you’ll want to replace the needle for every project or after 8-10 hours of use. Over time, needles get dulled and slightly bent, reducing their effectiveness. An ineffective needle makes bad stitches.
More about needles
Almost all household sewing machines use the 130/705H needle system. This is great for the consumer, because it means you can go to most any craft/sewing store and pick up a package of needles that will fit your machine—without being tied to a specific brand. Sometimes you’ll see additional letters that correspond to the type of needle, such as M for microtex or Q for quilting. The ‘H’ in the system designation stands for Hohlkehle, which is German for “chamfer” or “with scarf”—referring to the cutaway groove on one side of the needle shaft, called a scarf. This scarf allows the bobbin case hook to intersect with the needle thread, forming the machine lockstitch.
Now that you’re well acquainted with sizes and types of needles, make sure you master changing the needle on your machine. It’s generally a simple thing to do, and with practice it shouldn’t cause much more of an inconvenience than threading the machine. Double check your owner’s manual, but a good rule of thumb is to always make sure the scarf is pointing toward the back of the machine, and make sure the screw holding the needle in is well-tightened. A loose needle will end up falling and breaking.
My machine is headed to the shop to have the timing fixed, so projects are on hold for now. What is timing, you ask? I’ll get to to that… but story first: I was merrily sewing along the other day, trying to do a decorative stitch on another stuffed animal from the Simplicity 2613 pattern, when I noticed that the pattern was a bit lopsided. In fact, every third or fourth left-side stitch was being dropped. I figured I was using the wrong needle size for my fabric, and didn’t pay too much attention at that point, since it wasn’t in a conspicuous place. I hoped it was just a needle issue, because the other option is that the machine is out of time.
What to do when your machine drops stitches
As I alluded to in the intro, dropped stitches can be caused by something as simple as using the wrong needle size for the fabric you’re using. If your machine starts dropping stitches, try the following before jumping to the conclusion that it is out of time:
Change the needle
The needle could be causing the issue for multiple reasons:
The needle is dull: a dull needle will have trouble going through the fabric, causing it to bend and cause difficulty picking up the bobbin thread.
The needle is bent: even a small bend in the needle can cause issues.
The needle is the wrong type: especially if it is too small/light for the fabric you’re using, the wrong needle can have issues getting through the fabric, being pulled by the feed and bent. Using the proper needle size is vital to good machine sewing.
In general, you should replace your needle before starting a new project, and after about 8-10 hours of sewing (so, judge by the latter if you do many small projects).
Check your tension
Check your tension settings to make sure they haven’t been changed. If they have, play with the tension to see if it is causing the issue.
Re-thread the machine
Sometimes the issue can be caused by funky tension in the machine and in the bobbin. Rethread the machine to see if that fixes it.
Respool the bobbin
Unwind the bobbin and respool it. If the bobbin was wound incorrectly, it could cause this issue.
The fact that my machine was only dropping left-hand stitches on zig-zag and decorative stitches was a good indication that it wasn’t a tension or thread issue, in my case. It continued sewing perfectly fine on the right-side and down the center. It still could have been a needle issue, as you’ll begin seeing many issues with a slightly bent or dull needle (or one that is too heavy/light) when you start having the needle move around horizontally that just don’t appear when the needle is sewing straight. But alas, when I got around to working on additional projects with different needles, thread, and fabric, I found the issue was still occurring. That, my friends, was a bad sign.
What is timing?
When you have a machine with many moving parts, all of those parts need to be moving along in a well-choreographed dance. The right movements have to happen at the right time to make sure everything functions properly. Over time, friction and other issues can cause these movements to slow down or speed up, resulting in minute differences between movements that need to happen simultaneously. This causes things like missing the bobbin thread when the needle goes down for a stitch. When that happens, your machine is said to be out of time.
Other things can cause the machine to become out of time, aside from use. In my case, it is probably because of my using the wrong needle type/dull needles at a couple of points in the couch project (like when I forgot I’d removed the upholstery needle, and tried using a size 70 on my heavy upholstery fabric.). That resulted in some nasty thread knotting in the bobbin case that I pulled a little too hard on to remove. Otherwise, my machine, which is only about 8 months old at this point, shouldn’t be having issues.
Is it the timing? What should you do?
If you’ve tried all of the above and it is still happening, the issue is probably the timing. I’m sure you can find information out on the Internet somewhere about how to fix the timing on your machine, but your best bet is to take the machine to a repair shop with people who know exactly what they’re doing. Especially if you machine is still under warranty (like mine). Oddly enough, this is similar to what happened to my other machine that caused me to buy the current one, except of course, the gears that help control timing happened to rot and fall apart completely, which isn’t as easy of a fix.


 Chiffon. Gauze. Georgette. Organza. All four of these fabrics are sheer fabrics that are traditionally made of silk and often confused for one another. Small differences in the yarn used in weaving and the weight of the fabric can help you tell them apart.


 Math’s no fun, at least in my opinion. So, as I get into this whole quilting thing, I’ve been doing more math than I like, and doing it poorly. I have found that Adobe Illustrator is great to play around and piece my quilt blocks together in a digital sense, but unlike quilt-specific software (like Electric Quilt), it doesn’t magically add my seam allowances for cutting out the bits and pieces. My most annoying mistake: sizing half-square triangles.