This is a static export of a blog I put on ice many years ago, that still has personally relevant content. No promises can be made around linkrot, styles, or working functionality.
As a gift giver for Carl, I’m kind of lame: I usually get him things he needs but doesn’t want to spend his own money on (like jeans, sandals, etc…). For his birthday this year, I decided to supplement that with yet another item he maybe needs: a bag for his cycling stuff so that he doesn’t have to use our reusable grocery bags. This way he has a dedicated bag that won’t get co-opted for other uses.
Bijou Lovely has a great tutorial for a market tote that I based his bag on. Her instructions are clear, she has plenty of photos to illustrate what she’s talking about, and the result is a very roomy, practical, quick tote. For most purposes, it needs no changes.
Modifications
That said, it is a little feminine and has no pockets, which were two cons for my purposes. But both were easily modified.
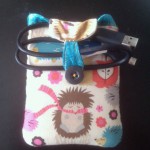
From a technologist’s standpoint, the number two tech item a college student needs is an external backup drive (number one is a computer). My oldest younger sister is finishing her first year at Missouri Science & Tech, and her birthday is coming up, so I’m giving her a backup drive. They are fragile, so I decided to whip up a quick carrying-case/shock absorber to go with it.
Caveat lector: I’m not claiming that batting can actually, truly help if the drive gets dropped/knocked around/etc, but it’s surely better than nothing, and I didn’t want to search for neoprene.
Our puppy isn’t exactly housebroken yet. The first night we had him, he messed all over the pillow in his kennel. We needed something that could protect the pillow and be easily washable. The solution: flannel, hospital sheeting (rubber sheeting), and velcro. And a whole lot of estimating and zero measuring with anything resembling a measuring tape.
Caveat lector: this isn’t intended as a tutorial, rather as a show of my process on an off-the-cuff project. But, if you want to make your own and want clarification on anything, let me know in the comments or contact me.
Normally I’d put more thought into something like this, but basically, I looked up pillow case sizes online (on my phone, on the way to the fabric store), decided I needed about a square yard of sheeting, give or take and went to buy it.
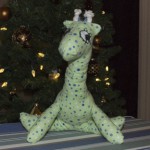
Once again, I’ve gone back to Simplicity 2613 to whip up a baby gift, this time for one of Carl’s coworkers. Rather than sew the elephant for a third time, I chose to make view B, the giraffe. To be entirely truthful, I constructed this a while back, but never finished stitching the felt eyes on or stuffing it (which is how I “sewed” it despite my sewing machine being in the shop).
For the mot part, the giraffe was as easy to build as the elephant, however I did find a few issues to keep in mind.
Issues
The shoulder curve
The arm openings are very tight, so a tool to help push in stuffing is very helpful. More importantly, I found that the quilter’s flannel I used wanted to separate at the shoulder seam. For best results, reinforce the curves with a second line of tighter stitching just inside the seam allowances. Since I didn’t realize this until after I’d begun stuffing, I darned over the corner with matching thread. The hidden reinforcement would have been better.
The importance of a proper stuffing hole
When I constructed the body, I was on auto pilot sewing all the pieces together and forgot about leaving an opening for stuffing in the suggested center back seam. By the time I realized my mistake, the only remaining logical place to leave open was the side neck seam, since I didn’t want to rip any stitches out.
It wasn’t until I actually began stuffing that I realized how unwieldy it was to stuff through the neck. In hindsight, it would have been worth it to rip out the back seam to leave a proper stuffing opening.
I still can’t figure out how to get the limbs to fall as cutely as they do on the pattern envelope. I think it has to do with the stuffing, but it is quite mysterious (unless of course they used hidden pins for photogenic toys).
A note on the neck ruff
The suggested construction calls for fringe with adornment on only one side, so that you can sew the unadorned side straight into the seam. Mine was double-sided, so I first sewed the center-back seam together, then topstitched my fringe down on top of it, folding the bottom edge under for a nice finish. The top edge was sewn into the side seam as one piece with the back.
Just keep in mind that you can use any fringe/ribbon—with adornment on one or both sides—even though the pattern instructions aren’t provided for the latter.
Rattle construction
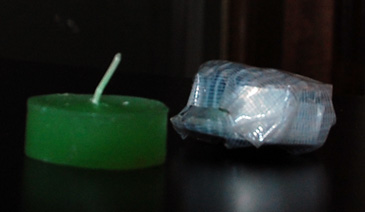
Like the two elephants I made from the pattern, I added a small rattle-like creation to this stuffed animal. It’s really quite simple to make.
Start with the metal bases of two tealight candles (mine are from a pack of Ikea ones, but I imagine any will do, so long as they have metal-ish base). It is best to use the bases of un-used candles, so you don’t have to deal with melted wax. The candles I have just slip out of the base with a slight tug on the wick. I put the container-less candles into other, larger candles that have burned to the bottom (leaving a wax cylinder) so as not to waste a perfectly good tealight.
Partially fill one with grains from your pantry (in the past I’ve used basmati rice, but this time was couscous. I liked the result a bit better). Play with the amount for desired sound.
Place the second candle base over the first, trapping the grains inside. You might have to add a small crease in the side of the inner one to get them to fit.
Wrap in duct tape to waterproof/seal the halves together.
In the future, I want to try using hot glue (or perhaps melted wax) to seal the rattle, because the duct tape muffled the sound a bit, but alas, I have no hot glue gun at present. My last roll of clear duct tape was less muffling than this new roll of yellow. The whole thing is very unscientific, so play around to find what suits you best.
The result was another quick creation that I hope the new baby will enjoy.
My sewing machine has been limping along, so my projects are all on hold while it gets serviced. I did manage to whip up one last thing before the machine went to the shop: a few gift bags for Christmas using allpeoplequilt.com’s Small Treat Totes pattern. With a finished size of 4″x4″x2″, they’re about perfect (if not almost too large) to house the jewelry I’m giving to my four older nieces, and the little finger puppets for the youngest.
I didn’t stick to the pattern 100%. The main change I made is the fabric layout. The original pattern calls for two fat quarters: a light pattern and a dark pattern. The result is four bags, two with the light pattern featured on the outside top and two with the dark featured.
None of the Christmas-themed fabric I picked up (50% sale at Joann) had small enough patterns to pair with each other, so I chose to use my holiday fabric on the upper outside and interior of the bags, and using a green dot fabric from my stash for the contrast on the bottom of the bags. I paid a very small amount of attention to fussy-cutting some of the exterior panels, but for the most part just cut the required rectangles from strips.
Construction notes
As usual, allpeoplequilt.com provided easy-to-follow directions for the project. They have you construct two panels: the lining, ribbon handle, and outer panel (of the focus piece and contrast). Then, you sew the two panels together, turning it inside out and pressing for the finished bag.
This is one of the panels. In the original pattern, the large piece on the left would be the same fabric as the smallest piece on the right.
In order to have a flat bottom, you fold the corners so that the two corner seams are touching, then press and sew a straight line across, creating a triangle of excess fabric (which you trim off).
View of the corners after pressing and stitching, but before trimming.
One thing that is not clear in the instructions is that you need to do this corner treatment to all four corners. I realized this during construction of the first bag, but decided to not flatten the lining corners for sake of time. It results in a baggy lining with excess fabric on the interior instead of a flat one. It doesn’t affect how the bags look, however.
A finished bag.
Verdict
This is a great quick project that is adaptable for just about any gift or treat-giving occasion.
This is a project where fabric size is important: you will need fat quarters to cut out all the pieces without wasting a ton of fabric. A normal quarter yard cut is not tall enough to fit two of the panels on top of each other. I was working with half-yard pieces that I’d picked up for various other project ideas.
This can also be a great project for scraps—who says you need to cut all the panels out of the same fabric? The pieces needed are: 2 5.5″ x 6.5″; 2 3.5″ x 6.5″; 2 2.5″ x 6.5″. If you can scrounge up those pieces, anything goes, right?
The handles could also be created from the fabrics you use. I grabbed a spool of 75%-off Christmas ribbon. The pattern recommends heavy grossgrain ribbon (which is what I bought), but depending on what you plan on putting in the bags, I don’t see why lighter ribbon wouldn’t work.
An unawesome photo of five treat totes for five awesome nieces.
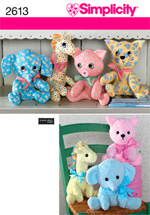
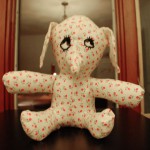
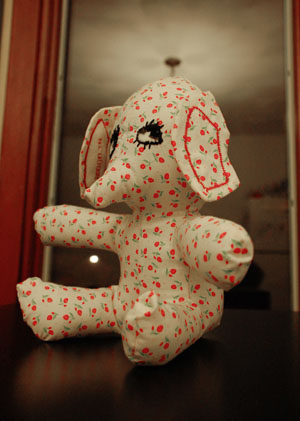
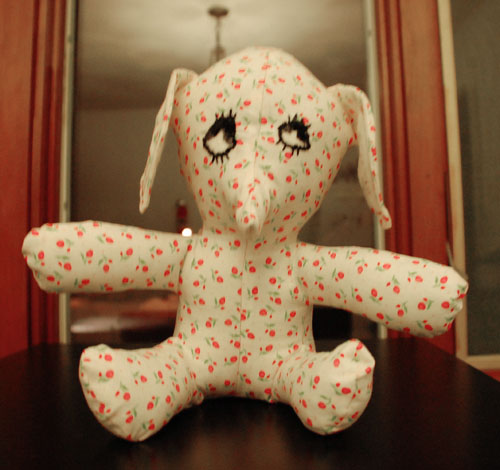
Carl’s sister is expecting a new addition to the family this week, and I wanted to make something personalized for the baby that can still be used as a toy, not just some pretty thing that is never touched. The local fabric store was having a five for $5 sale on Simplicity patterns this weekend, and it was kismet: an adorable Two Pattern Piece Stuffed Animal collection. I think it was the vintage-y calico prints that sold me, but also the simplicity of a two piece pattern, as I’ve never attempted something like this.
The Pattern
Courtesy Simplicity Co.
This pattern set comes with pieces and instructions to make four animals: elephant, cat, giraffe and piglet. I thought the elephant was especially cute with its little trunk, so that was my decision for this project. I have plans to make at least two more in the near future, including grandiose thoughts of modifying the pattern to make a bunny or dog.
Ease of creation
They’re doing the nursery in pink polk-a-dots. However, considering that the father-to-be kept referring to them as “puke-a-dots,” at the shower, I thought this cute rosy calico would be timeless, and it blends with the theme to some extent.
This was an extremely simple pattern to construct. The directions were very clear, and it’s all pretty simple construction. They even do a pretty good approximation of where curves need to be clipped on the diagrams. The biggest issue beginners might have would be sewing the curves (just go very slowly). If worse comes to worst, someone who is having issues with the curves around the corners of the limbs could just make sharper 90° corners.
Total project time: 3.5hrs.
It took about 45 min to cut out the pattern and pin up the seams. The sewing part was actually very quick, and was done within about 15 min (with the exception of the back stuffing hole). The rest of the time was experimenting with/completing the personalization, stuffing, doing the eyes, and sewing up the back by hand.
One thing I don’t understand
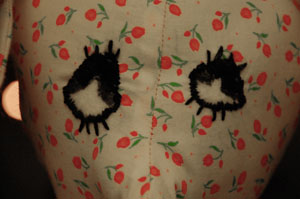
The pattern calls for substitution of “safety eyes” instead of the felt ones if the animal will be used as a toy. I don’t understand why hard little plastic pieces would be preferable to soft, well-attached felt ones. The closest explanation I could come up with is that the felt could easily be ripped off and swallowed, but somehow the hard plastic pieces can’t be (really?).
Since I didn’t like the idea of hard plastic things, I made some modifications. A little non-matching, but it gives it some character
I decided to make the felt ones, but with a modification for safety: rather than making the eyes out of two contrasting pieces of felt that are glued or hand stitched on as called for in the pattern, I used one white circle of felt and created the pupil with hand-sewn black embroidery satin-stitching straight through the felt into the body of the animal. This change ensures that the felt eyes are very securely attached—the baby would have to somehow remove all of the embroidery to get those pieces off. If the parents choose to keep the toy away from the infant in light of this “lack of safety,” my feelings won’t be hurt, however I don’t see how it’d be an issue.
My modifications
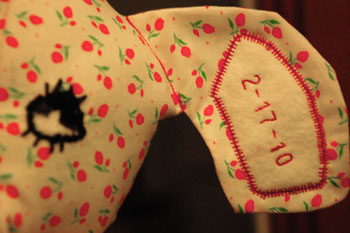
Maybe I’m projecting here—I still have the very first stuffed animal given to me tucked away in a box somewhere. It is a little pink bear that rattles, which my uncle bought in the hospital gift shop. Its name is “Jiggles,” and it wears a t-shirt that says “baby’s first bear.” But regardless of my reasoning, I thought personalizing it would make it a great keepsake. My decision: embroidering her name and birth date on the ears with the simple embroidery functions on my machine. I could do it by hand, but it’s been many years since I tried to do any lettering, so the machine sounded like a good choice. Since they’d already decided 100% on the name, and the baby is scheduled for surgical birth, I can do this and have it ready for the big day.
Personalization
My machine isn’t too advanced, but it will do simple block letters.
In testing (always test these things), I found that the background print on the fabric I chose was a little too busy to allow lettering to show up well, even with a contrasting color. I had some white 100% wool felt remnants leftover from a previous project, and decided to make an insert for the ears with the personalization. This sets off the lettering (the best use I’ve found of it on this machine function so far), and gave a little more interest to the solid patterned toy.
Even though the ears aren’t stuffed according to the design, I choose to leave all stuffing out until after I’d sewn on the ear patches just for sake of easy maneuverability with the machine. The body being stuffed would make it a little more difficult and I had no desire to do it by hand. If you are doing this and don’t have the convenience of knowing the name and date before birth, it is still possible to get everything ready and add the patches afterward, but will likely need to do it by hand. Or, it might make a great meet-the-baby party gift after you know all the details.
Making it More Fun (for the baby)
It doesn’t look too pretty, but it sounds good enough.
The second modification I made was adding a rattle. Annoying to the parents? Perhaps, although I’m sure no where near as annoying as the newer electronic toys are. Endless hours of entertainment for a developing infant? Definitely.
Getting creative here, I used the empty shells of two tea lights with a little rice inside. Completely encasing it with clear duct tape provided a great seal that should stay water-tight if the animal is washed. I added the rattler it to the middle of the body wrapped in a little bit of spare batting I had, and put in the rest of the stuffing around it. It can barely be felt through the stuffing. It’s not loud, but does provide some audible interest.
The Finished Product
Now, I just need more baby nieces and nephews to sew cute things for! This wasn’t the only adorable pattern I bought.
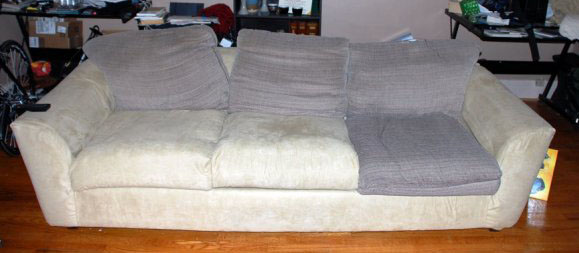
The ultimate impetus for purchasing my new machine was the disastrous crumbling of a gear in my old one midway through the first seam of the new upholstery on our couch. That was six months ago. Somehow, with all of life and my lack of interest in working on the cushions, it’s still not complete. However, I made a promise that I wouldn’t work on any stitchery projects until the couch is done, thus my lack of projects in this section. So, “How’s the couch coming,” you say? Slowly, but surely.
The background. When a dear friend was cleaning out her basement very soon after we’d moved into our new apartment, she offered an aged couch she had down there. Carl had quite the history with this couch, having moved it first into the house when she moved in, and then into the basement when she replaced it with a new living room set. All I knew was that it was far, far comfier than the cheap “click-clak” couch I had from college. So somehow (and I’m really not sure how, given its size) Carl and another friend managed to maneuver all 8’+ of it into our living room.
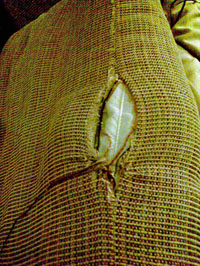
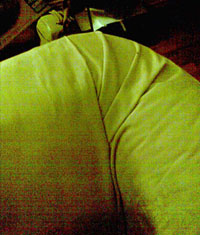
This is one of the worst rips, right on the top of one of the top cushions. I tried sewing it up, but the edges of the fabric were very frayed.
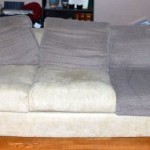
After a year of living with it, some of the small wear spots began to rip, creating sizable holes in some of the cushions. After one of the top cushions tore about halfway across, we decided to just reupholster it. And, rather than make a simple slipcover, we decided to go all the way and almost completely redo it.
Working on the Project
Our decision was admittedly impulsive. The night we decided it’d be nice to do, we headed over to our local JoAnns (the only fabric store around) to see what the possibilities were. Luckily, when it comes to decor, Carl and I are generally on the same page and easily agreed to go with something in the tan/brown/sandy-green color range. While we went to the store with plans to just review the possibilities and make a choice later, we came across a great bargain: 16 yds of tan microsuede upholstery fabric for $6/yd (originally $24)! We decided to make the purchase then and there, especially when a helpful free guide in the store said that it was about the perfect amount for our ~8.5′ long overstuffed monstrosity.
For some reason, I didn’t think to take a photo before we started the process. This is actually about a week in, after we’d covered the base of the couch completely. Note the overstuffed side cushion that will be removed.
We got to work the next night. We decided against removing all of the fabric from the body of the couch, choosing to wrap the new around it to save us from some sure headaches. The biggest obstacle? Choosing how to handle the extremely overstuffed arms, which we removed in preparation for covering the body. Ultimately, we decided to just ditch them instead of trying to incorporate them under the new shell. After removing them, we decided we really liked the lines of the couch without them. There were four pieces:
The back was stapled to the bottom, wrapped over the top and pulled through to the bottom again and stapled.
The two sides were single pieces stapled to the bottom, secured under the back piece, and seamed on the front The fourth side is stuffed under the cushion base. I actually got around to sewing on of those seams by hand. The other is still undone.
The front bottom is a strip sewn to muslin, the latter of which serves as the cushion base. This piece was stapled to the bottom front and pulled through under the back, then stapled there as well.
The staple gun really was our friend.
Modifications were made to the corners to save having to sew a very difficult seam. Apologies for the horrible color from my phone camera.
Covering the body went pretty smoothly. I did make the executive decision to cut one corner—or not, as it were: rather than shape it to the back of the couch, we did some creative tucking. It’s not as clean-lined as it could be, but it would have been a very difficult seam to create. The front of the arms, however, I chose to sew, which was where my old machine broke.
The second major change was made with the bottom cushions. Originally, they were multi-sectioned—a base latex block section was topped by a second smaller cushion in its own zippered compartment. My procrastination actually benefited us here: originally we decided to ditch the top section, partially because I had no desire to recreate the multiple compartments. However, after taking the first cushion apart and being lazy about making the new cover, we threw the latex block, loosely covered in fabric on the couch when company came over. After a few weeks, we decided that the extra padding really was more comfortable. Final decision: stack them in the same compartment creating a smoother silhouette with the same comfort.
Eventually, after more procrastination, I created a muslin of the new cushion cover, and have managed to sew up two finals so far.
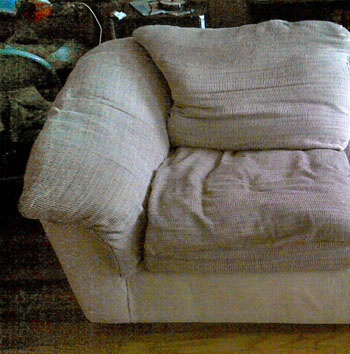
Here is how it stands today. The middle cushion was the first. The stuffing needs to be adjusted a little.
What’s Left?
As you can see from the second photo, we’re a little over half done. There’s still a final bottom cushion to go, and all three of the back ones.
The biggest change? We’ve chosen to completely redo the top cushions with new stuffing. We still haven’t decided exactly how to shape them. Mostly likely they’ll be large squares. We definitely won’t be making them side-specific as the current ones are.
Once the cushions are complete, depending on the amount of fabric leftover, I’ll likely whip up a few extra throw pillows. The biggest downside to removing the pillows on the arms is that they’re a little uncomfortable to lean against.
And someday, in the far future, I’ll get around to sewing the back and front bottom seams on the body. Right now, they’re just craft glued, but as you can see in the second photo on the bottom left side where it is puckered, the seam has come loose and needs to be pushed back together a bit.