To be a bit cliché, this shoemaker is a professional Web Developer and her child is this blog, but it was past time to launch what I have of a new design. All the content is still here, everything else is a work in progress (kind of like most of my sewing projects)!
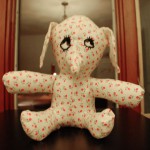
There must be something in the water at Carl’s company, because many of his coworkers have become or are becoming parents recently. I made one of these elephants in the craziness of the week before Christmas, but forgot to take photos.
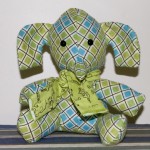
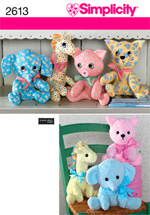
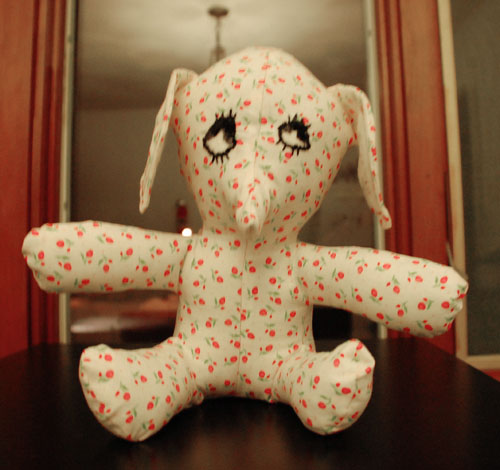
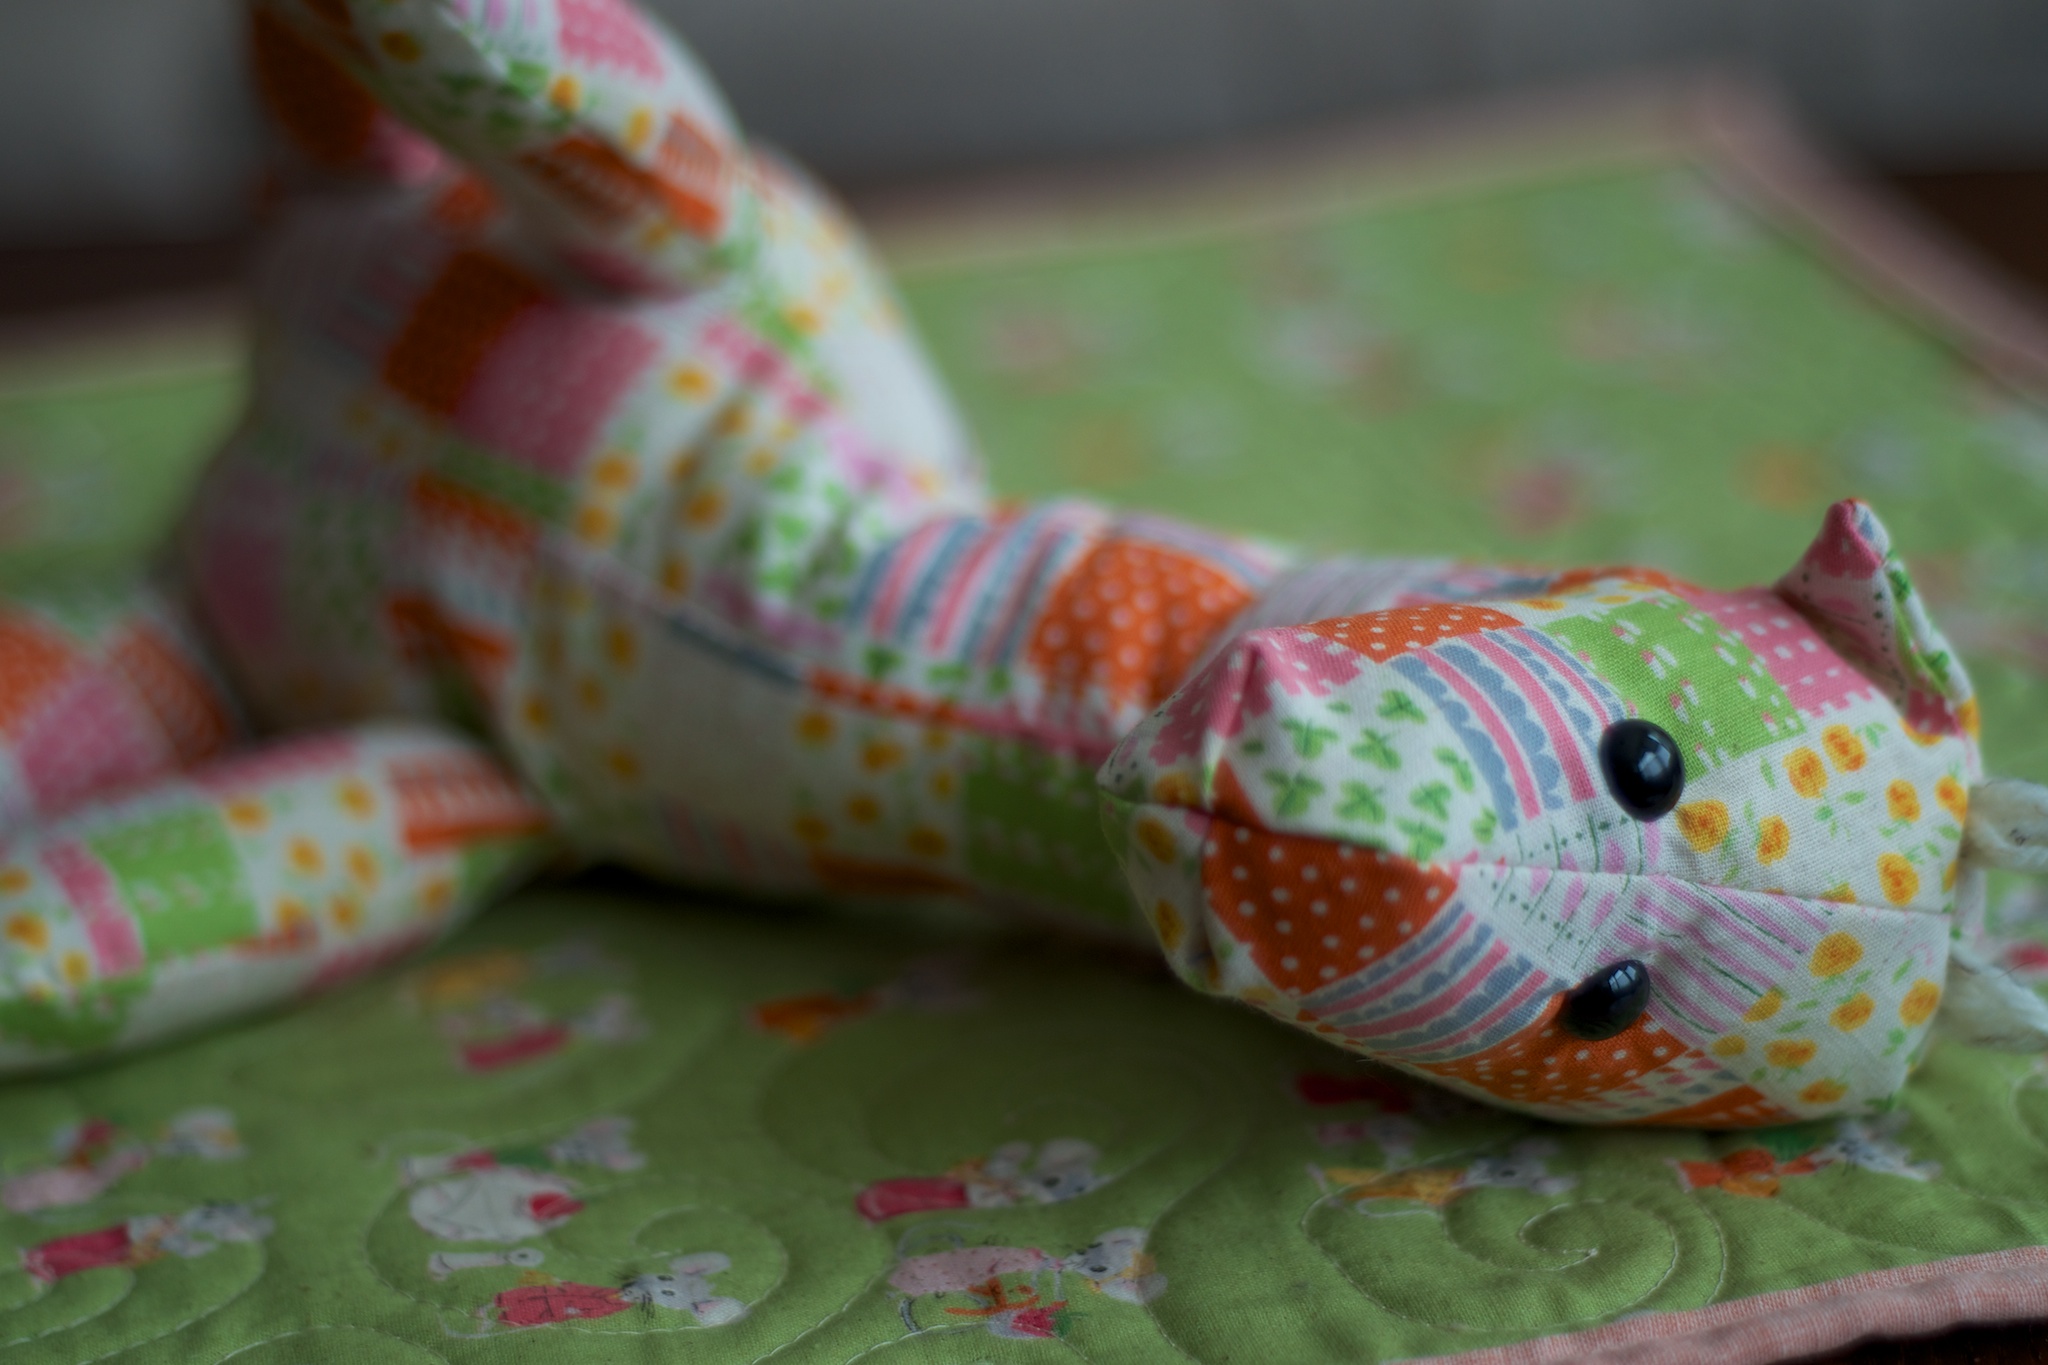
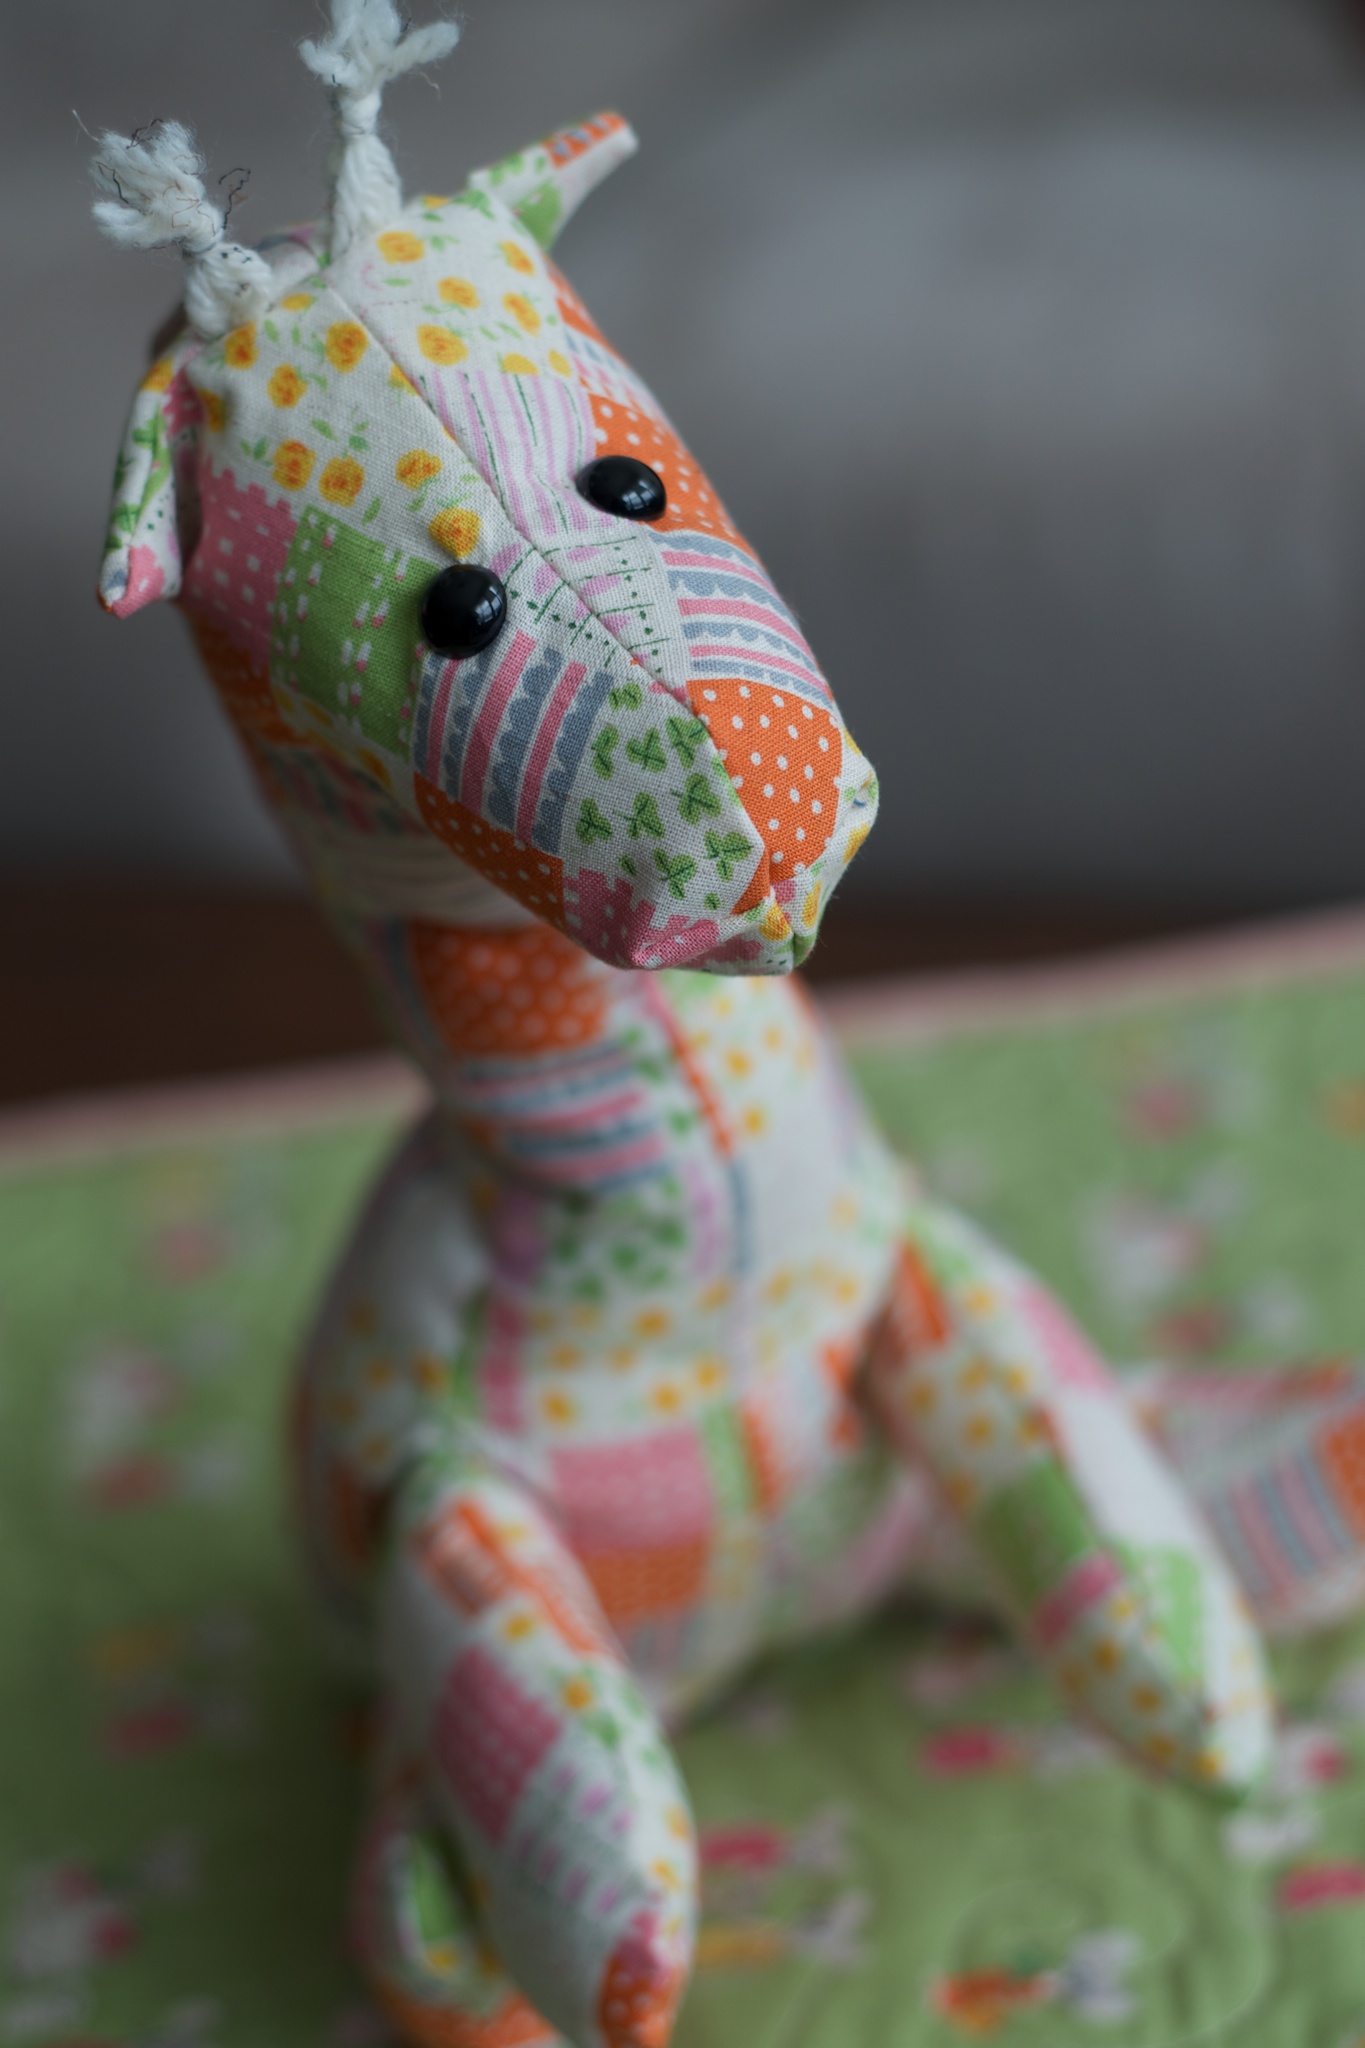
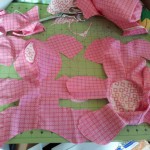
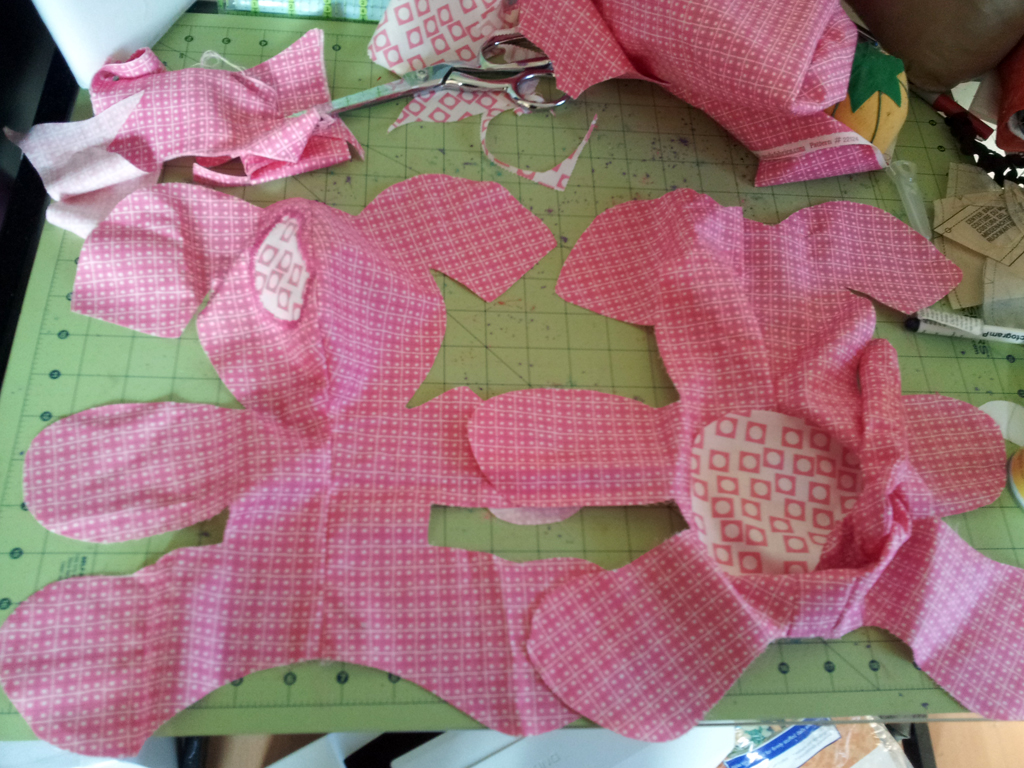
Carl’s sister is expecting a new addition to the family this week, and I wanted to make something personalized for the baby that can still be used as a toy, not just some pretty thing that is never touched. The local fabric store was having a five for $5 sale on Simplicity patterns this weekend, and it was kismet: an adorable Two Pattern Piece Stuffed Animal collection. I think it was the vintage-y calico prints that sold me, but also the simplicity of a two piece pattern, as I’ve never attempted something like this.
The Pattern
Courtesy Simplicity Co.
This pattern set comes with pieces and instructions to make four animals: elephant, cat, giraffe and piglet. I thought the elephant was especially cute with its little trunk, so that was my decision for this project. I have plans to make at least two more in the near future, including grandiose thoughts of modifying the pattern to make a bunny or dog.
Ease of creation
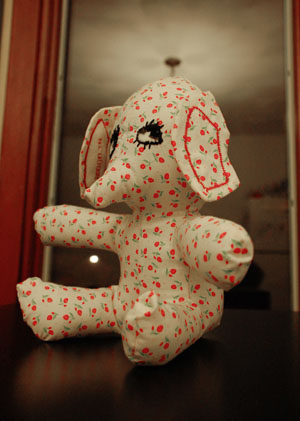
They’re doing the nursery in pink polk-a-dots. However, considering that the father-to-be kept referring to them as “puke-a-dots,” at the shower, I thought this cute rosy calico would be timeless, and it blends with the theme to some extent.
This was an extremely simple pattern to construct. The directions were very clear, and it’s all pretty simple construction. They even do a pretty good approximation of where curves need to be clipped on the diagrams. The biggest issue beginners might have would be sewing the curves (just go very slowly). If worse comes to worst, someone who is having issues with the curves around the corners of the limbs could just make sharper 90° corners.
Total project time: 3.5hrs.
It took about 45 min to cut out the pattern and pin up the seams. The sewing part was actually very quick, and was done within about 15 min (with the exception of the back stuffing hole). The rest of the time was experimenting with/completing the personalization, stuffing, doing the eyes, and sewing up the back by hand.
One thing I don’t understand
The pattern calls for substitution of “safety eyes” instead of the felt ones if the animal will be used as a toy. I don’t understand why hard little plastic pieces would be preferable to soft, well-attached felt ones. The closest explanation I could come up with is that the felt could easily be ripped off and swallowed, but somehow the hard plastic pieces can’t be (really?).
Since I didn’t like the idea of hard plastic things, I made some modifications. A little non-matching, but it gives it some character
I decided to make the felt ones, but with a modification for safety: rather than making the eyes out of two contrasting pieces of felt that are glued or hand stitched on as called for in the pattern, I used one white circle of felt and created the pupil with hand-sewn black embroidery satin-stitching straight through the felt into the body of the animal. This change ensures that the felt eyes are very securely attached—the baby would have to somehow remove all of the embroidery to get those pieces off. If the parents choose to keep the toy away from the infant in light of this “lack of safety,” my feelings won’t be hurt, however I don’t see how it’d be an issue.
My modifications
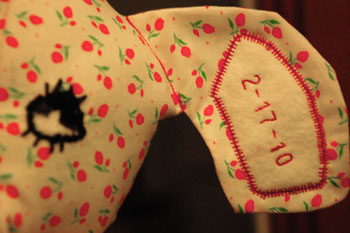
Maybe I’m projecting here—I still have the very first stuffed animal given to me tucked away in a box somewhere. It is a little pink bear that rattles, which my uncle bought in the hospital gift shop. Its name is “Jiggles,” and it wears a t-shirt that says “baby’s first bear.” But regardless of my reasoning, I thought personalizing it would make it a great keepsake. My decision: embroidering her name and birth date on the ears with the simple embroidery functions on my machine. I could do it by hand, but it’s been many years since I tried to do any lettering, so the machine sounded like a good choice. Since they’d already decided 100% on the name, and the baby is scheduled for surgical birth, I can do this and have it ready for the big day.
Personalization
My machine isn’t too advanced, but it will do simple block letters.
In testing (always test these things), I found that the background print on the fabric I chose was a little too busy to allow lettering to show up well, even with a contrasting color. I had some white 100% wool felt remnants leftover from a previous project, and decided to make an insert for the ears with the personalization. This sets off the lettering (the best use I’ve found of it on this machine function so far), and gave a little more interest to the solid patterned toy.
Even though the ears aren’t stuffed according to the design, I choose to leave all stuffing out until after I’d sewn on the ear patches just for sake of easy maneuverability with the machine. The body being stuffed would make it a little more difficult and I had no desire to do it by hand. If you are doing this and don’t have the convenience of knowing the name and date before birth, it is still possible to get everything ready and add the patches afterward, but will likely need to do it by hand. Or, it might make a great meet-the-baby party gift after you know all the details.
Making it More Fun (for the baby)
It doesn’t look too pretty, but it sounds good enough.
The second modification I made was adding a rattle. Annoying to the parents? Perhaps, although I’m sure no where near as annoying as the newer electronic toys are. Endless hours of entertainment for a developing infant? Definitely.
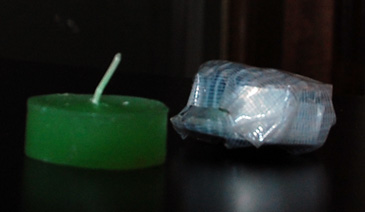
Getting creative here, I used the empty shells of two tea lights with a little rice inside. Completely encasing it with clear duct tape provided a great seal that should stay water-tight if the animal is washed. I added the rattler it to the middle of the body wrapped in a little bit of spare batting I had, and put in the rest of the stuffing around it. It can barely be felt through the stuffing. It’s not loud, but does provide some audible interest.
The Finished Product
Now, I just need more baby nieces and nephews to sew cute things for! This wasn’t the only adorable pattern I bought.
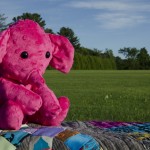
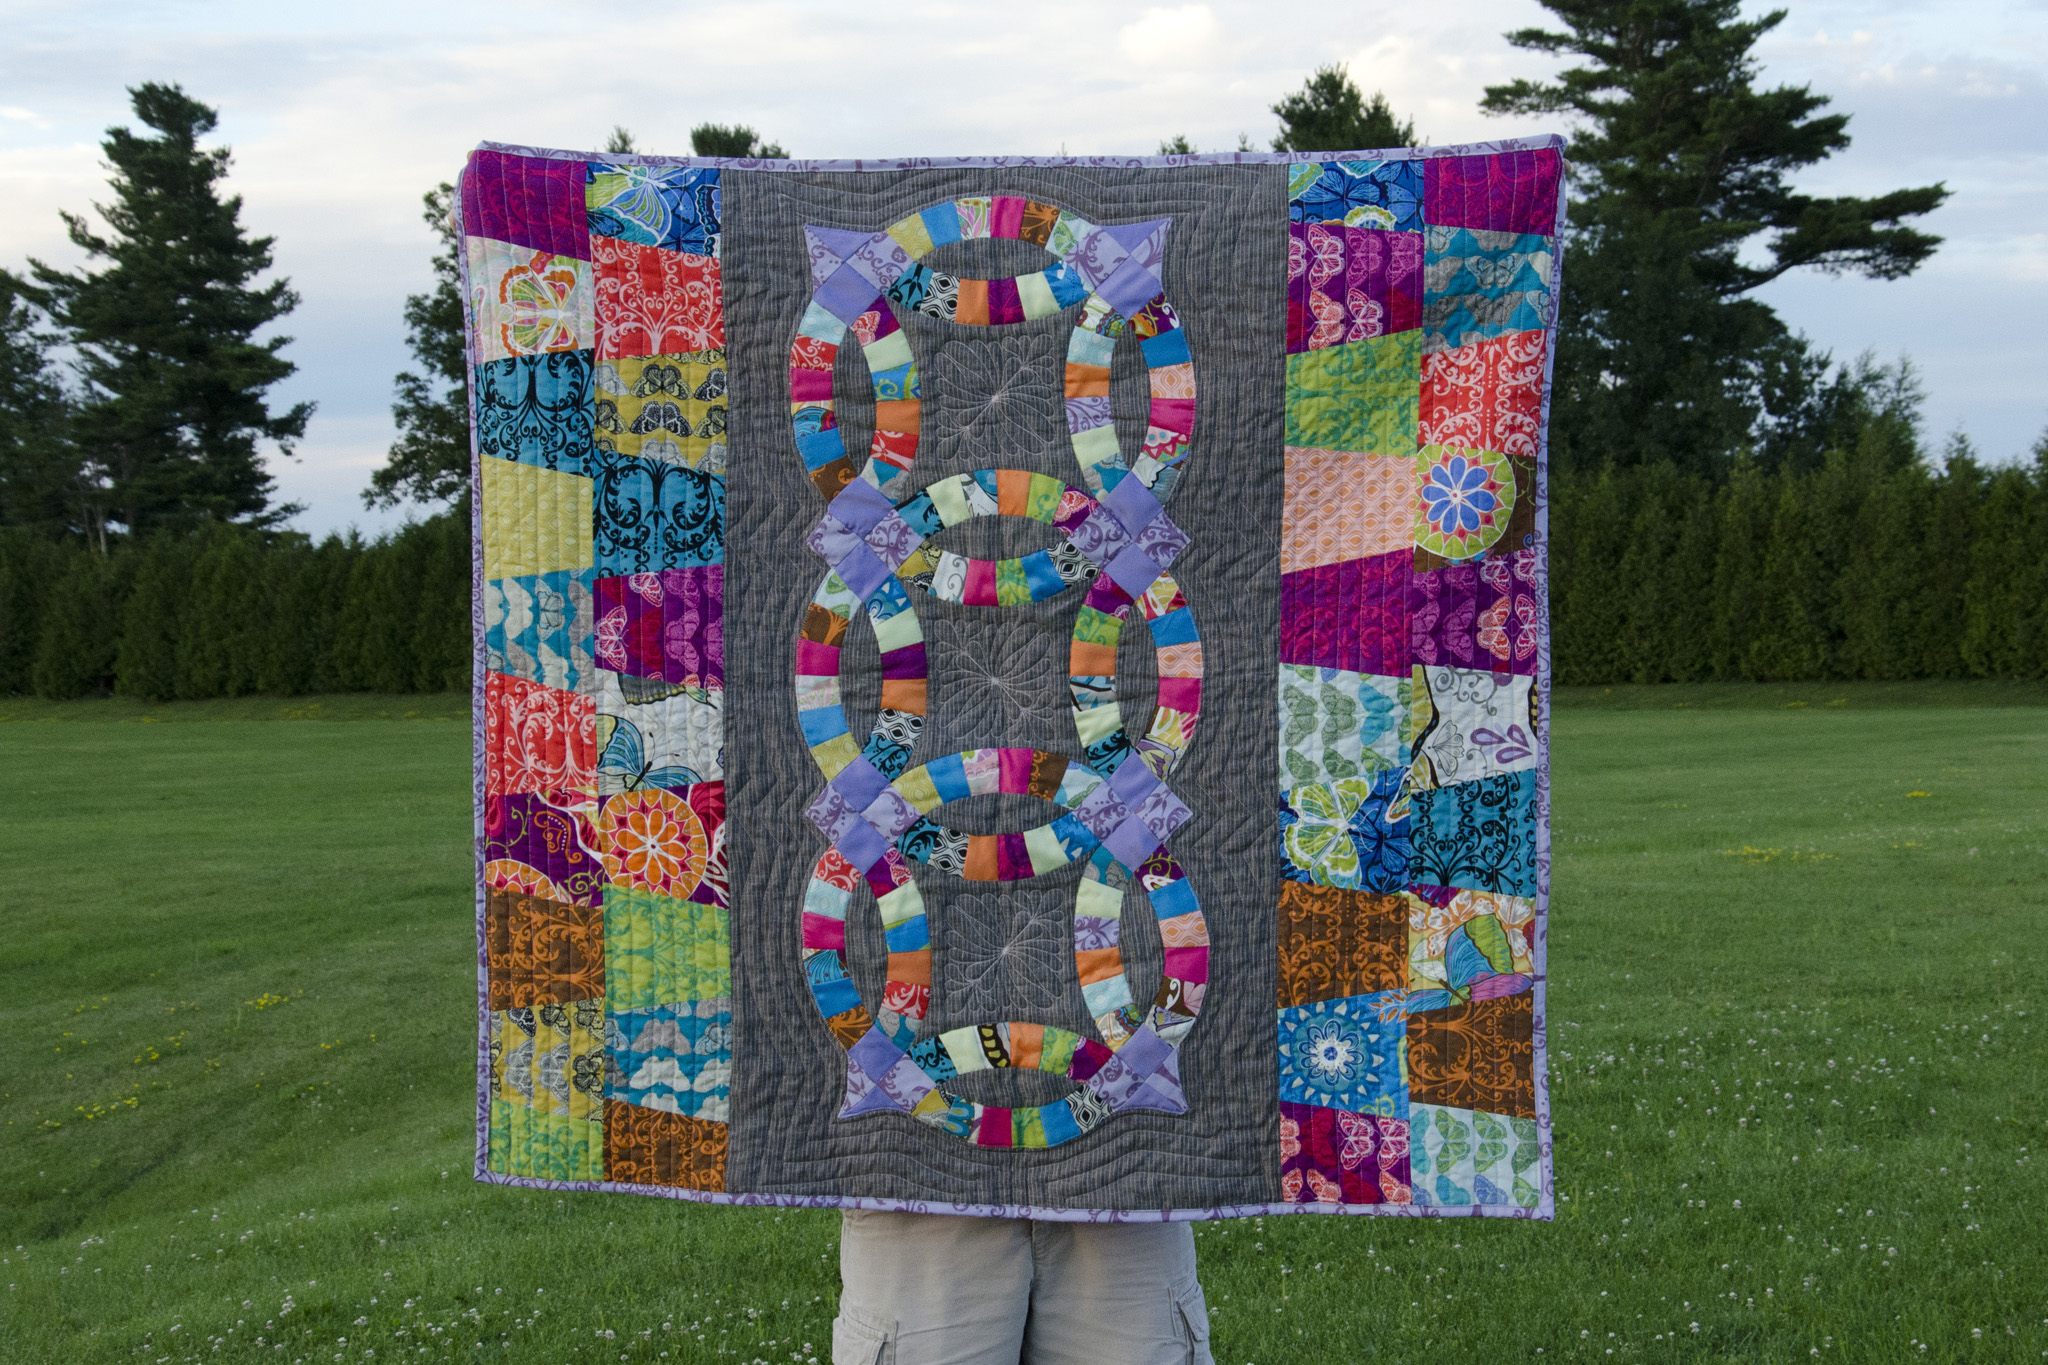
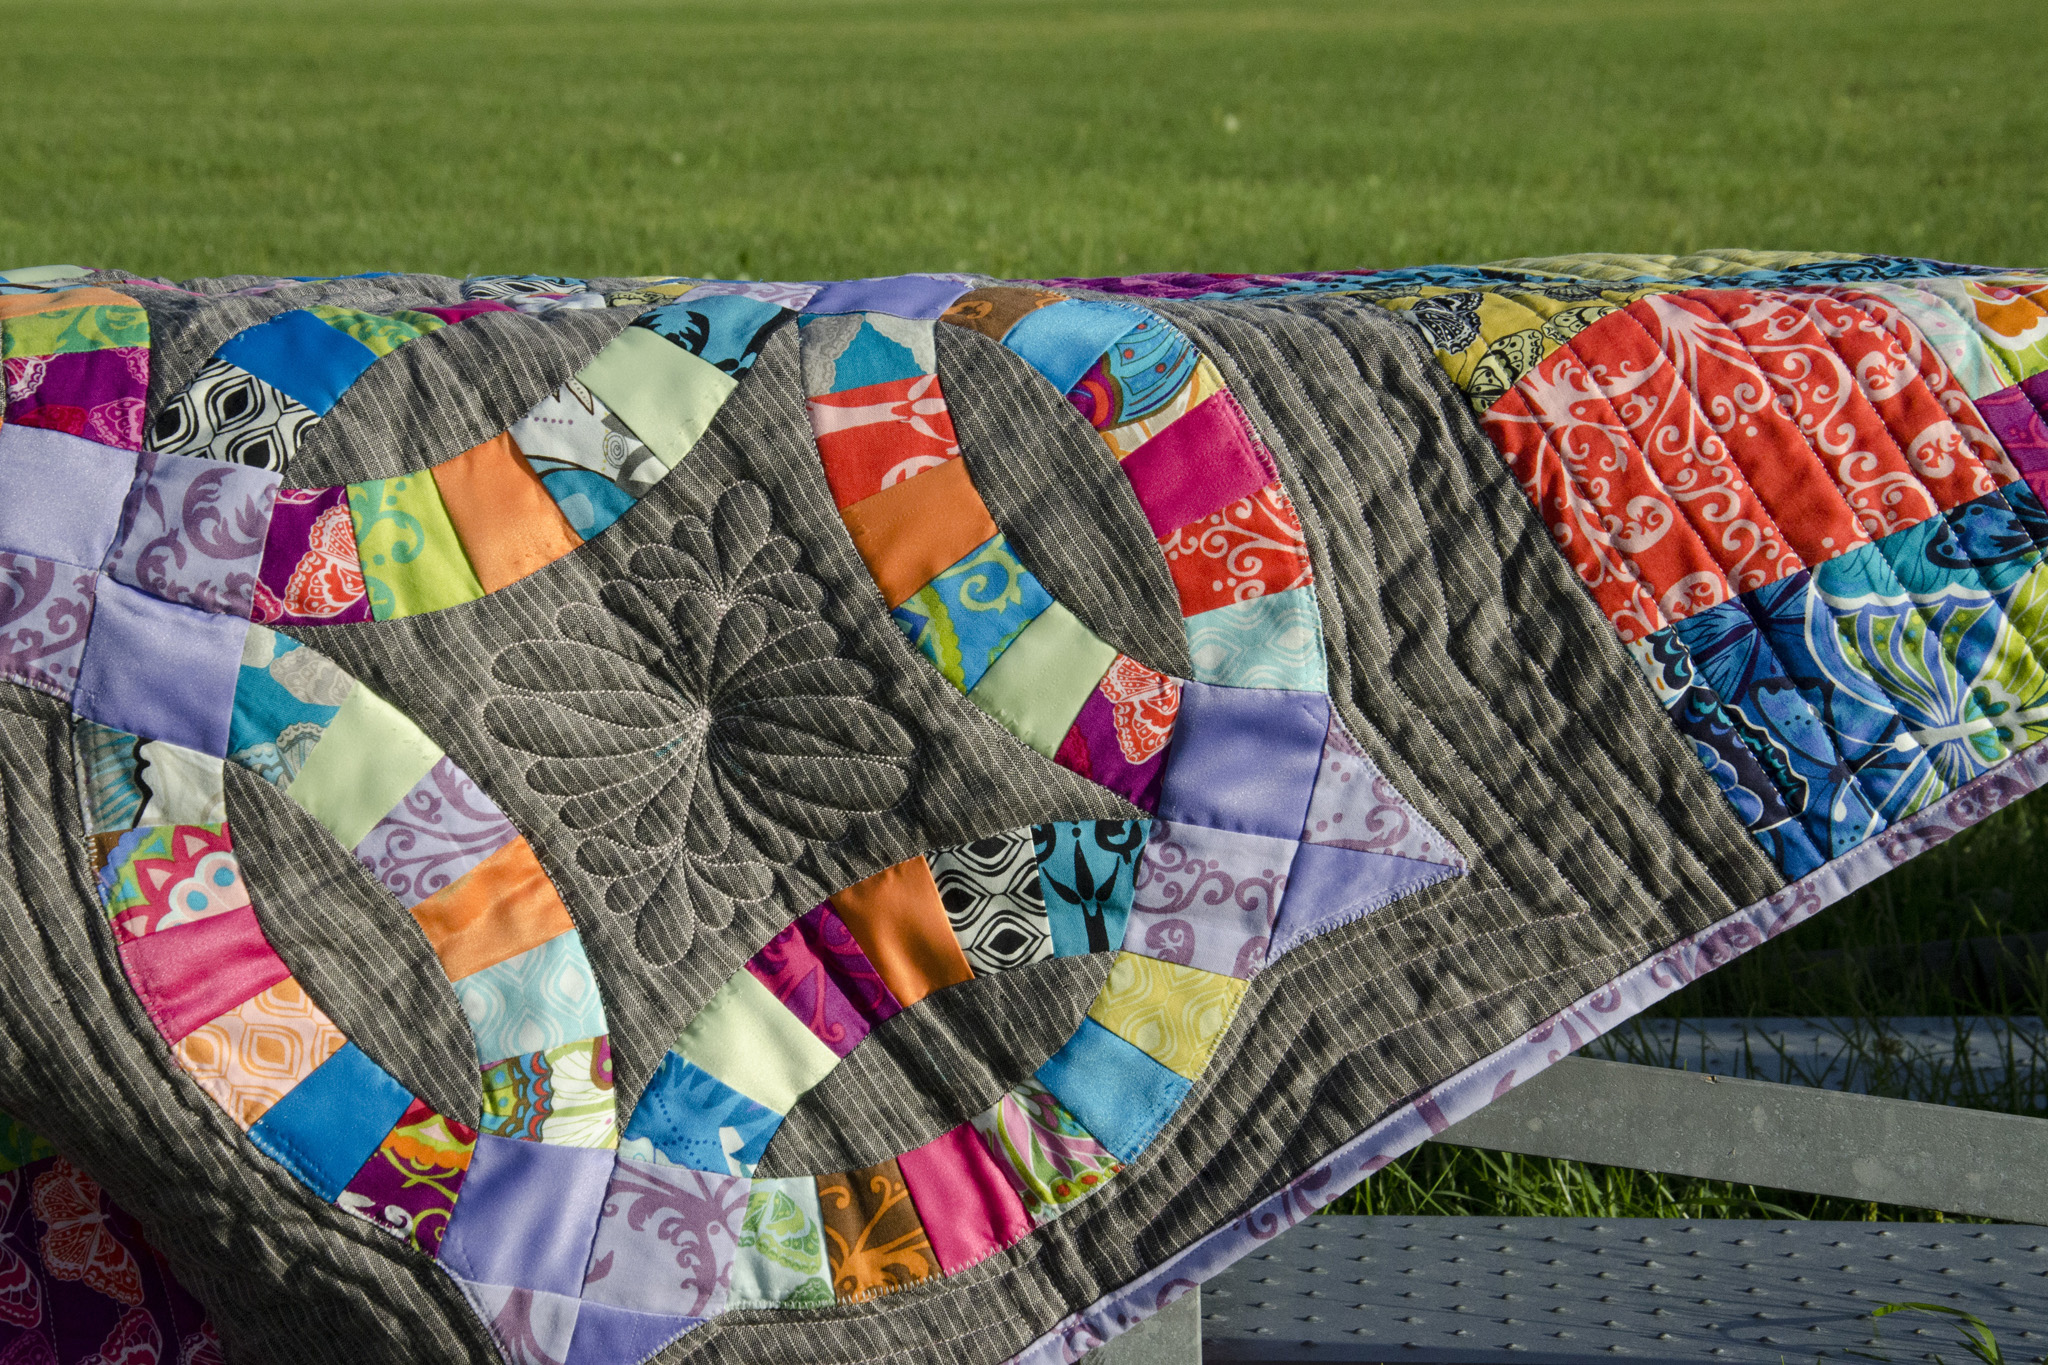
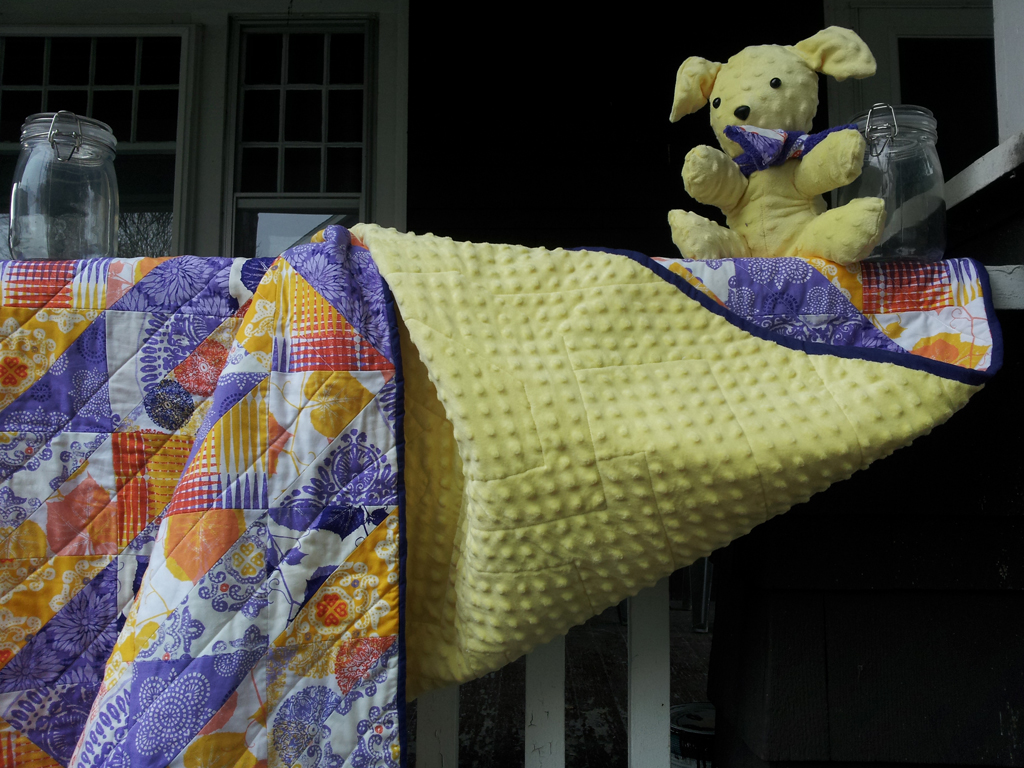
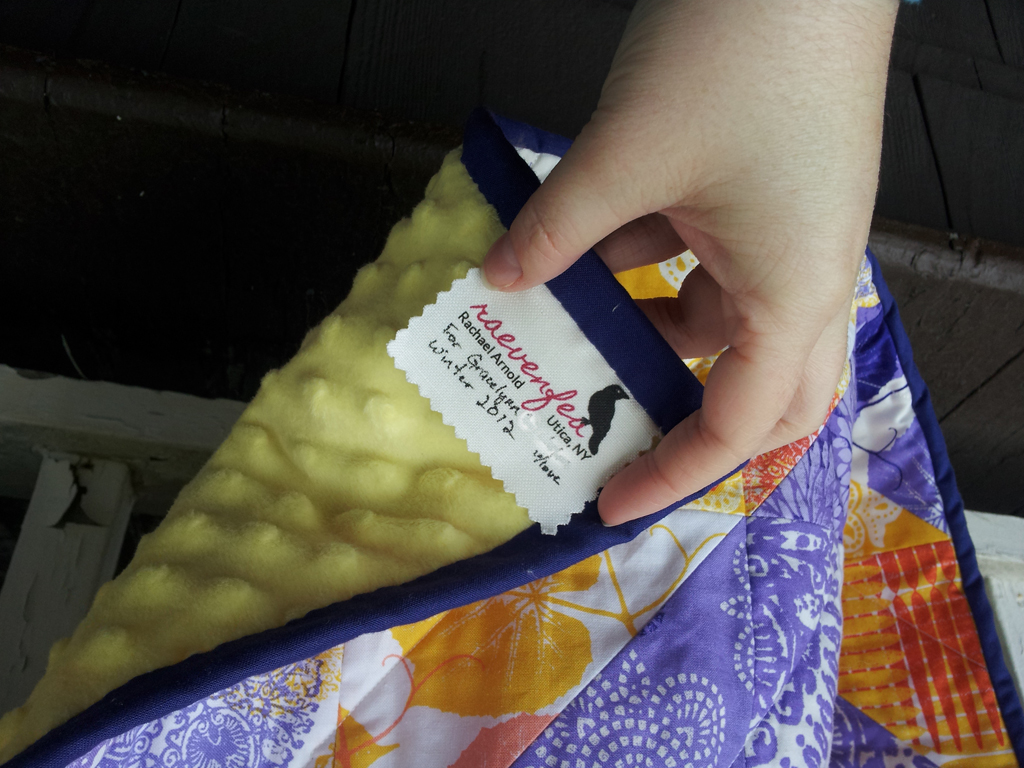
I started a double wedding ring quilt in the summer of 2012 as part of a local quilting group in Utica. At the time, I was still enamored with using all types of fabric for quilting, so I paired some Valorie Wells Cocoon with poly satin and a linen blend. After finishing three rings from a Double Wedding Ring pattern published by Free Spirit, I decided that was enough of that plan, and packed it all away. When I needed a baby quilt for another little girl this summer, I had the perfect excuse to pull it back out and cobble a new design together.
“Jewelry Box”, Rachael Arnold, July 2016, 43”x41”.
In addition to the three finished rings, the storage box contained a yard of a purple print, a yard of the butterflies print, two 6″ charm packs, a fair number of other charm squares cut into fourths, a quarter yard each of the five poly satins, and a ton of the linen blend. If I recall correctly, once I’d given up on doing an all-over double wedding ring quilt, I decided to do a somewhat complicated (and large) medallion quilt with the leftovers, but then put that off as well. This time around, I wanted something simple and baby-sized. Her sisters were recipients of the Impressions Baby Quilt (coincidentally started around the same time as this DWR) and Noble Blooms, both of which were around 40-45″ to a side, so that’s what I aimed for here as well. The length was easy—the rings were 40″ long—so I just had to worry about width.
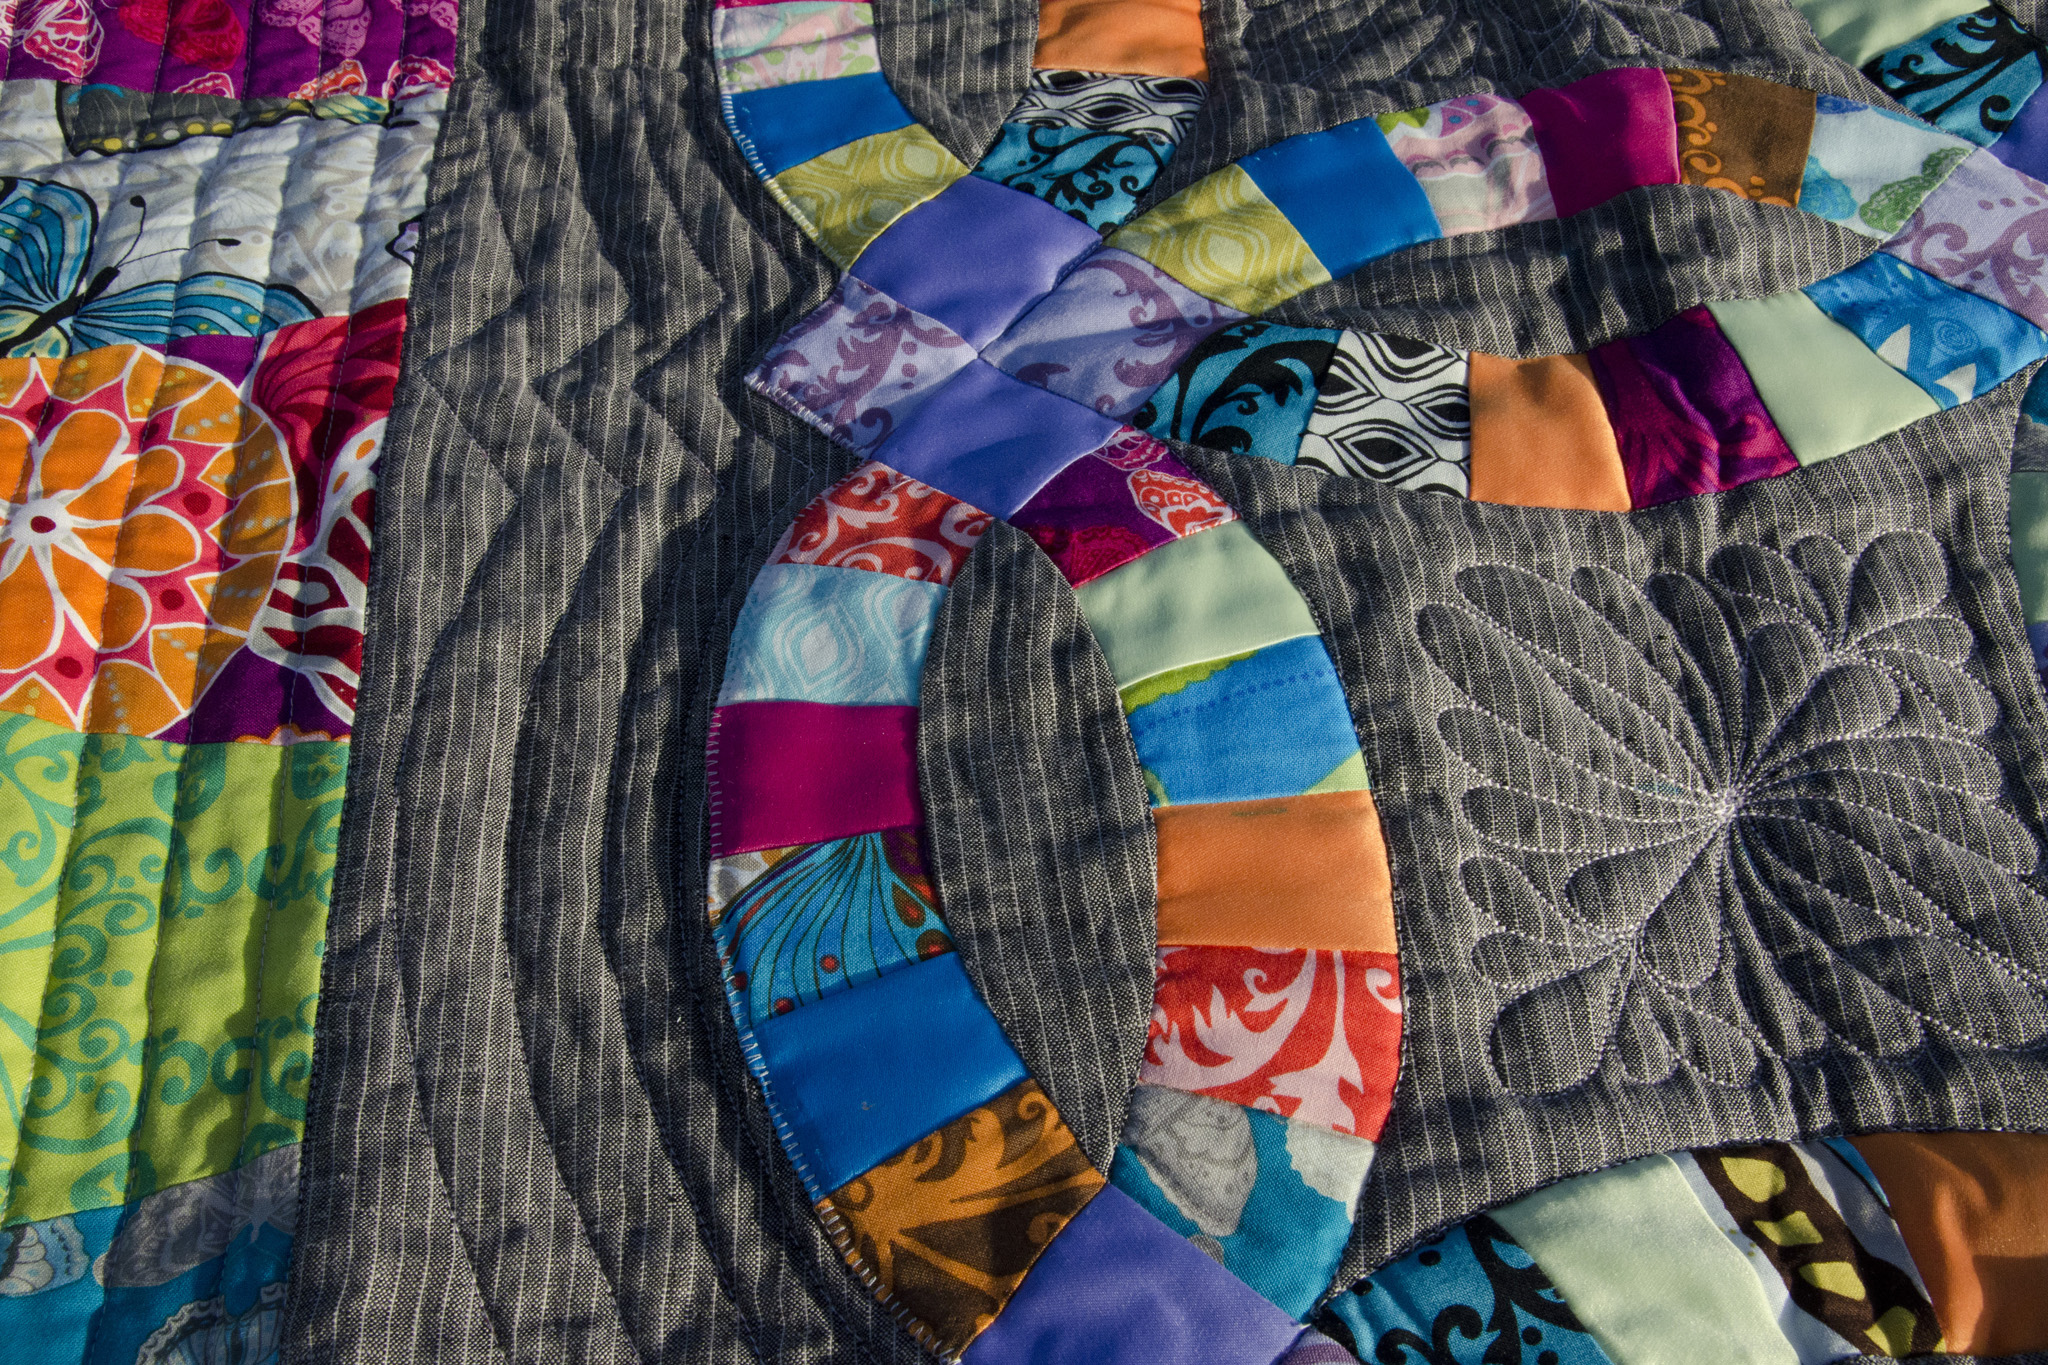
“Jewelry Box” (detail), Rachael Arnold, July 2016, 43”x41”.
After thinking about it for a couple of days, I decided columns of charms on either side of the centered ring applique strip would work well to finish this off. To tie it in to the shapes in the rings, I sliced off the edges of the charms at an angle for a trapezoid shape, which still stacks well if you flip them around back and forth. I meant to have the strips on the edges be reversed (long edge of trapezoid to long edge), but pieced them incorrectly. I decided to leave them as is. I could have paid better attention to pattern placement within the strips as well, but in this case done is better than perfect.
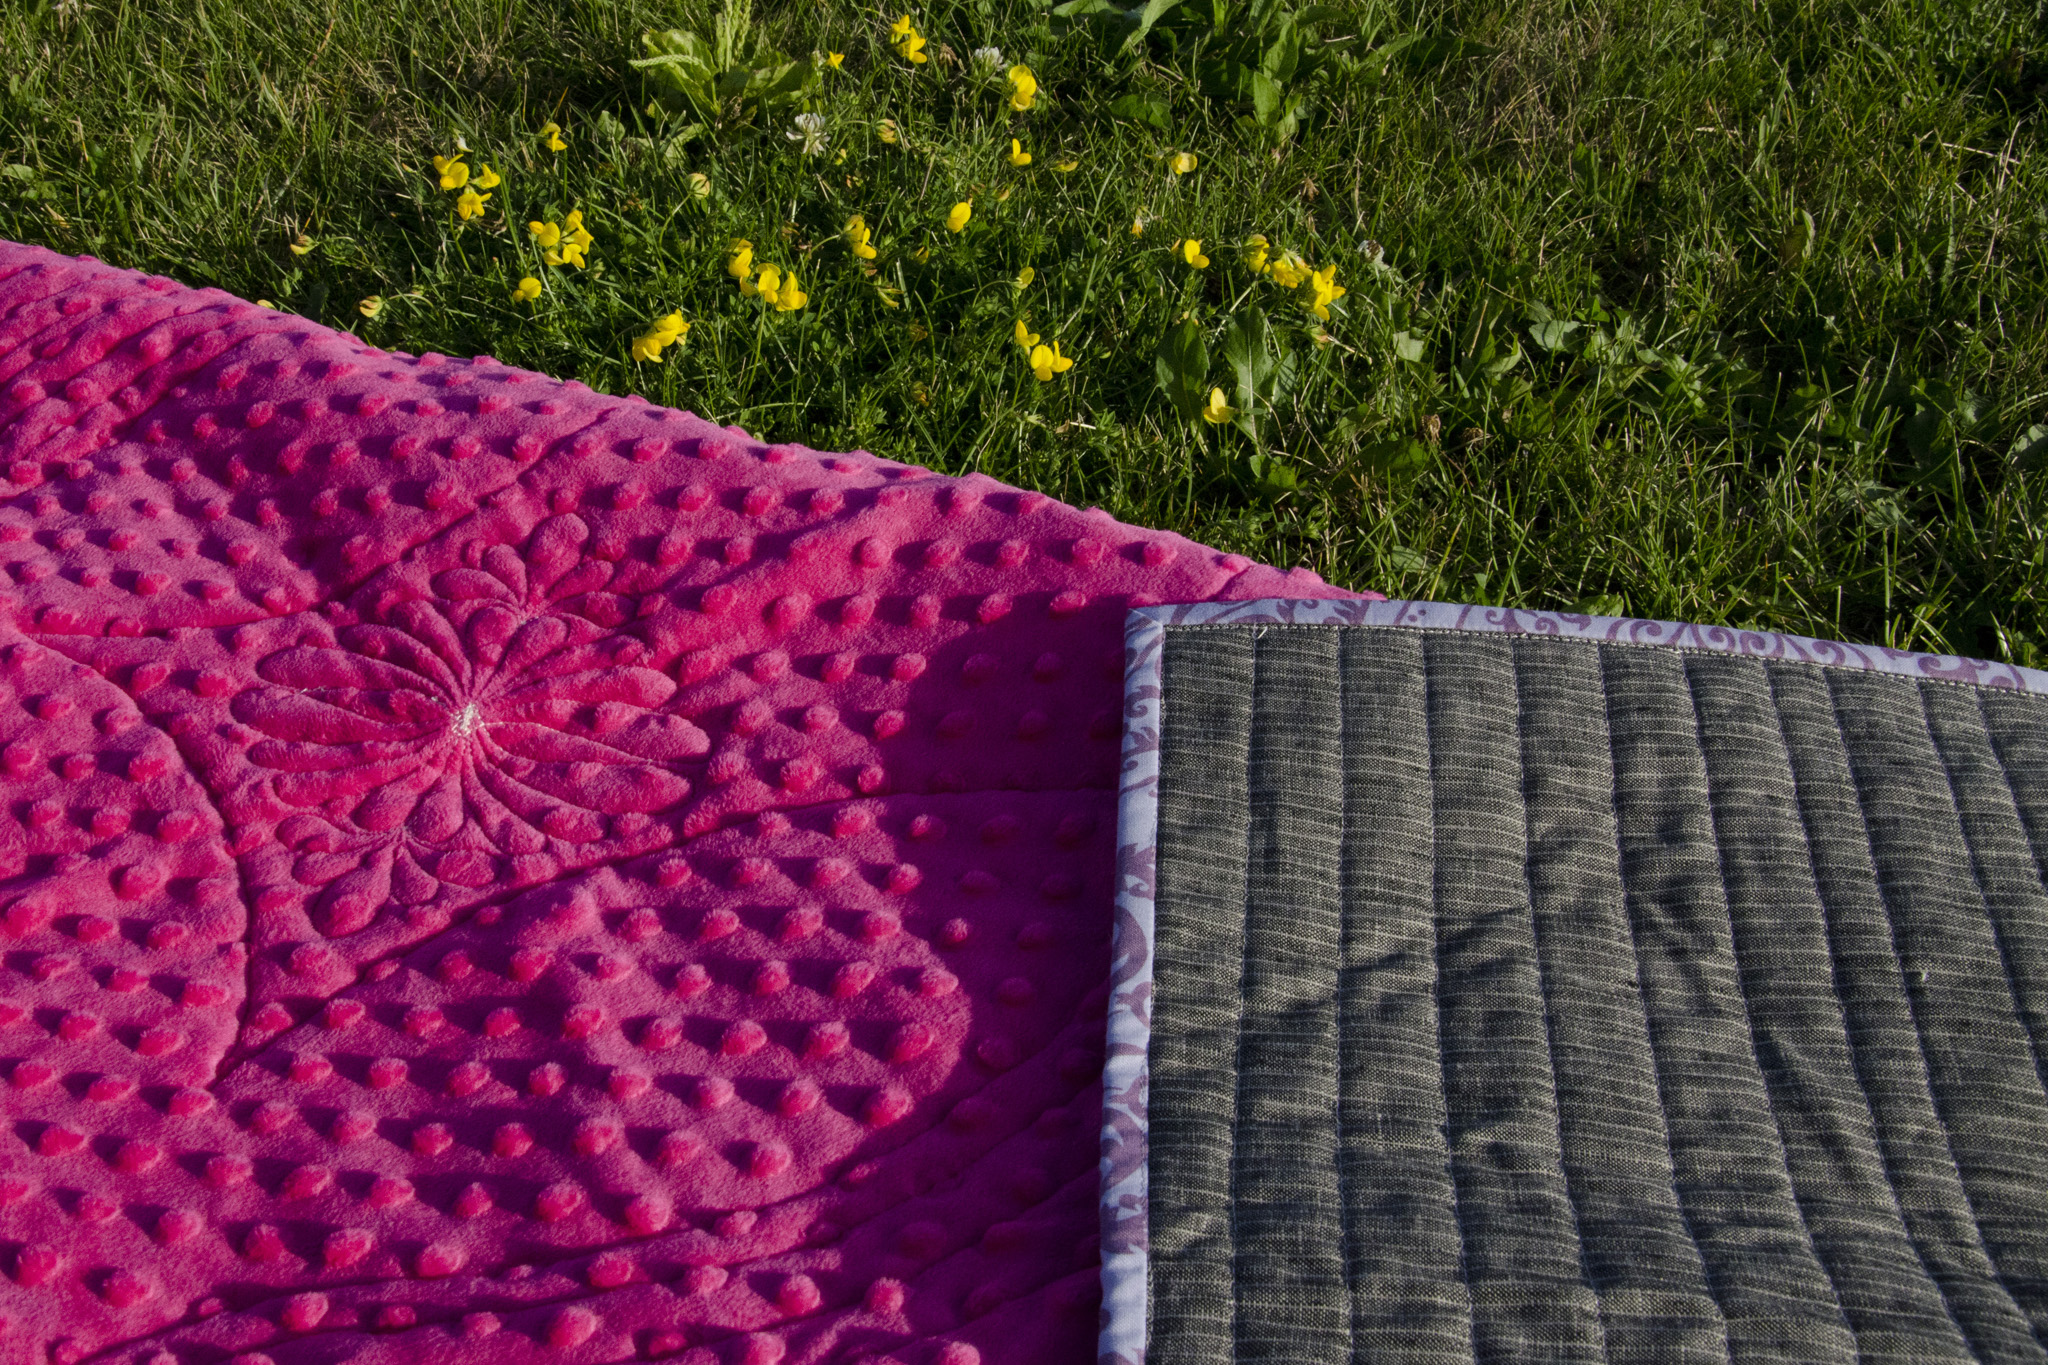
“Jewelry Box” (back), Rachael Arnold, July 2016, 43”x41”.
It’s backed with a dimpled cuddle fabric—I wanted to be consistent with her sisters’ quilts rather than use the cotton yardage I had leftover. In between is Soft ‘n Crafty 80/20. The rings are a bit loftier because they’d already been quilted to a layer of batting back in 2012.
“Jewelry Box” (detail), Rachael Arnold, July 2016, 43”x41”.
Most of the quilting is straight line (and echoes of the rings). In the center of each ring, I used a machine embroidery quilting design for feathers. It looks okay on the front, but I’m a bit unhappy with the back of those sections due to the heaviness in the center. I considered much more intricate quilting, but didn’t want to squish the cuddle background too much. I used a pale pink Aurifil for all the quilting—it’s a nice contrast in the grey areas, and blends well into the colorful parts. (Also in the box of supplies—color matched rayon embroidery threads I’d intended to quilt with—those definitely wouldn’t have held up to use!) It’s machine bound in the purple yardage I had from the line.
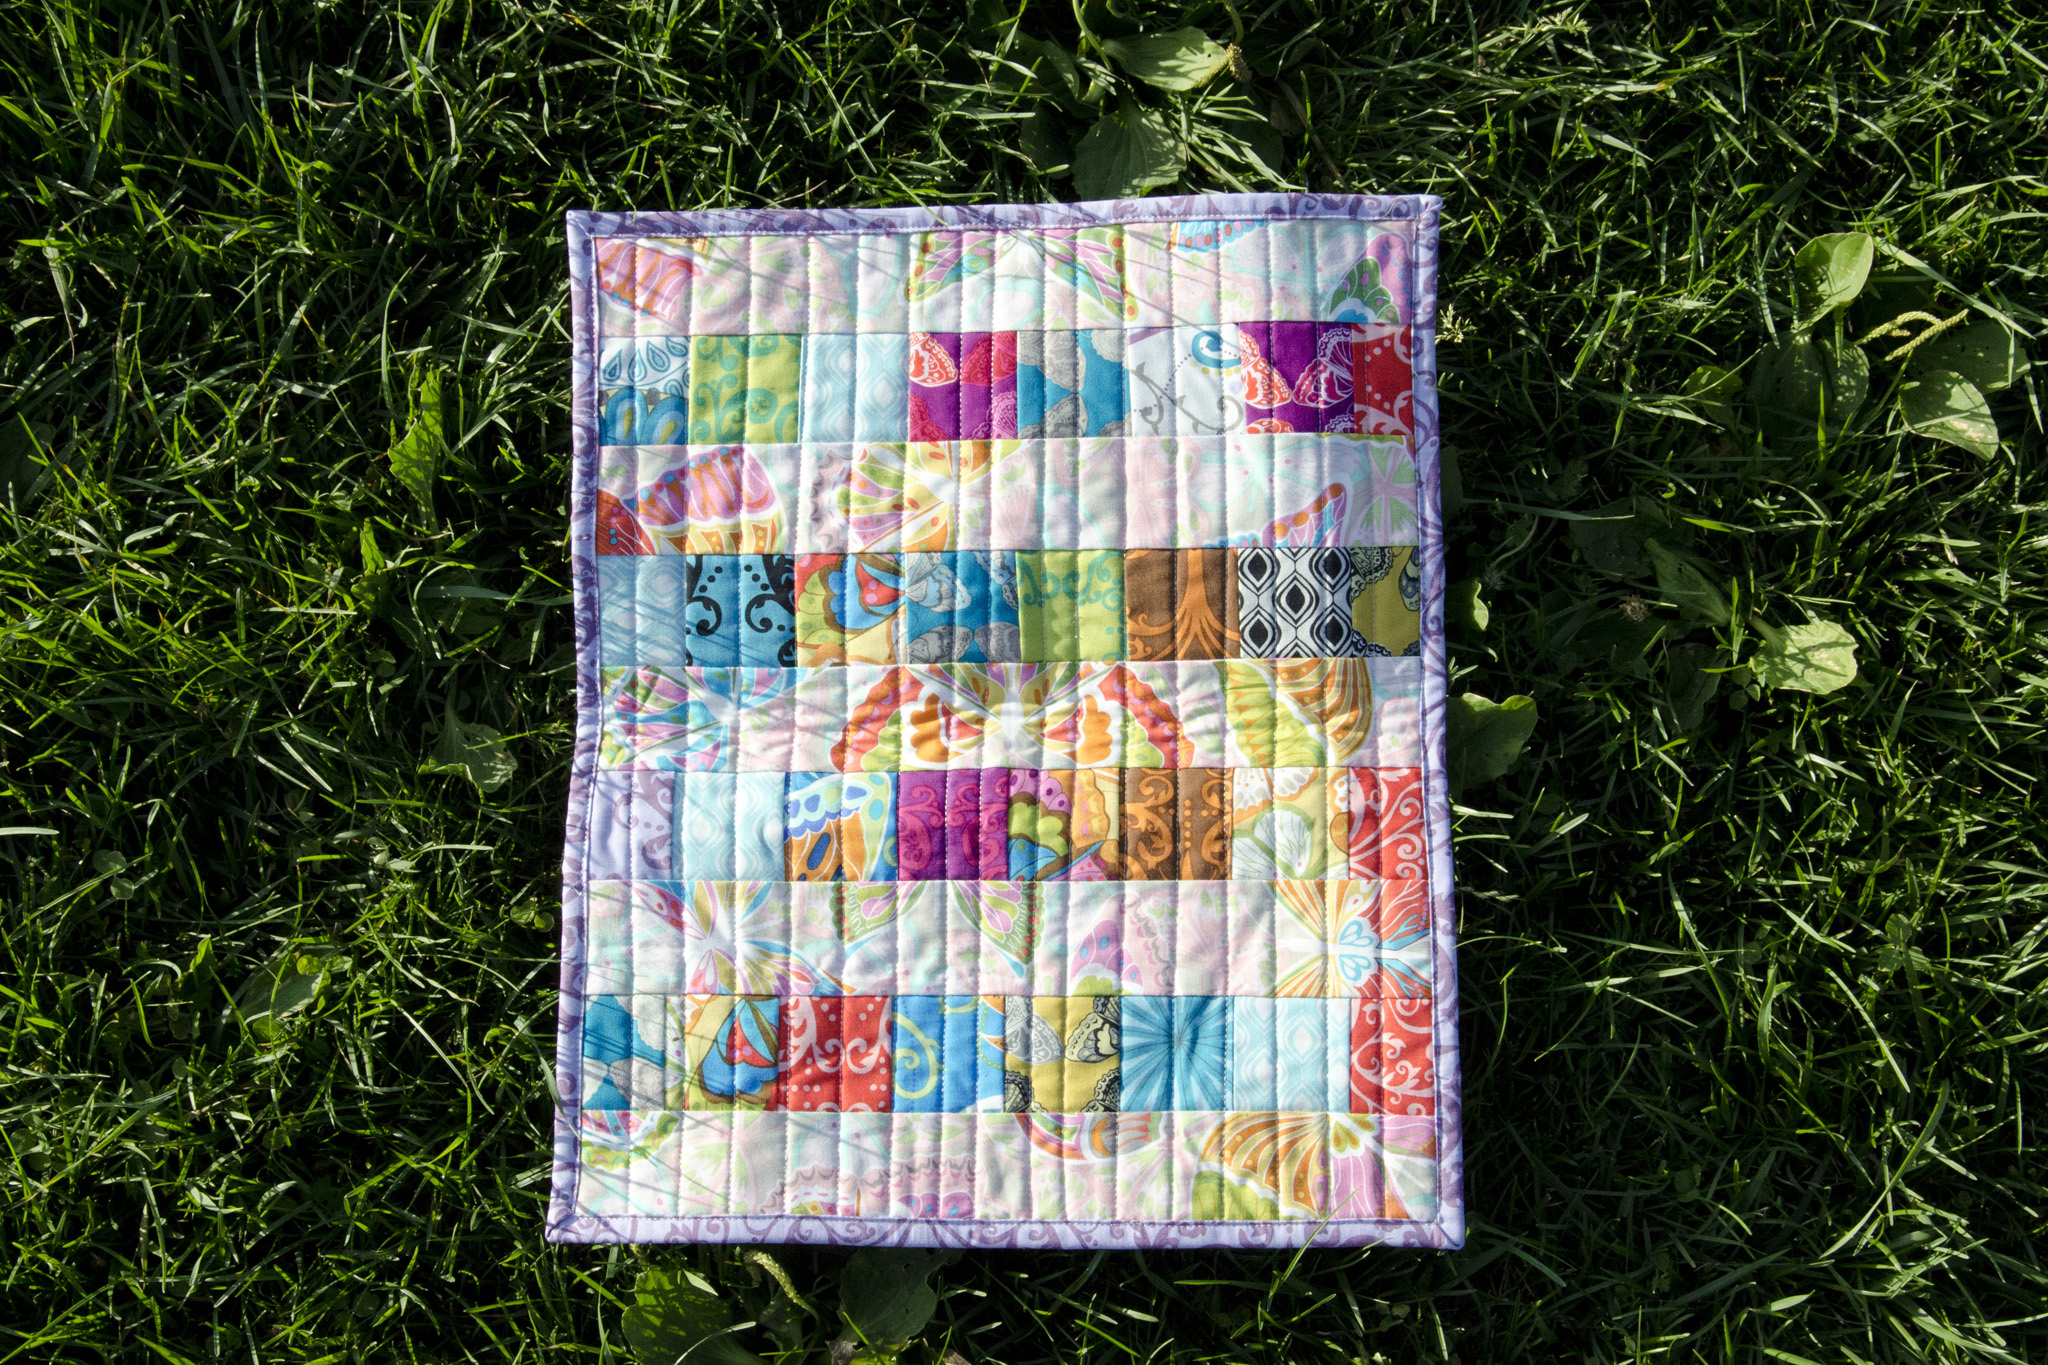
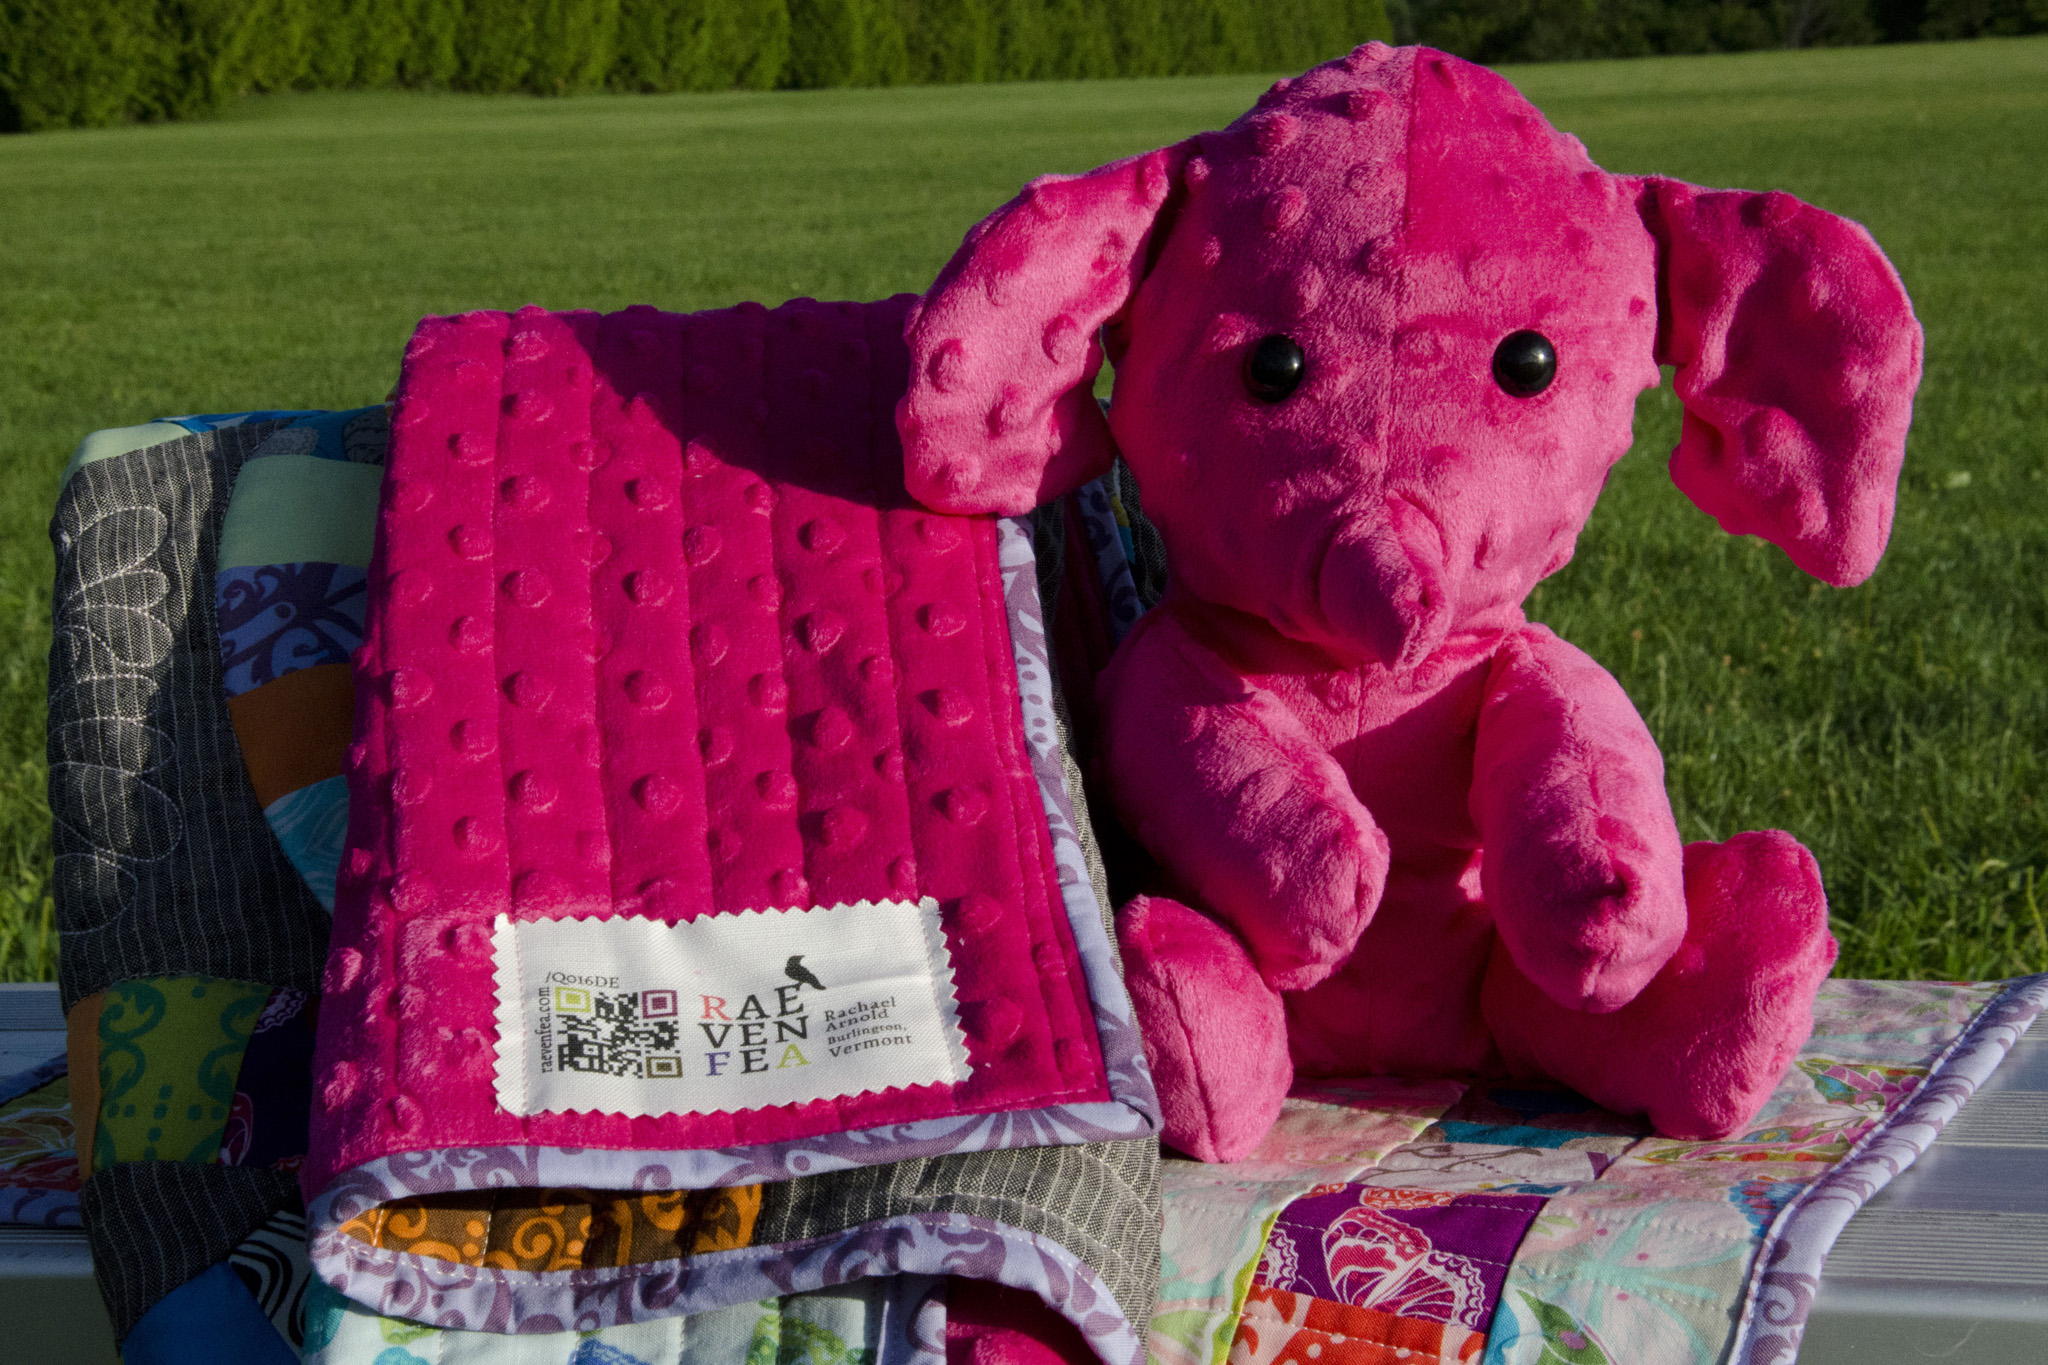
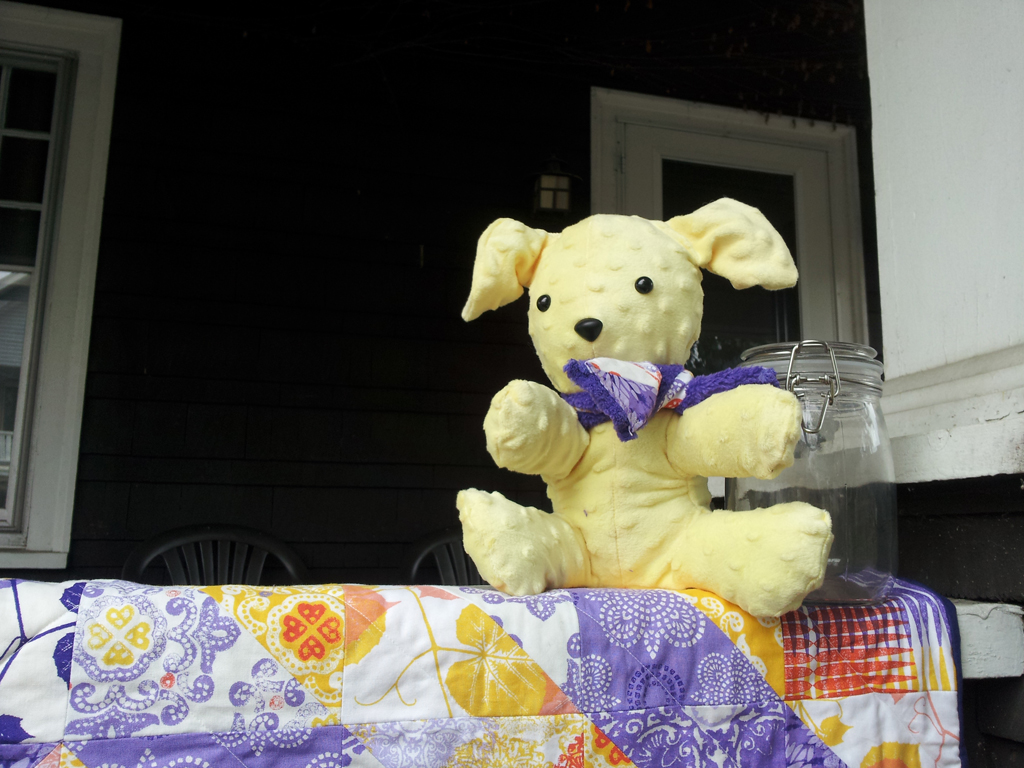
As I did for her sisters, I made a stuffed animal and doll quilt to go with the baby quilt. The stuffie is made from backing leftovers using my trusty copy of Simplicity 2613. The 16″x18.5″ doll quilt used up the quartered charm square scraps (trimmed down to 2.5″ squares) and 2.5″ strips from the butterfly print. It’s backed with the pinstriped linen blend and bound with the same purple as the quilt.
“Jewelry Box Doll Quilt”, Rachael Arnold, July 2016, 43”x41”.
It’s nice to cross another project off the “in progress but more or less abandoned” list and lighten my stash a bit! Plus, I’m glad that the new baby has a quilt just like her sisters do, even if it was a few months late this time around. Now to wash it and send it on its way! (Speaking of washing, please forgive the fact that you can see blue markings in some of the photos from where I marked to center the embroideries.)
“Jewelry Box” (collection), Rachael Arnold, July 2016, 43”x41”.
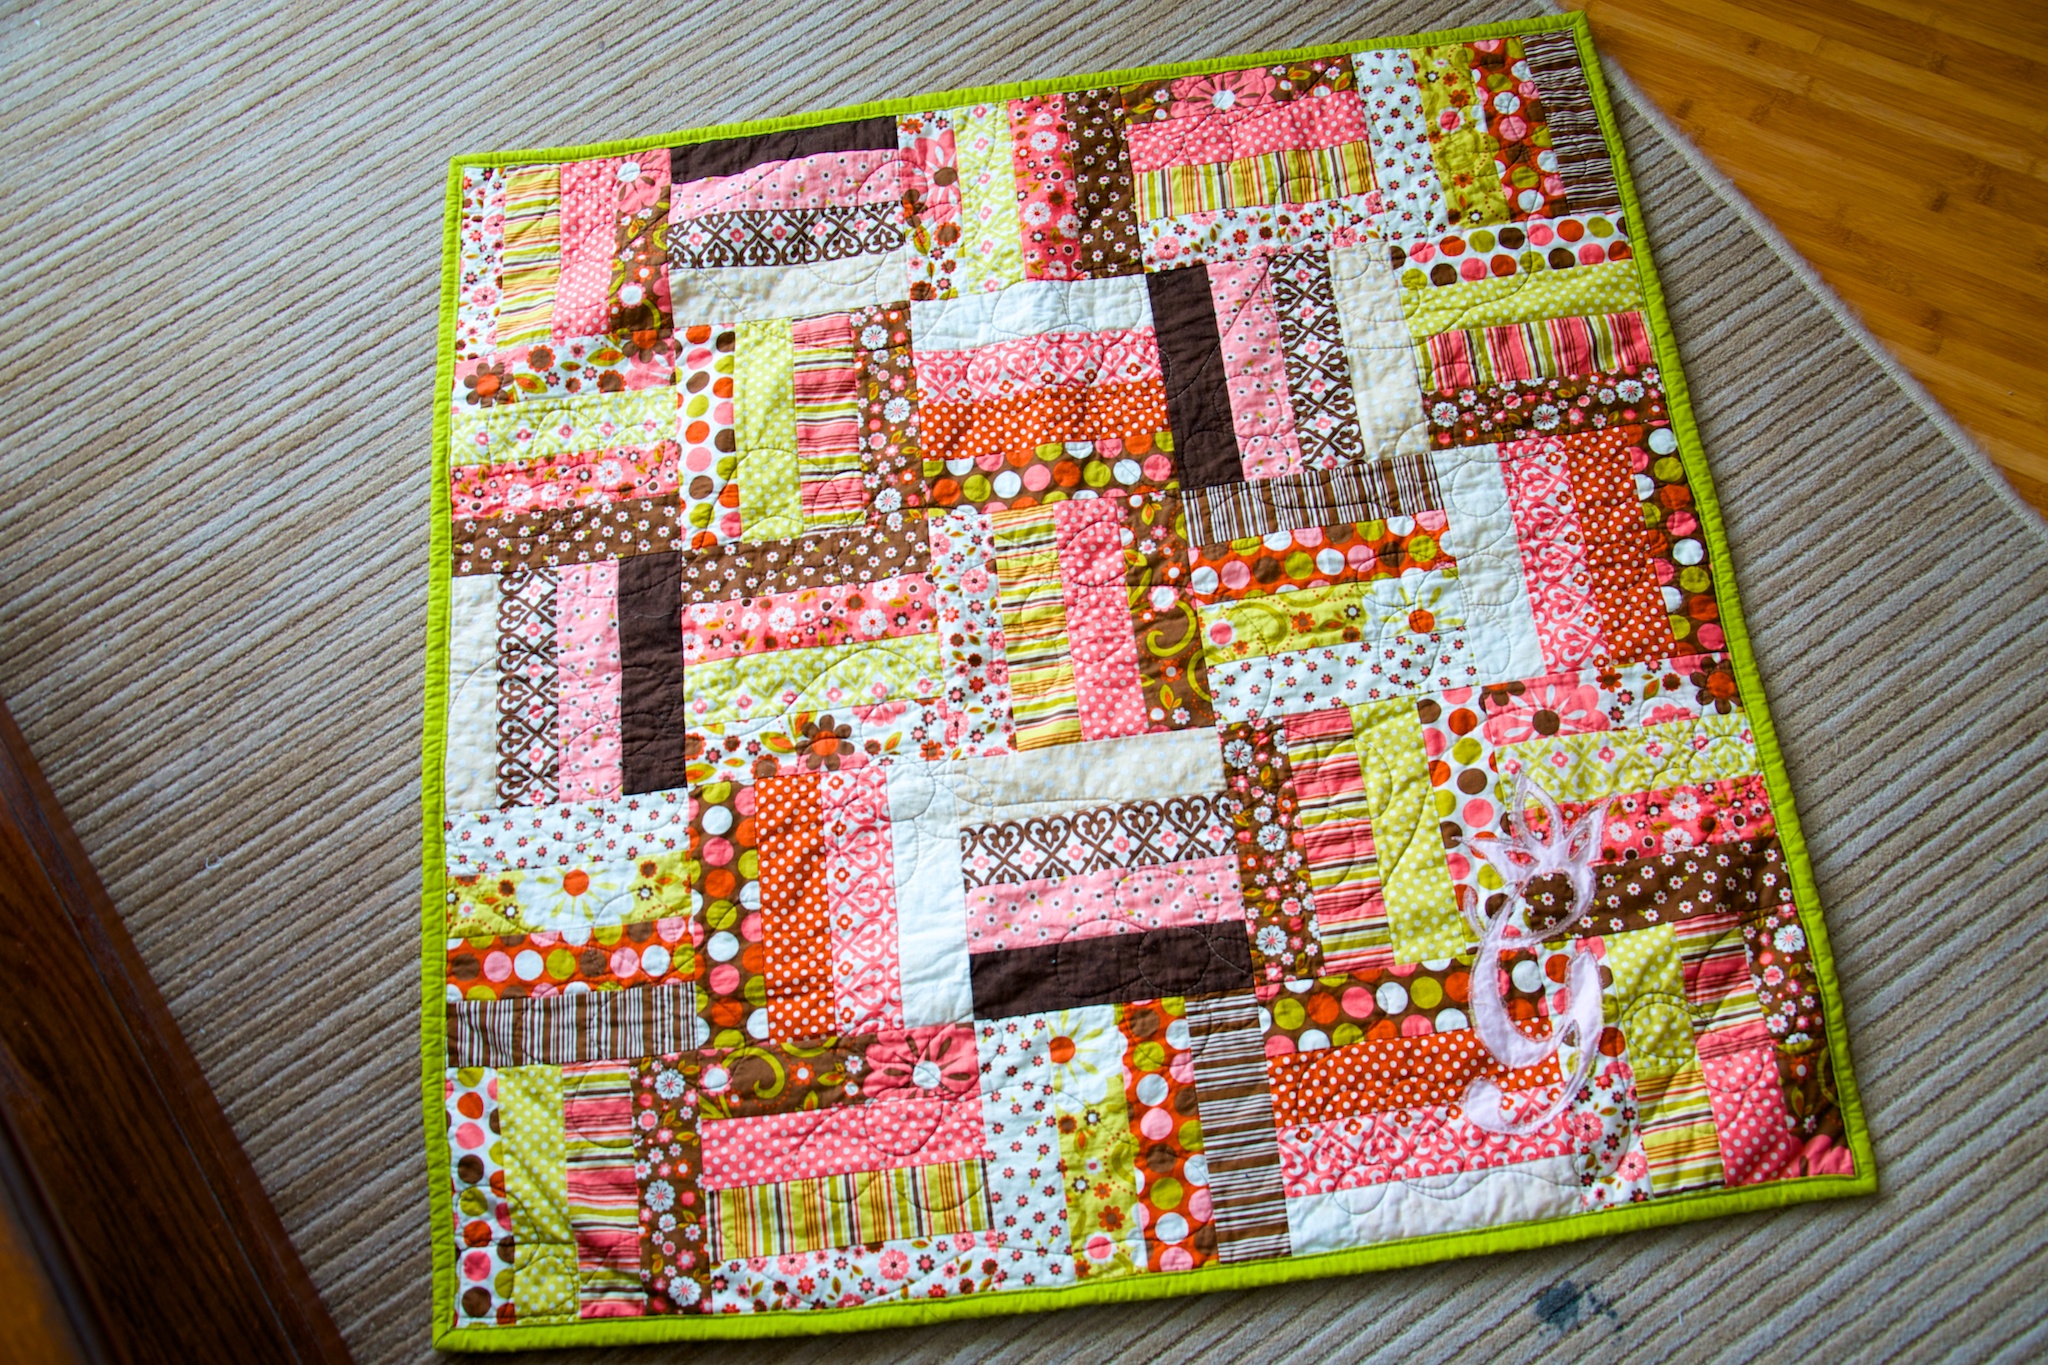
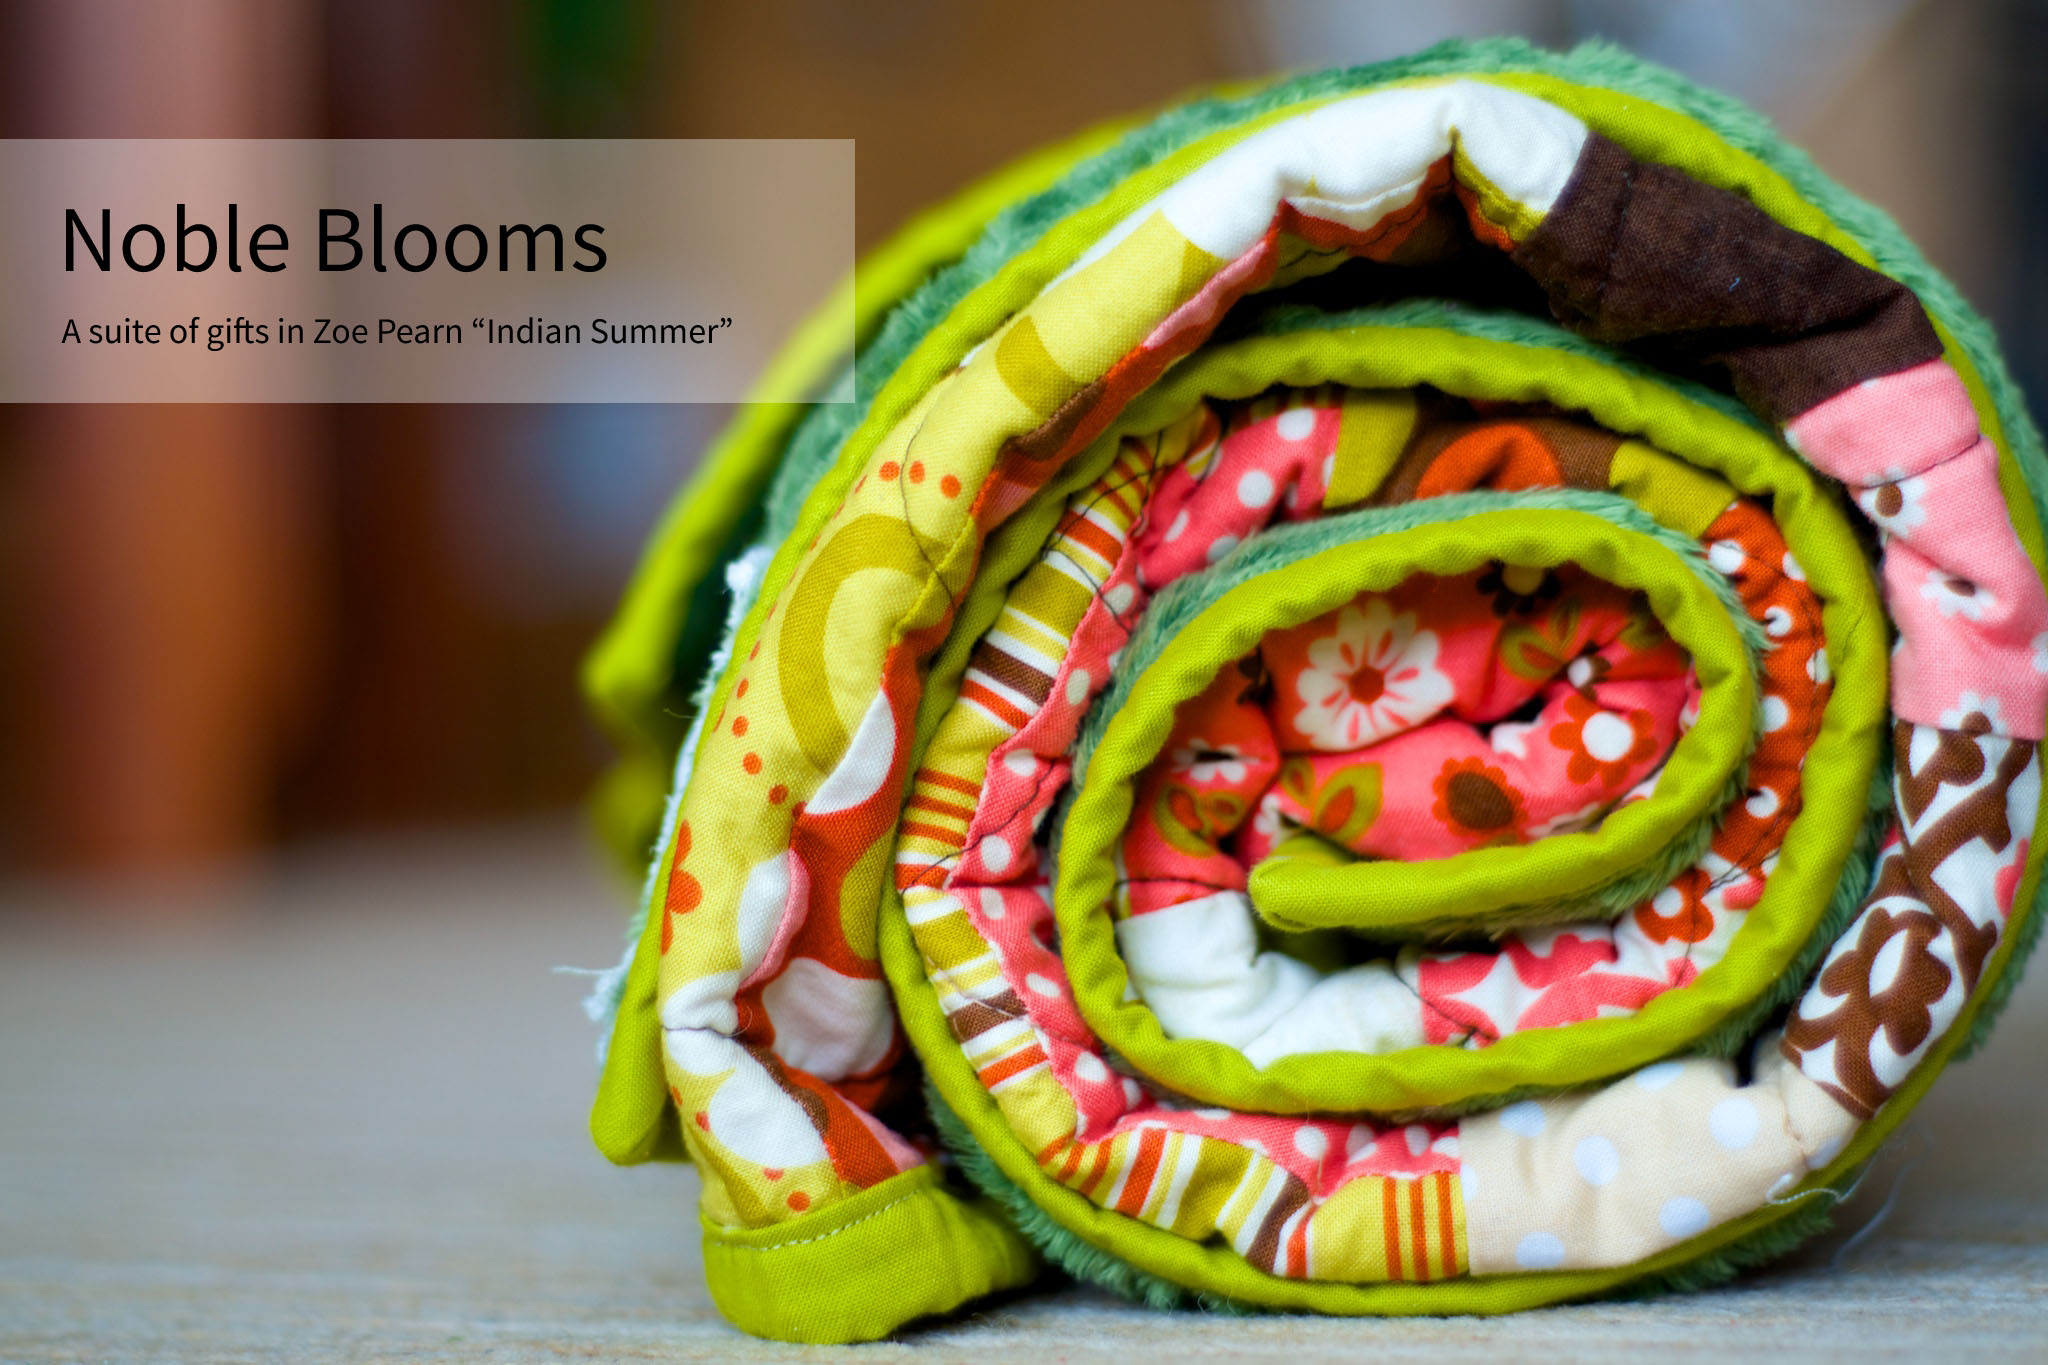
One of my earliest stash purchases was a Rolie Polie of Indian Summer that I’ve been holding on to for the perfect project. Its day in the sun (or perhaps clouds, based on recent weather) has finally come in the form of a quilt for a newborn girl.
“Noble Blooms”, Rachael Arnold, February 2014, 40″x40″. Photo by Carl Pfranger.
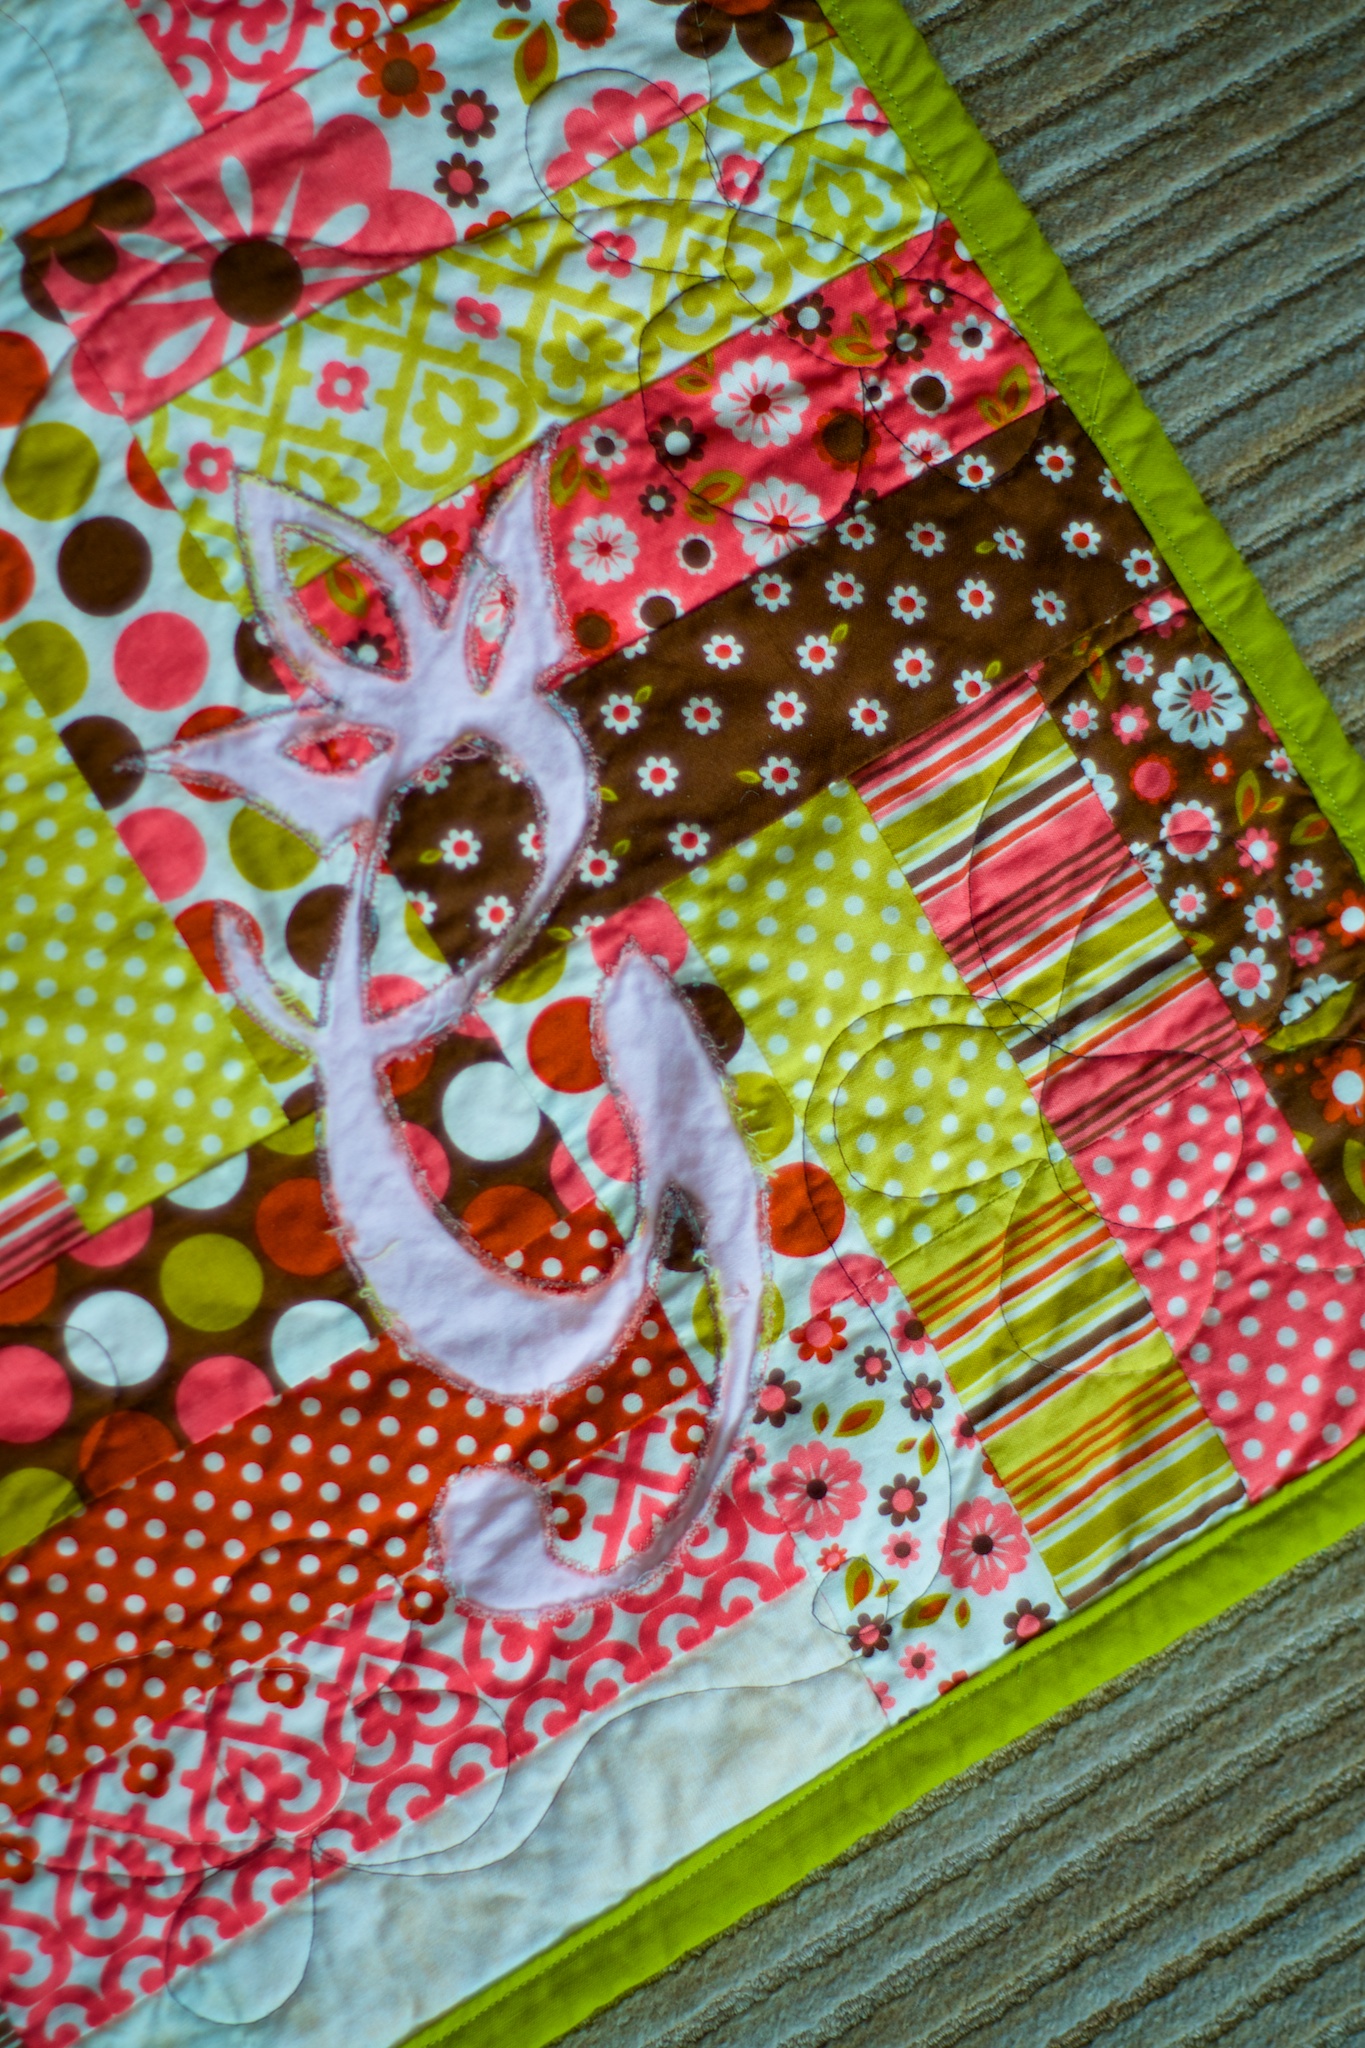
Because the Rolie Polie only had 23 strips, I had to add in one of a coordinating dot from my stash to finish up the strip sets needed for the 8″ blocks. To personalize the quilt, I did a reverse raw-edge applique of her first initial in one corner. The pale pink solid (exact type unknown) doesn’t stand out as much as I’d hoped in the curly, light typeface I used, but that’s okay. You can also see in that corner that I was one block short of the 25 needed for the quilt, so the very last one is pieced from two strip sets.
“Noble Blooms” (detail), Rachael Arnold, February 2014, 40″x40″. Photo by Carl Pfranger.
The piecing was a breeze but the quilting was not. I decided to try a new FMQ design (don’t scrutinize my sloppy first attempt!), so I used leftovers from the top to make a doll quilt/FMQ tester. The tension left something to be desired, but was good enough. Moving on to the quilt, I broke two needles. Then, my darning foot broke! I was able to finish up the quilting with my floating embroidery foot, but it was rather obnoxious and puts a kink in the progress of other projects.
“Noble Blooms” (back), Rachael Arnold, February 2014, 40″x40″. Photo by Carl Pfranger.
The back is a Minky that came from my stash (actually, the result of an incorrect shipment when I ordered the paisley backing for the Peter Rabbit quilts. Thank you, Fabric.com for your great customer service). In between is a low-loft cotton, likely Pellon Nature’s Touch White or Warm & White—possibly even both, as it’s joined stashed pieces. The quilting was done with a Gutermann brown-to-cream variegated thread. It’s bound in a lime solid from stash.
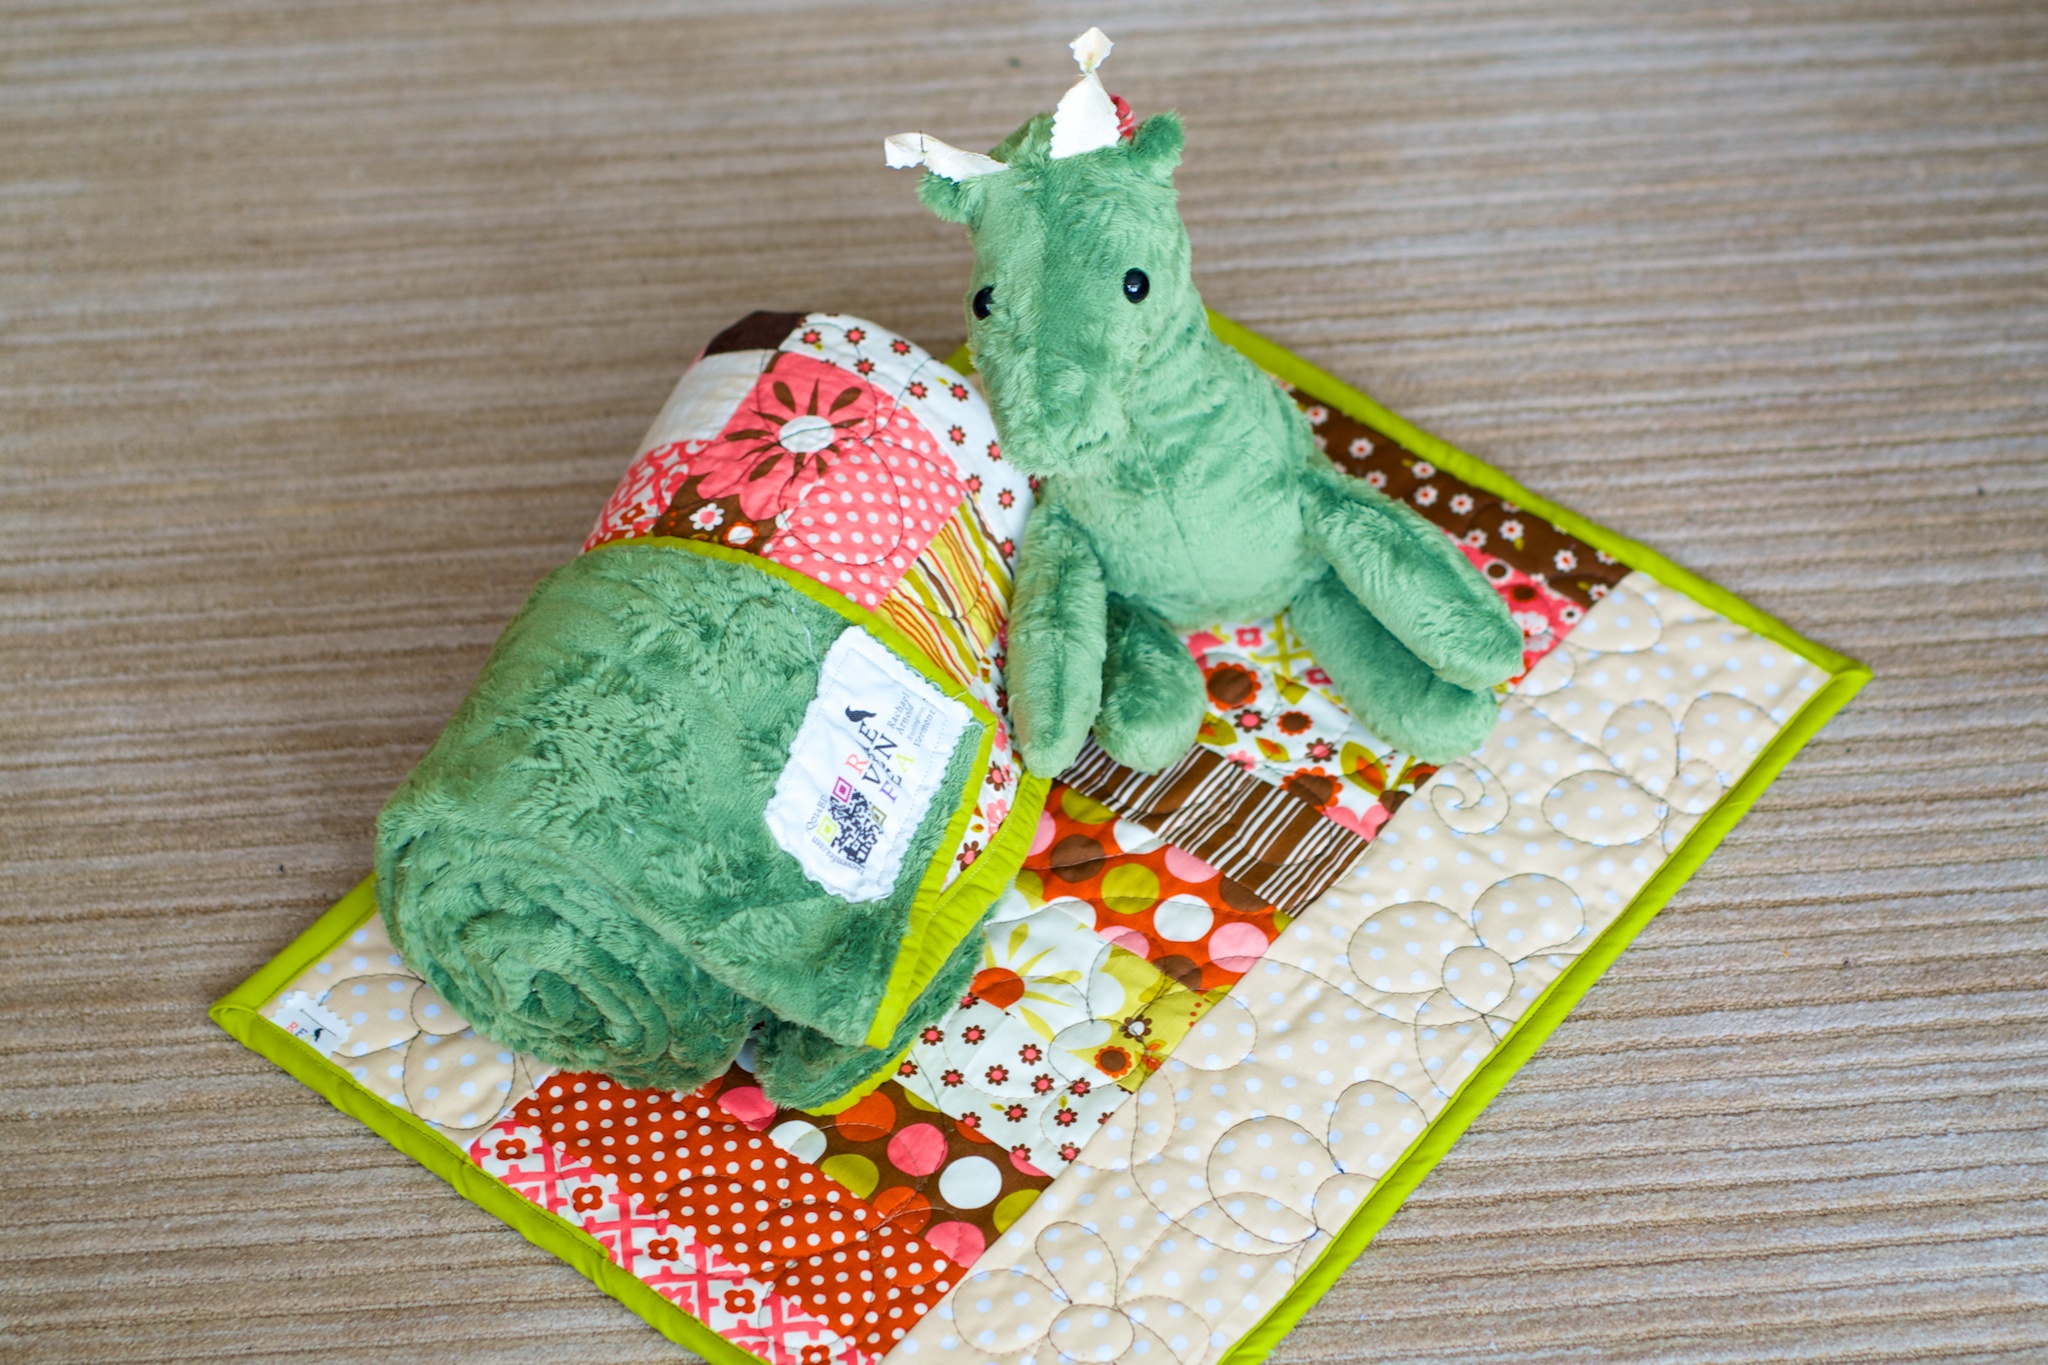
“Noble Blooms” and accompanying items, Rachael Arnold, February 2014, 40″x40″. Photo by Carl Pfranger.
A Minky giraffe made with backing leftovers completes the shipment. I tried something new with this round of Simplicity 2613 giraffe-making: the ossicones and neck-hair details are made with pinked fabric from the quilt. The ossicones especially worked out so well that I might continue using fabric in the future. As it was, it was a great way of eating up more scraps.
“Noble Blooms” and accompanying items, Rachael Arnold, February 2014, 40″x40″. Photo by Carl Pfranger.
I hear that the Impressions Baby Quilt and stuffie that I sent her sister are well-loved possessions, so I hope that the baby comes to love her own set just as well.
“Noble Blooms” (detail), Rachael Arnold, February 2014, 40″x40″. Photo by Carl Pfranger.
It’s probably a bit gauche to mention this when the result is a gift, but this project was entirely from stash—fabric, batting, thread, giraffe eyes and stuffing, … everything. Go go gadget stash busting in 2014!
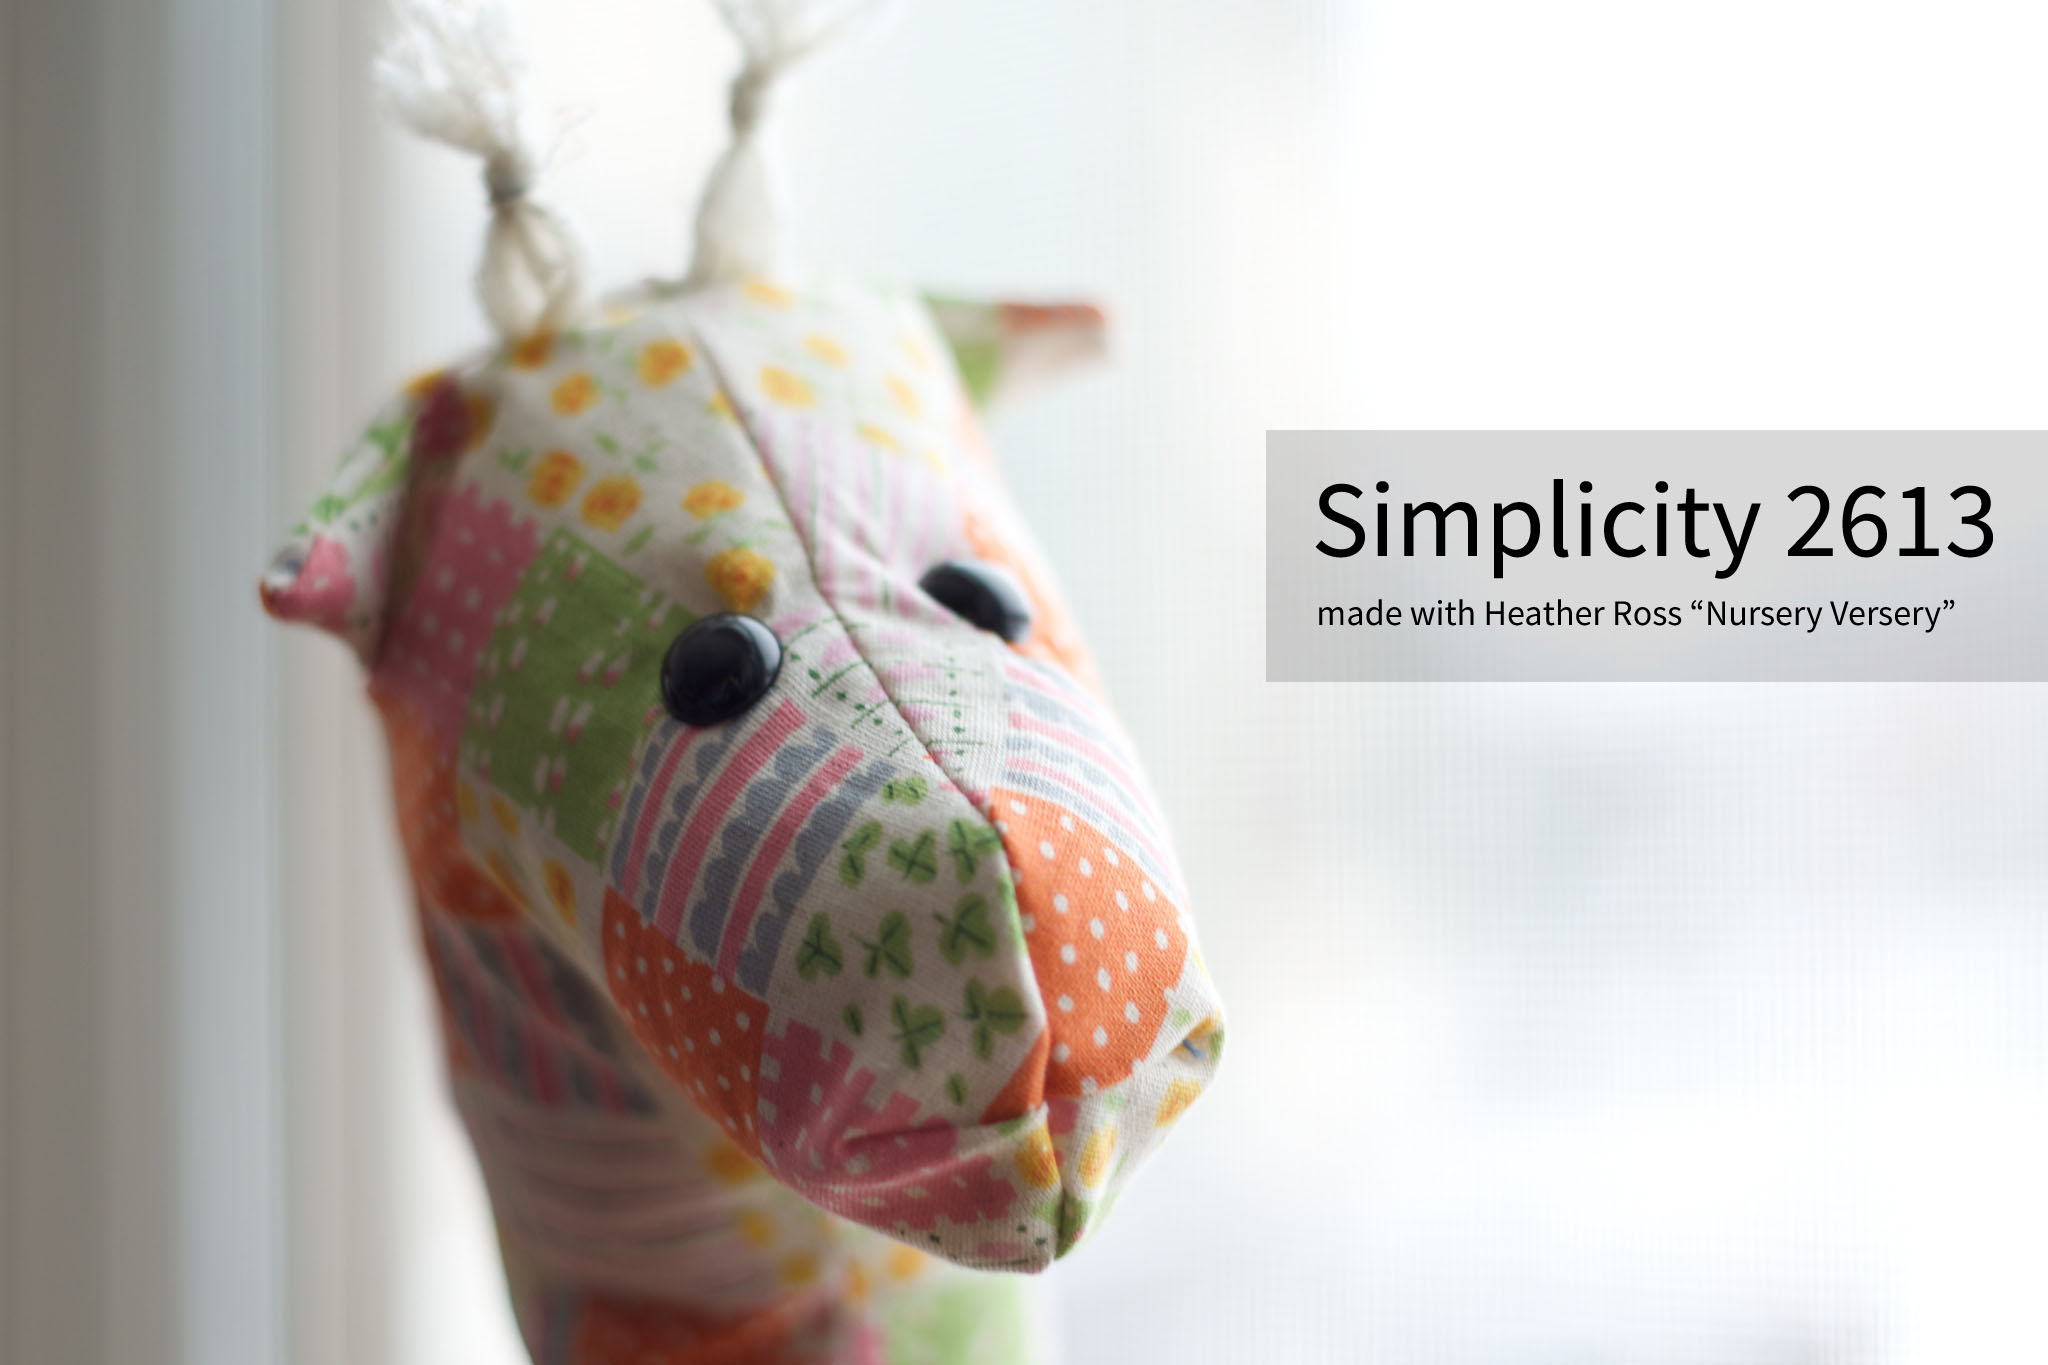
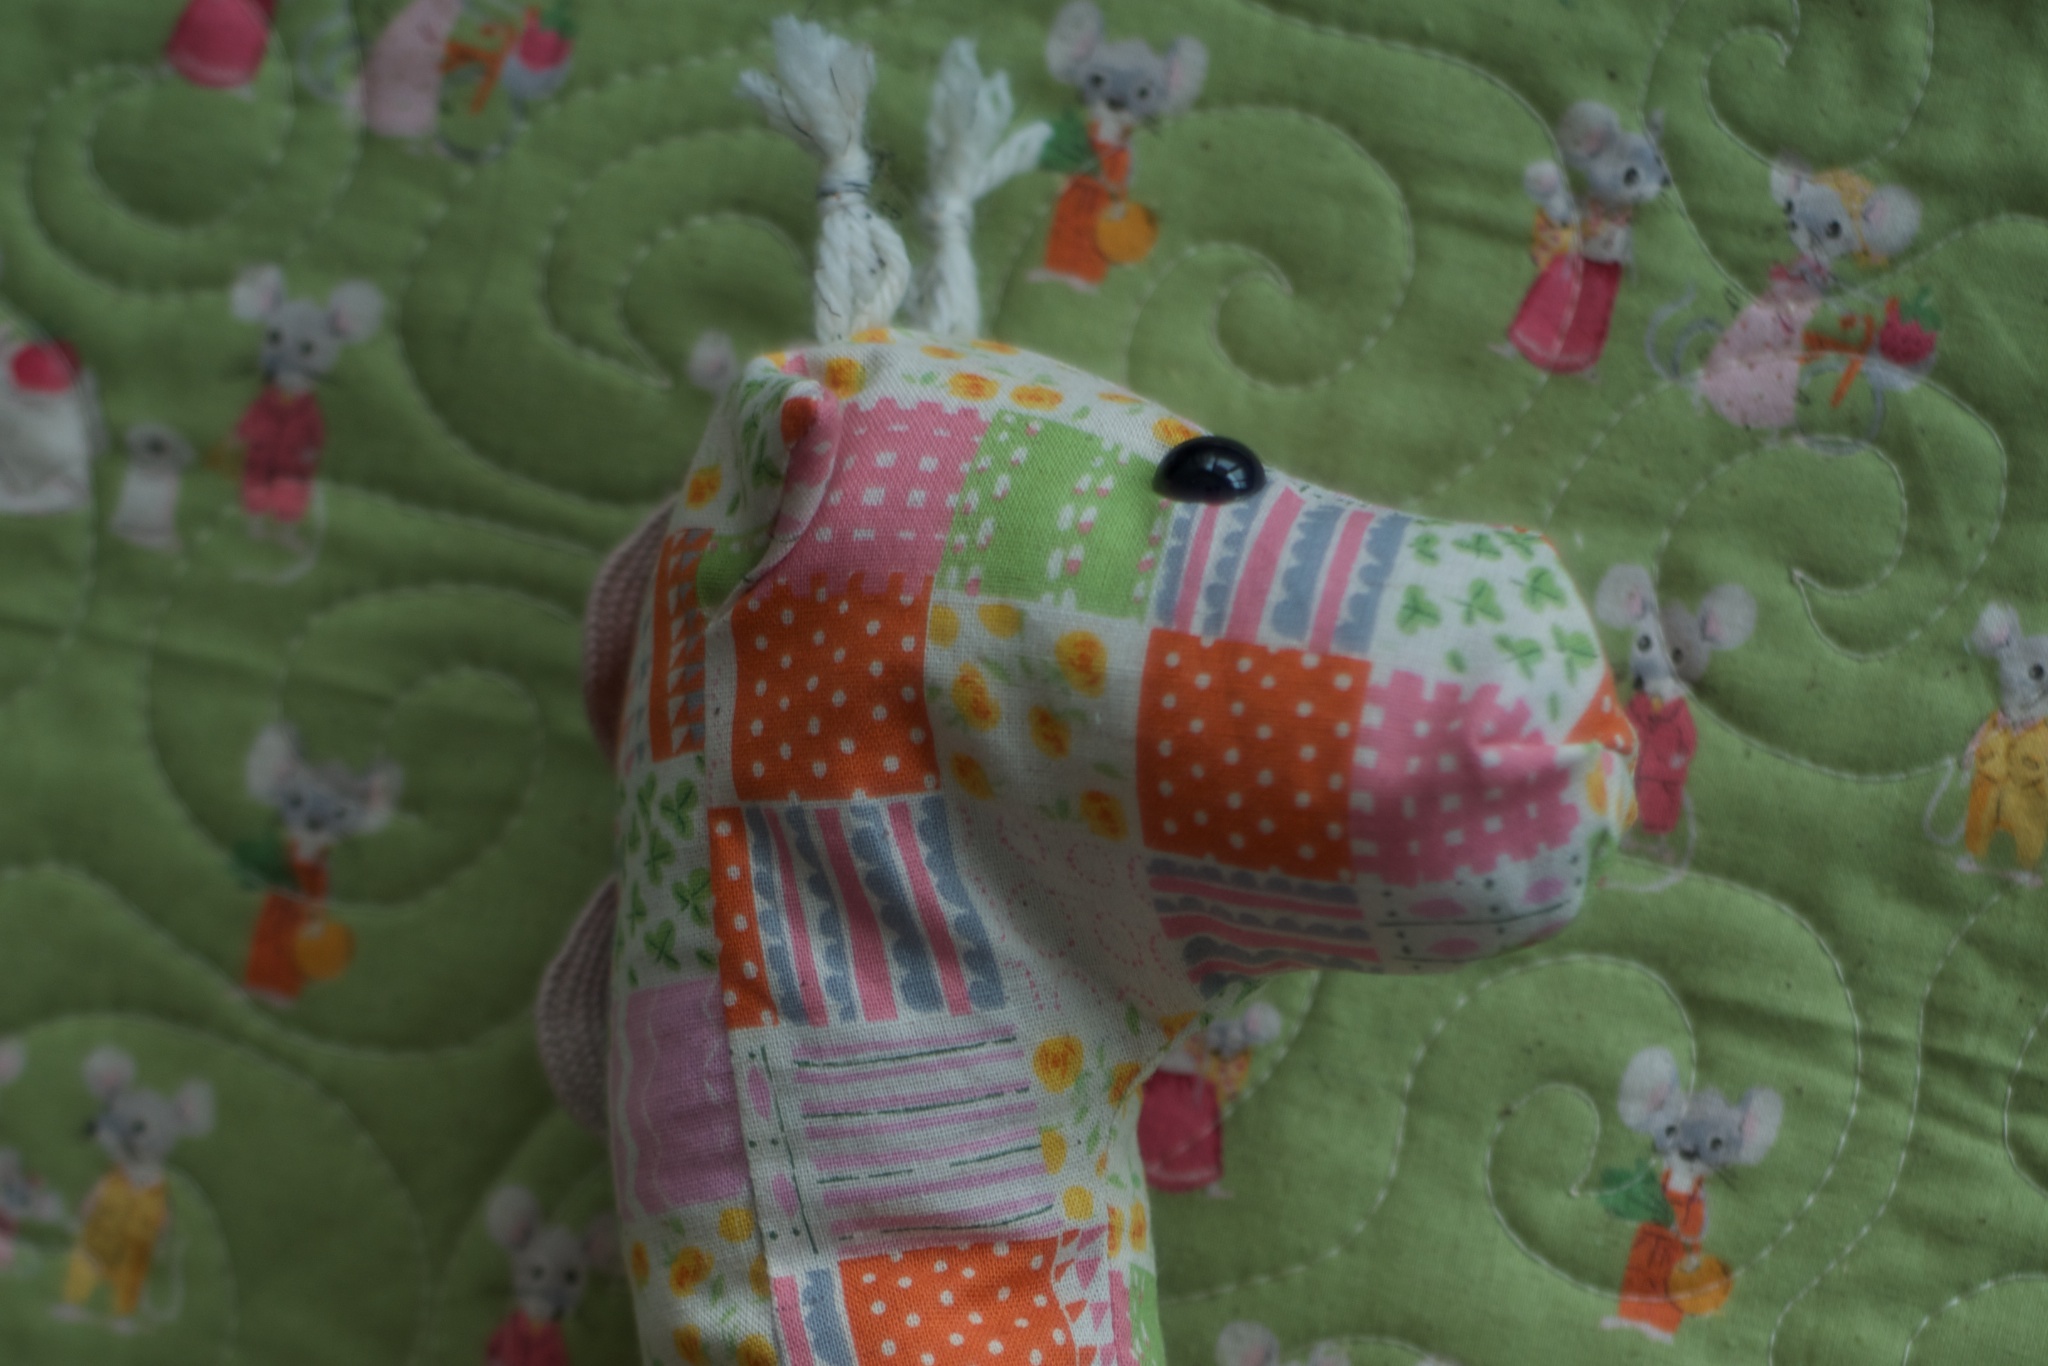
With the emergency surgery needed for one quilt, I didn’t manage to finish the quilt for my friend’s soon-to-be-born daughter. I knew I needed something quick that would go with it, since we flew down to visit and attend her shower, so out came my trusty copy of Simplicity 2613.
The quilt uses Heather Ross’ Nursery Versery fabric (among others) and Nido was having a sale, so I picked up extra for this project. I had a bit of yarn and large rickrack that coordinated for the ossicones and tufts of hair on the neck.
It rattles, thanks to some sort of plastic capsule I had around and pearled barley from my cupboard.
Once I finished the stuffed giraffe, I thought the gift needed a little something more, so I grabbed a FQ of another Nursery Versery print (that will also be the backing of the baby quilt), paired it with a pale yellow and white flannel (backing) and pink linen (binding) from my stash, and made a whole-cloth doll quilt to match.
She’s not due until April, so I still have time to finish up the quilt, but I’m happy to have made these accessories in time.
Considering that we’re a day away from March, it is probably a bit late for a review of last year. But, since I found this in my drafts and find it helpful to refer back to, I’m publishing it now to motivate me to do even more in 2013.
Quilt Finishes
I had a goal of finishing 10 quilts in 2012. I didn’t make it, but I’m happy with the ones I did finish.
Fails and Projects I Got Bored With or Ignored For Too Long
These are my guilty secrets. The projects that I started and then just stopped for some reason or other (generally to work on something else). These are my goals for 2013.
2011: Organic Spins—I made some progress, but I want to finish it by this September. I have everything I need, I just need to finish appliqueing and quilting.
2012: Double Wedding Ring—is not going to be a DWR, but I do want to finish something with the rings that are complete and the remaining fabric.
2012: The Steampunk Costume—is never going to be finished with the original plan, but I’d like to do something with all of it.
A Resolution
I wish I could say I am going to focus on finishing up those fails and boring projects instead of starting new projects in 2013, but that would be a huge lie, knowing myself.
I just shipped off a quilt started and finished this year, and have another brand new top completed. I also started a new sampler, a new SYWTQ group project, and have already failed at completing a Tiramisu during the sew-along.
However, I do resolve to finish at least one quilt top before starting anything new after quilting the aforementioned top. And I resolve to finish Organic Spins before my guild’s show in September.
Baby quilt two of the fall rush is complete and delivered.
I was inspired by all the diamond HST quilts in blogland, and decided to throw in a heart just for good measure. It finished at around 41″×45″.
It’s backed with a solid piece of Minky fabric. It’s wonderfully soft and cozy.
Because of the Minky backing, I didn’t want to quilt it too closely. So, I just echoed the diamond inside the middle of the HSTs, and made a couple of echo lines inside the heart. Her initials are also in the middle of the heart. The density (or lack thereof) is pushing the limits of the 80/20 batting I used, but I think it will be ok.
Because of the lack of pieced backing, I didn’t make a custom label. I just used one I had printed from Spoonflower, and added a few details in handwriting.
To complete the set, I made another modified Simplicity 2613 dog out of the leftover Minky, along with a small scarf of leftover top pieces and some other fuzzy purple fabric I had in my stash. I like how the pattern goes together with the Minky… it will be used again, I’m sure.
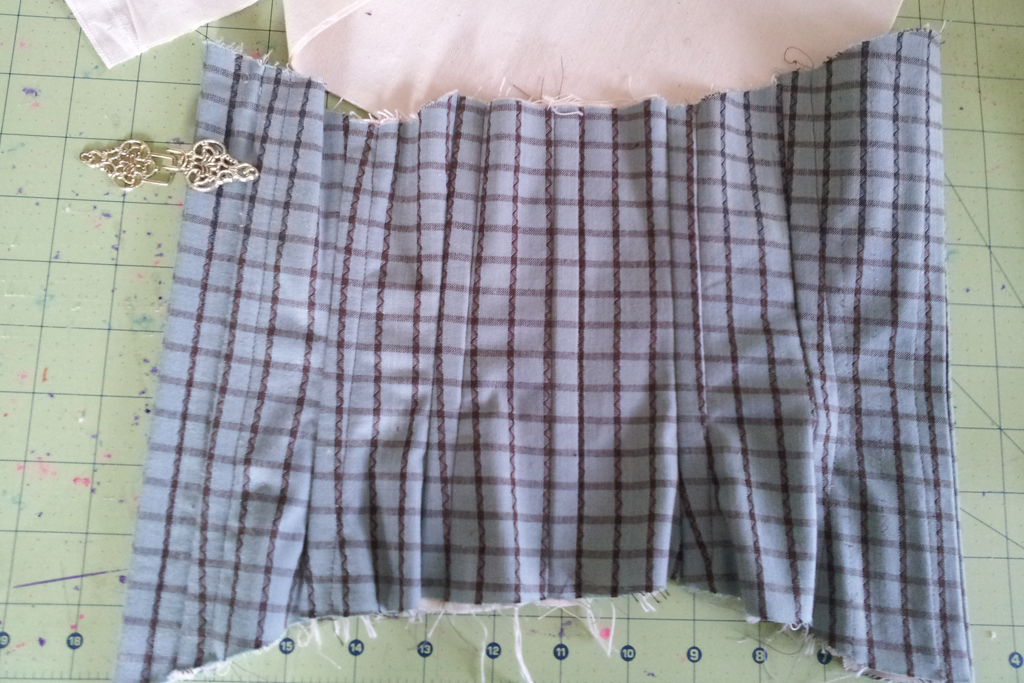
Despite the lack of updates, I haven’t entirely forgotten about that giant Steampunk outfit plan that I’m supposed to be working on. I finally took a stab at putting the corset together this weekend, in a form slightly modified from my original plans, but one that should still work.
In May, after having C&K try on the mockup, I knew I needed to modify it to an underbust.I drew out the new top while they were wearing it, and then ripped apart the mockup and modified my pattern pieces according to the drawn lines. The other major modification is that the budget got the best of me and I decided to forgo using a traditional separating busk in lieu of hooks and eyes. I found these great filigree ones on sale, so there will be four of them, and likely a few more hidden ones. This is not going to be used for tight lacing or everyday wear, so I think it should hold up.
I have the fashion fabric and drill interlining all pieced together for both sides (one shown here, with some bones in place). I’m now in the process of sewing in the boning casings. After that will just be the lining and grommets, and deciding on what to lace it with.
I’d completely forgotten that I had this homespun in my stash. When I uncovered it, the whole corset look clicked in my head—I like it much better than the other options I’d laid out (and C&K said that they had no preference at all).
It’s a bit annoying to match the lines, and it’s by no means perfect, but there aren’t any absolute glaring mismatches. Luckily I have plenty of fabric so that I needn’t be hampered by a restrictive cutting layout.
I hope to finish it this week so that I can get started on the other torso-covering pieces. It’s September already!
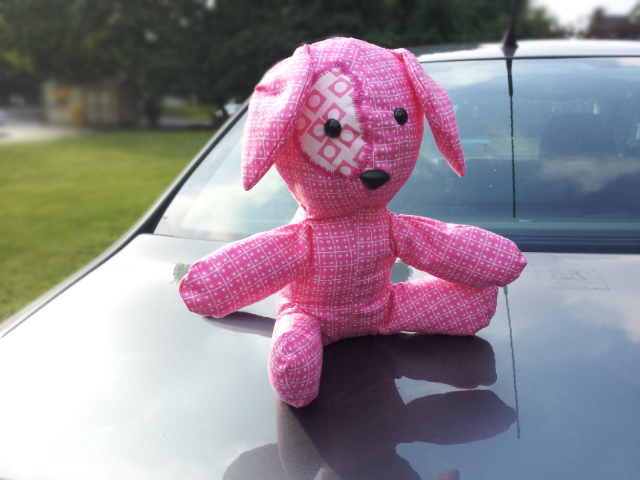
Also, here’s a look at the dog modification I made from Simplicity 2613 now that it’s been delivered:
The concept needs work, but I like it (and so did the recipient!).
Sometime around now (give or take a month) is the nebulous second anniversary of when I started quilting and sewing again in earnest. I think I have a ton more to learn, although I know I’ve learned a great deal in the intervening months.
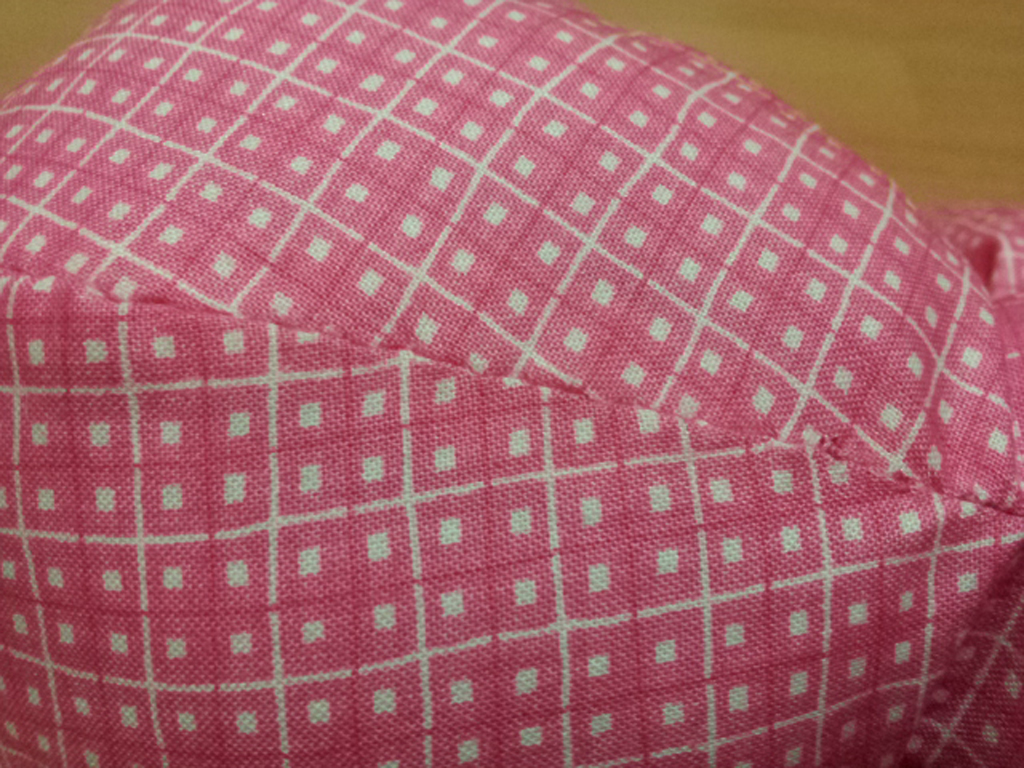
While finishing up another stuffed animal last night, I was really amazed at the difference a little experience with hand-sewing binding and closing up stuffies can do for hiding the stuffing hole seam. Compare the first one I made a little more than two years ago, when I really only knew how to whip stitch (poorly, at that)…
… to this latest one (which I’ll post about after it’s delivered to the recipient’s father once he’s back at work):
I think the stitch is called the ladder stitch, if you want to look it up. My actual stitch is some sort of hack I figured out when starting to bind quilts and not wanting the thread to show, so it’s probably not precisely the ladder stitch.
But, sometimes the lessons are a little harder. When I set out to start quilting by making a baby quilt for my oldest friend’s son, I knew absolutely nothing about quilting. Sure, I’d been sewing on and off for about fifteen years, which is why some of my choices probably didn’t faze me at all, but it’s really not very smart quilt production. It has faux-Minky, flannel, silk, eyelet, linen-textured cotton and cheap quilter’s cotton all thrown together.
It’s also incredibly well loved—to an extent that I only hope the rest of my quilts can ever match, possibly all together. As a result, I got a message from my friend showing that the silk is starting to completely wear away.
I think the only solution is to applique a better-lasting fabric over the top of those pieces, correct? (Short of completely deconstructing the quilt and re-piecing, which is not an option.) I would love any advice you have about fixing damage like this.
Two years into my journey, I still don’t think that you can’t use non-quilting cotton in quilts, but there are disadvantages, and I feel pretty safe in saying don’t use silk in a baby quilt.
What have you learned over the years? Have you encountered bad choices that you’ve had to compensate for down the road?
I’ve been procrastinating on larger projects (quilts, the Steampunk costume) by making small crafty things. The problem is, I’m now at a stand still, because I can’t decide whether to continue embellishing or just stuff them and sew ’em up.
One is for a class. It’s supposed to be either a table mat or a pillow. I don’t know what I want it to be. Probably a pillow, as it’s not all that flat. It is also supposed to have a ton of beading. I started the beads, but I’m just not feeling them.
What do you think. Beads or no beads?
The other is yet another stuffed animal from Simplicity 2613.
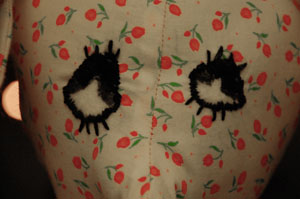
I’m trying to modify it to look like a dog. In doing so, I decided it needed an eye spot, and maybe one on its back. But, I can’t decide if it actually needs the one on its back or if that is overkill. It really looks a bit more like a pig than a dog at this point, I think. I’m leaning toward no spot on the back (it’s just sitting on the back piece in the photo, not actually attached).
Most of the time when I hit this point, the project ends up in the unfinished and forgotten pile, but I need to finish both of these up in the next couple of weeks—the former for a discount at the next class, the latter for a gift. Maybe inspiration will hit between now and when I get off work this evening.