To be a bit cliché, this shoemaker is a professional Web Developer and her child is this blog, but it was past time to launch what I have of a new design. All the content is still here, everything else is a work in progress (kind of like most of my sewing projects)!
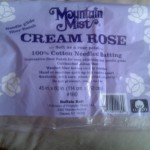
I think most quilters develop a preference toward one type of batting, but as I progress in my quilting journey, I’m trying to experience all that’s out there. Okay, that’s PR speak for “so far I’ve chosen the precut closest in size to what I need that was either on sale or which I had a coupon for.” I’ve used cheap-o poly (yuck, although warm and lofty), Bamboo/Organic Cotton (love it), Warm & Natural for some small projects (like it a lot), and most recently Cream Rose by Mountain Mist for the Spring QAL project.
I can’t see myself using it in the future for quilts. While it is very soft and sews as well as W&N, it seems very insubstantial. It is much thinner than the bamboo/W&N—1⁄8″, according to the manufacturer—and the piece I had was not an even thickness; you could actually see through it in a few spots. It isn’t as warm as a slightly-higher, yet still low-loft batting, either, so I would classify it as a warm-weather quilt batting if I were to use it again. The QAL quilt wasn’t about warmth—it’s a picnic quilt to lay on the ground—but I wish I’d used something a bit thicker for more padding power.
I can see using it for some crafts in the future. It drapes well, and its thinness makes sense for wall hangings, table covers and runners, etc. The very thin spots aren’t all that obvious once quilted, and on a small scale with quilting even closer than the prescribed 6″, I don’t see it mattering much.
So, overall, not a waste of the $4 or so it cost me with a 40% off coupon at JoAnn (I bought the 45″ × 60″ crib size, but can’t find the receipt for the exact price), but not high on my list of future batting purchases unless I need to go very economical. Warm & Natural still wins on the “need something cheaper than bamboo” front for me.
Have you used this? What is your opinion of it? Do you have a favorite to suggest for me to try out next?
Quilting, quilting, quilting. On one hand, I like this part, because it’s really the point where you almost have a real finished project (pssh, who needs binding). On the other, my sewing machine doesn’t really like behaving when it comes to quilting—FMQ, at least. I can fiddle with my tension/needle and rethread the machine all I want sometimes and the tension just won’t be right, and then bam! it’ll magically start working again. So, walking foot it was.
While I’m quilting away on the Spring QAL, and prepping the binding, I thought I’d share my binding method.
I don’t know that I ever officially learned how to make binding. In fact, after I publish this, I’ll probably head out into the quilt blogging world to re-learn from everyone else’s posted tutorials. The first quilt I made, I self bound. That means I folded the extra backing fabric to the front and sewed it down, rather than cutting it off. But for the bargello quilt and the Spring QAL I used straight-of-grain binding strips.
Binding strip width seems to be a matter of preference, to a large extent, and wider or narrower strips will result in wider or narrower binding, of course. However, a decent standard seems to be 2.5″ or 2.25″. I use the former, mostly.
First I was ahead, now I’m behind. This weekend was quite unproductive, so I didn’t finish Friday’s assignment (the borders) until tonight.
I’ll provide better photos (that are color correct) once I quilt it, promise!
There’s nothing too interesting to talk about here… just your basic, mitered-cornered borders.
A label
Since day 4’s assignment (backing) went up today, I’ll talk a bit about it, even though I’m not done piecing it (although it will look quite a bit like Chris’ piecing since she is doing exactly what I was envisioning from the start)…
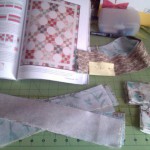
I’m getting a bit ahead of schedule, but I just couldn’t stop myself from working on sashing when I got home from work yesterday. Remember, I decided to make a modification and add set-in seams to the center instead of doing butted sashing.
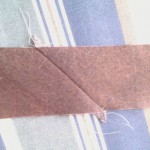
Checkout the twist: there’s no right-side up (although it’s really only obvious in the photo if you look at the trees.
I started early, because I had a feeling that the set-in seams would piss me off, requiring use of the seam ripper, and make me want to stop working (requiring more time so I could take a break for a day or so). But actually, it all went swimmingly. It’s not absolutely perfect—one seam ended up off by a little less than 1⁄8″ so there’s a really small gap in the center to cover with the quilting, but it is close enough for me.
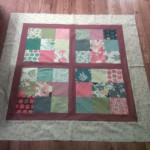
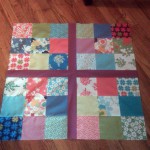
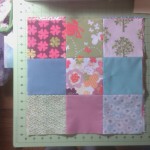
I’ll admit, I’ve been playing with the layout since I got my charm pack in the mail. I couldn’t help myself. Once I decided on my border, sashing, and bag fabrics, I chose to set aside those charms so that I could showcase as many of the collection’s prints as possible.
The Above All Fabric Spring Quilt-Along started yesterday. The assignment: cut out the sashing, border, and binding strips and work on arranging the charm squares.
Backing up: fabric choices
Before I can blog about progress on this, I have to tell you about my fabric choices, huh? I’m doing the quilt top entirely out of Just Wing It by MoMo for Moda. I played around with some other collections to go with the Just Wing It charm pack, but wasn’t feeling it.
It’s official: I have Project ADD. The damask quilt is on hold. Now I’m working on one of the jelly roll quilts. Here is the not-a-full jelly roll cut into the required pieces. I still need to cut up the sheeting I’m planning on using for the inner border/snowball background blocks.
Not to make too many excuses, but I have good reason for switching gears: the quilt is a gift, and I realized that the damask plan was ultimately wrong for the recipient, and this fabric/pattern is a better fit, I think. And I have a deadline for it to be done.