To be a bit cliché, this shoemaker is a professional Web Developer and her child is this blog, but it was past time to launch what I have of a new design. All the content is still here, everything else is a work in progress (kind of like most of my sewing projects)!
Back before I started this whole quilting endeavor, the quilting section of fabric stores was quite a mystery to me. Sure, I’d wander about because patterned cottons can come in handy for other types of sewing, but one section of fabric really confused me: the fat quarters. I had no idea what that meant. But now, the mystery is solved.
It’s all in the cut
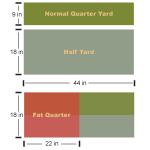
Fat quarters are are 18″ × 22″ rectangles of fabric. They get their name from the fact that they are quarter yards of fabric, but cut differently than “normal” quarter yards. Rather than cutting a quarter yard off of a bolt, which results in a 9″ × 44″ piece of fabric, a half yard (18″ × 44″) is cut in half parallel to the selvage, resulting in two fat quarters.
So, you see the measurements come from the size of “normal” quarter and half yard cuts. The size of those cuts are determined by the width of fabric, which is almost always 44″ for quilter’s cotton (plus or minus an inch). A yard is 36″.
Fat quarter uses
Fat quarters have some advantages over traditional quarter yard cuts.
Longer strips can be cut parallel to the selvage, or lengthwise grain, which is less stretchy than the crosswise grain.
You may be able to cut more of certain shapes. For instance, you can cut 12 5″ squares from a fat quarter (3 rows of 4 squares) rather than 8 from a normal quarter yard (1 row of 8 squares).
For larger patterns, the 18″ side may allow for more flexibility in larger blocks (as in you can get more of the pattern).
Beyond their usefulness of cutting, more fabric sellers and manufacturers ship pre-cut fat quarters as part of a fabric collection, meaning you can easily pick up the prepackaged cuts (sometimes in packs with multiple patterns).
You can also find fat eighths, which follow the same idea. Rather than a very thin strip (4.5″ × 44″), a quarter yard is cut in half resulting in a 9″ × 22″ piece of fabric.
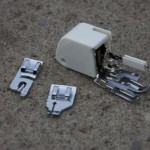
The presser feet I ordered finally came in the mail today! I’m looking forward to all the things I can do with them.
It all started with the narrow hemfoot (or rolled hem foot). I made some alterations to a friend’s bridesmaid dress and needed the foot to shorten the hem of the poly chiffon layer. Unfortunately the foot didn’t make it in time, and it was not the best attempt at hemming a dress I’ve made. But, I was excited to have an excuse to buy the foot, because there are so many uses for it. It’s the perfect foot for finishing off edges of fabrics like silk georgette (of which I still have a few yards in my stash even after making a shrug). It’s wonderful for finishing off the edges of light-weight linens for historically-pieced late-Elizabethan shifts that were seamed using insertion stitches on hemmed edges (of course, historically accurate reproductions would be hand sewn. I don’t want to hand sew them). It works great for things like sheer curtain edges and likely a million other things I haven’t even begun to consider sewing.
Left: The rolled hem foot. The fabric feeds through the curved part in the middle, turning it under for the neat hem. Right: a quick hem sewn with the foot on a scrap of fabric I had laying around. So small and neat!
Then, since the shop I was buying from had a great shipping deal when you purchase multiple feet, I went ahead and grabbed two others I’ve been wanting: a ¼” piecing foot and an even feed (walking) foot.
This piecing foot has a small round opening for the needle, which gives the proper pressure on the fabric. It has ¼” guides on the right and 1⁄8″ guides on the left for use in top-stitching.
When I first started my quilting adventures, I put off buying a piecing foot in favor of using my standard foot because I knew there were some ¼” feet out there that also came with 1⁄8″ guides as well, but my local shop doesn’t carry one. This shop did. So, I’m eager to throw it on and continue piecing the blocks of the quilt I started on this past week.
The walking foot has a set of feed dogs on top to move all layers of fabric through, rather than just pulling on the bottom one.
Although I haven’t finished piecing either of the quilt tops I’m working on, looking ahead I know that I’ll need a walking foot to successfully quilt them. Without it, the backing of the fabric gets pulled by the feed dogs enough to visibly offset that part from the top regardless of how well the layers are pinned. The even feed foot isn’t useful only with quilting though. It is wonderful to use on projects where matching patterns is vital, for instance when sewing plaids or stripes. The foot acts as a second, upper pair of feed dogs to ensure all layers of fabric move through the machine together, making sure that matched patterns stay matched. Having sewn plaids without one before, I am eager to see what a difference it makes. Supposedly it’s great for dealing with vinyls and other fabrics that don’t want to feed correctly using a normal foot.
Now, I’m off to try out the piecing foot! I think I have about all the presser feet I could ever need now, except for a darning foot. I wanted to grab one of them in this order as well, but the shop didn’t carry one for my machine, nor does Joann Fabrics. Oh well, I should probably try quilting with straight lines before I try to start stippling, any way.


 The presser feet I ordered finally came in the mail today! I’m looking forward to all the things I can do with them.


